
Earlier this week I introduced you to the concept of functional testing on iOS. Yesterday, I showed you how to install KIF, a tool for functional testing on iOS. Today, I’m going to walk you through writing your first KIF test.
If you haven’t done so, please start by downloading the demo application, and installing KIF from yesterday’s post, . This article will continue where it left off. If you want to skip that, and just start with a fully configured demo app with KIF installed, you can download that here.
Demo Of The Demo App
From the root directory of the Demo app, KIFDemoApp, open the workspace file KIFDemoApp.xcworkspace in Xcode.
Build and run the app, and give it a try.
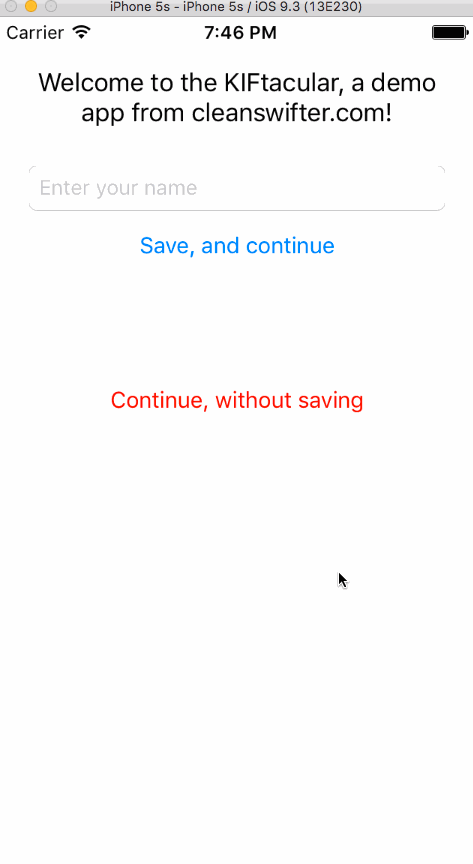
You’ll notice a view with a text field, and two buttons. Each button presents a new view. The difference is that one button will replay back the text that you specified in the field, and the other button just shows the next view with static text.
Step 0 – Add An Extension For KIF’s tester
Disclaimer: This should probably move to yesterday’s post on installing CocoaPods.
Before writing your first KIF test, there’s a step that must be done. The critical mechanism that the KIF API provides for enabling you to navigate through your app is called tester(). It’s implemented as a C preprocessor macro that isn’t naturally available in Swift. You’ll need to manually configure this via an extension that you create.
Create an empty new Swift file in the group and target KIFDemoAppFunctionalTests called KIF+Swift.swift. Replace it’s contents with:
extension XCTestCase {
    func tester(file : String = #file, _ line : Int = #line) -> KIFUITestActor {
        return KIFUITestActor(inFile: file, atLine: line, delegate: self)
    }
}

extension KIFTestActor {
    func tester(file : String = #file, _ line : Int = #line) -> KIFUITestActor {
        return KIFUITestActor(inFile: file, atLine: line, delegate: self)
    }
}
You will then use tester() in writing your first KIF test case. Now you need to create that new test file.
Step 1 – Create a Unit Test
You might be wondering, “Why am I creating a unit test case class? I want to create a functional test!” The answer is that it’s convenient to use Xcode’s template for unit tests, you’ll see how to then convert it to a functional KIF test next.
To create the unit test, back in Xcode, in the group KIFDemoAppFunctionalTests create a new Unit Test Case Class by clicking File -> New -> File… and then in the resulting prompt, iOS -> Source -> Unit Test Case Class. Yes, I recognize this is a little weird.
Name the new file, “MyFirstKIFTest” and make sure the Language is Swift.

On the next screen, make sure that the new file will only be added to one target, the KIFDemoAppFunctionalTests target, and click Create.
Xcode just created a unit test for you, a good ole subclass of XCTestCase. Now we’re going to convert that to a KIFTestCase.
Step 2 – Convert The Unit Test to a KIF Test
In MyFirstKIFTest.swift, change the superclass from XCTestCase to KIFTestCase. Also, delete all code within the class.
MyFirstKIFTest.swift should now look like:
import XCTest

class MyFirstKIFTest: KIFTestCase {
}
Build the app, and verify everything still compiles. Congratulations on writing your first KIF test!
Step 3 – Write A Functional Test For a Button
For writing your first KIF test, you are going to write a test that taps the Continue without saving button in the demo app, and verifies that the subsequent view is shown.
Add this method to MyFirstKIFTest
func testContinueWithoutSaving_ShowsNextScreen_WithCorrectText() {
    tester().tapViewWithAccessibilityLabel("Continue, without saving")  // 1
    tester().waitForViewWithAccessibilityLabel("Welcome Player 1")      // 2
    tester().tapViewWithAccessibilityLabel("Start Over")                // 3
}
This method is simple, yet very powerful. In 1, the tester() is told to tap something on screen with the accessibility label “Continue, without saving.” If that thing isn’t there, the test will fail. So right off the bat, this line alone provides verification that there is something on the screen with that label, AND that it can be tapped.
In 2, the tester() is told to wait for a view to appear on the screen with a accessibility label of “Welcome Player 1”. If you played around with the demo app, you would have realized that “Player 1” is a static name for players who don’t provide a name. This is the real thing that this test is verifying- that whey the user continues without providing a name, a new screen is shown with a default name.
In 3, you need to reset the app to a “default” state. This isn’t technically required, but I suggest it as a best practice. Future tests you write will automatically continue in the app wherever the prior test left off. For good decoupling of your tests, I recommend “undoing” anything that your test did in the app, so that future tests can start assuming a “fresh” app.
Run your tests by selecting Product -> Test, or use the keyboard shortcut Command-U. Watch how the iOS Simulator launches your app, and magically navigates through the screens. This part never gets old for me, I love watching my apps get automatically verified.
It’s always best to verify that tests fail as well. That way you aren’t lulled into a false sense of security, when the test was just giving false positives to begin with. You should do this all the time, not just when writing your first KIF test. Change either of the accessibility labels in the test, and re-run. You’ll see that the test fails.
Test Suite 'Selected tests' started at 2016-04-27 20:14:17.801
Test Suite 'MyFirstKIFTest' started at 2016-04-27 20:14:17.801
Test Case '-[KIFDemoAppFunctionalTests.MyFirstKIFTest testContinueWithoutSaving_ShowsNextScreen_WithCorrectText]' started.
/Users/andyo/Documents/MyGitHubProjects/KIFDemoApp/KIFDemoAppFunctionalTests/MyFirstKIFTest.swift:14: error: -[KIFDemoAppFunctionalTests.MyFirstKIFTest testContinueWithoutSaving_ShowsNextScreen_WithCorrectText] : The step timed out after 10.00 seconds: Failed to find accessibility element with the label "Continue, without savingg"
Test Case '-[KIFDemoAppFunctionalTests.MyFirstKIFTest testContinueWithoutSaving_ShowsNextScreen_WithCorrectText]' failed (10.064 seconds).
Test Suite 'MyFirstKIFTest' failed at 2016-04-27 20:14:28.022.
     Executed 1 test, with 1 failure (1 unexpected) in 10.064 (10.221) seconds
Test Suite 'Selected tests' failed at 2016-04-27 20:14:28.023.
     Executed 1 test, with 1 failure (1 unexpected) in 10.064 (10.222) seconds
In this output, also notice the message “The step timed out after 10.00 seconds.” That’s an important nuance. By default, KIF allows a 10 second grace period for a given “thing” to be found by the API. This allows for slow user interface transitions to complete without falsely failing a test.
Let me also pause to clarify and reinforce that KIF’s magic is totally driven off of accessibility labels and identifiers (and luckily this is in common with other functional tests in case you ever want to switch test tools later, as well as best practice for enabling people with impaired vision to use your app). As you create your app, and write your KIF tests, it’s much easier if you specify the accessibility information along the way.
Step 4 – Write A Functional Test For a Text Field
Now that your whistle is wet, let me further satiate your desire to write functional tests. This time, you’re going to raise the stakes by inputting text, and based on this input, verify an expected output on the second view.
Add this second test method to MyFirstKIFTest:
func testSaveAndContinueWithAName_ShowsNameOnNextScreen_WithMatchingText() {
    let name = "Clean Swifter"                                                   // 1
    tester().enterText(name, intoViewWithAccessibilityLabel: "Name field")       // 2
    tester().tapViewWithAccessibilityLabel("Save, and continue")                 // 3
    tester().waitForViewWithAccessibilityLabel("Welcome \(name)")                // 4
}
- Create a constant string representing the name that will be entered and verified.
- Enter the name into the text field.
- Tap the Save, and continue button
- Wait for the next view, reusing the
nameconstant to verify the output string.
Run your tests. What happens?
The tests won’t pass.
Failed to find accessibility element with the label "Name field"
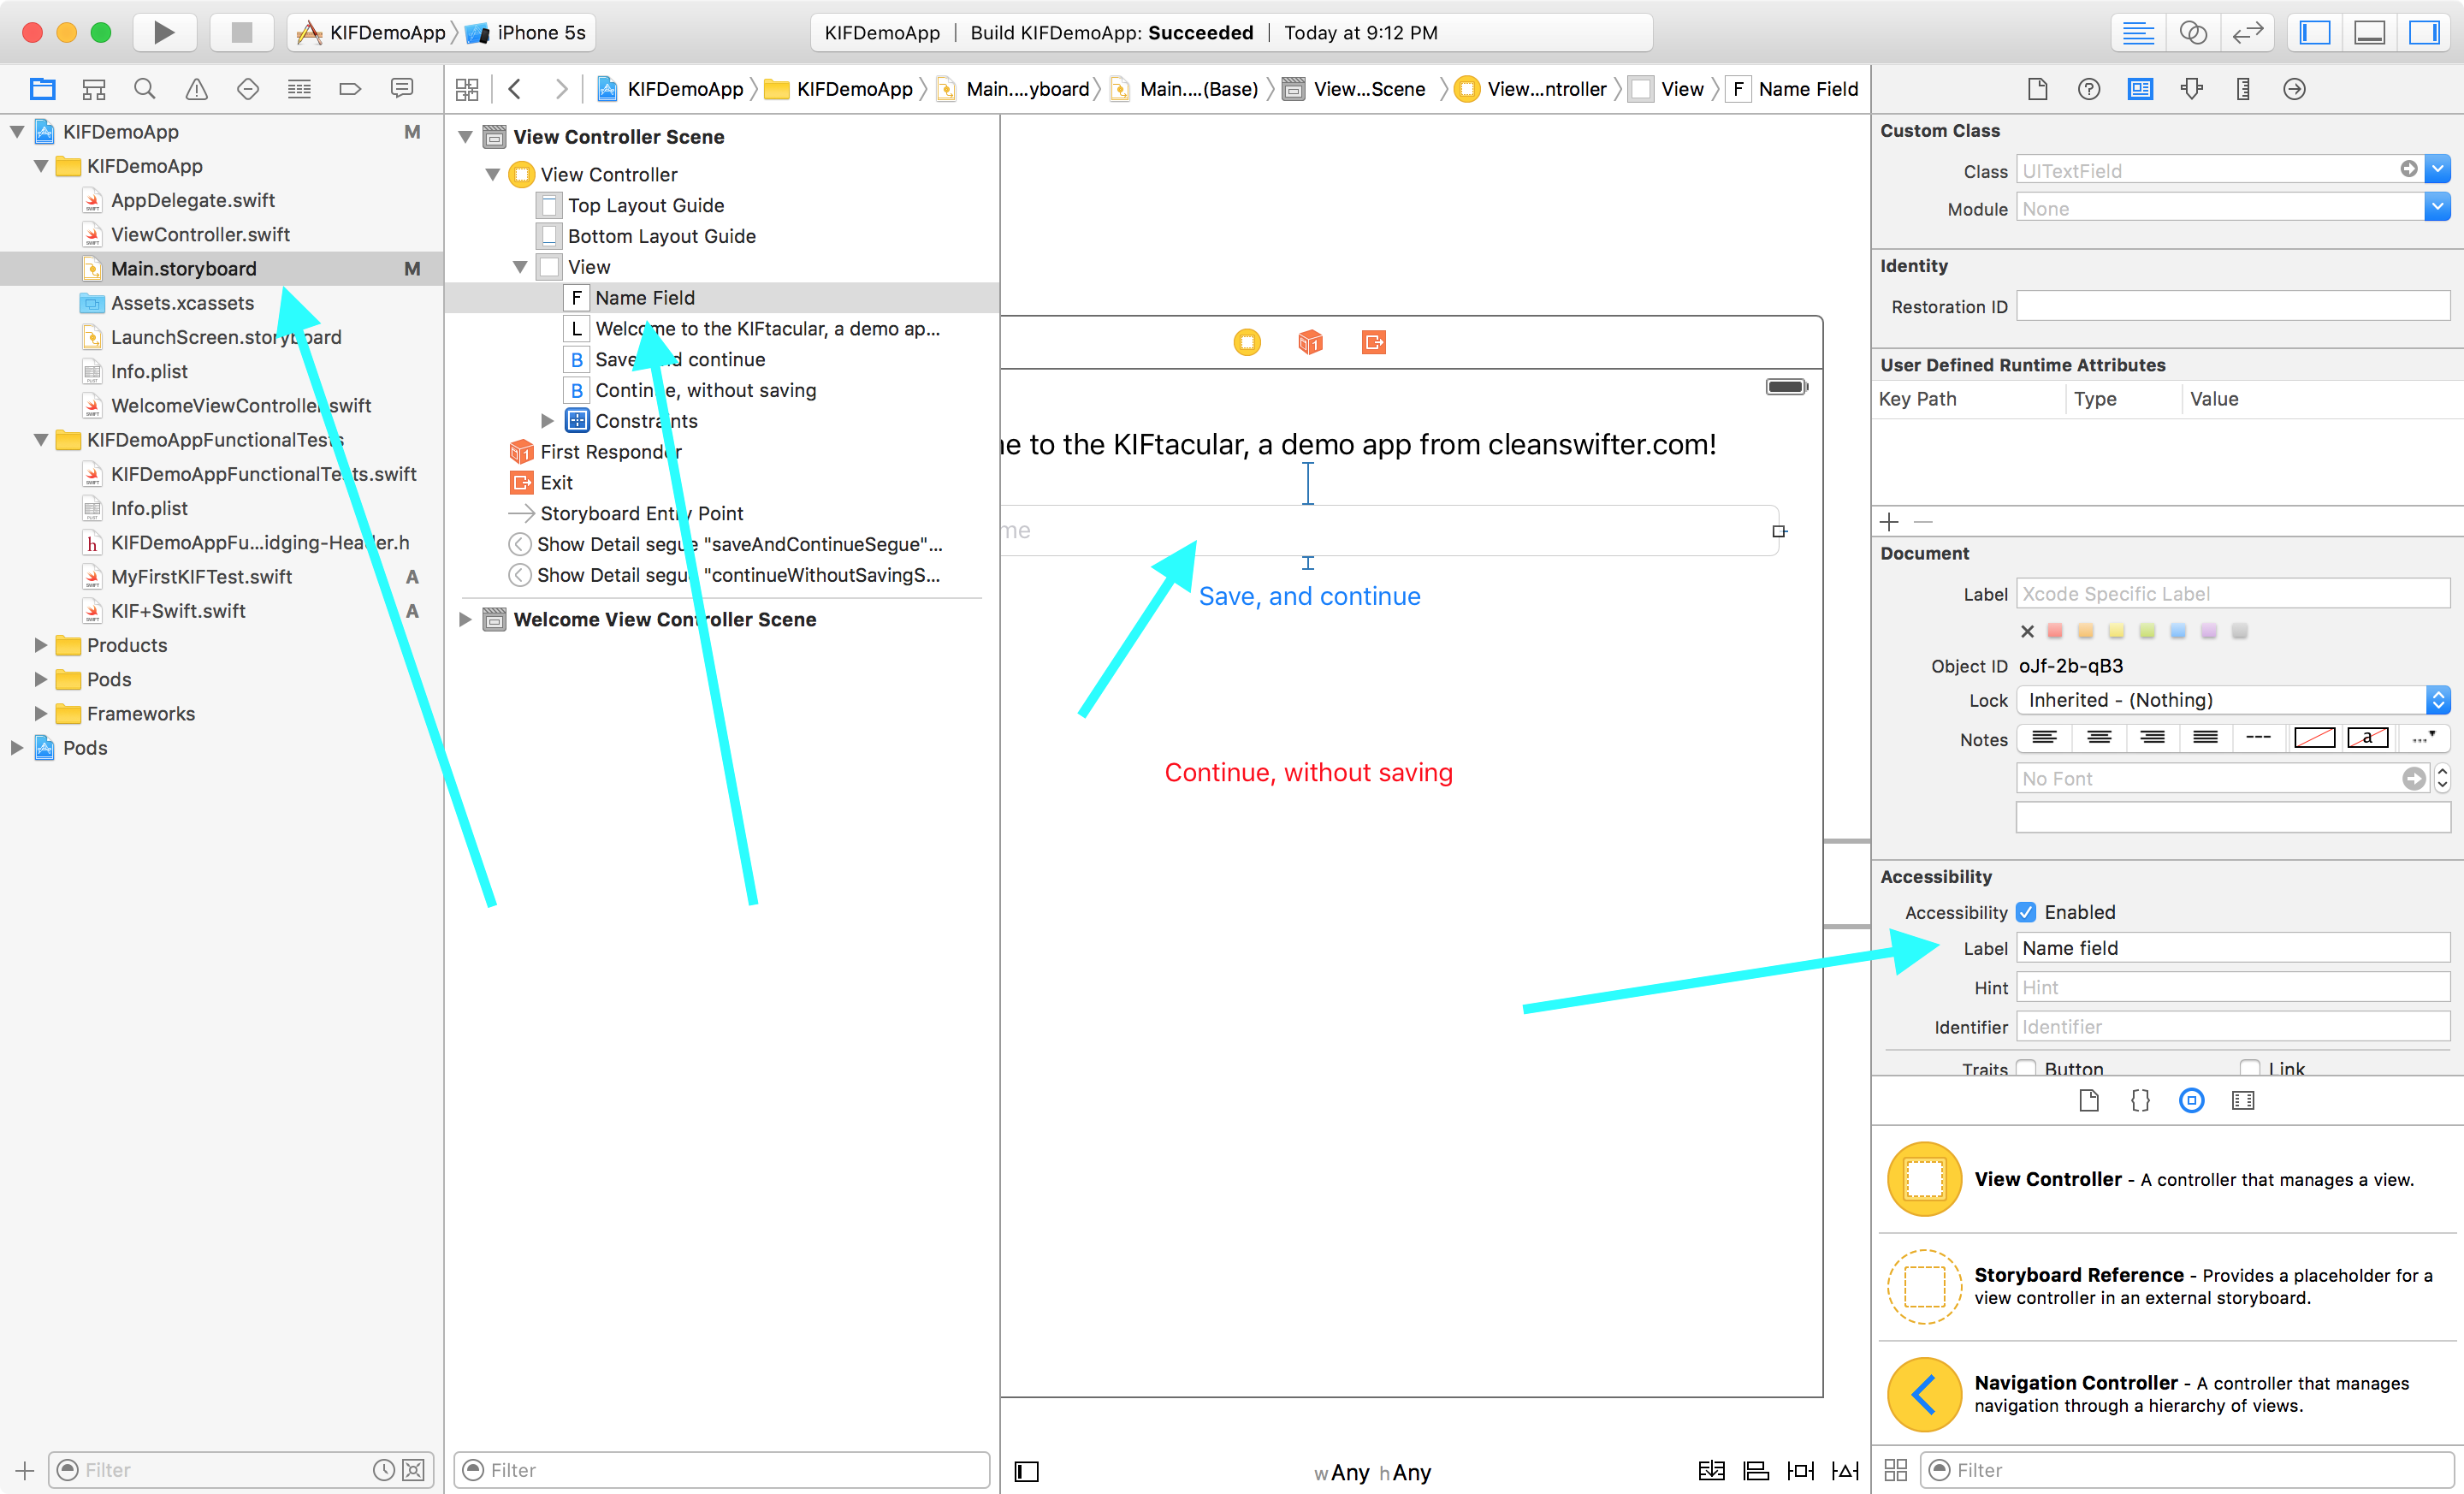
You never specified an accessibility label on the text field. Open Main.storyboard and set the Accessibility label on the text field. This screenshot should help you figure out how to find and do that:
Run your tests, again. All should be good!
Wrap Up
I hope you enjoyed writing your first KIF test. Well, it was a bonus because you really wrote two! With these basics, it really opens up a world of opportunity for functional iOS testing. For further reference, take a review of the methods available on KIFUITestActor. Those methods provide the comprehensive list for navigating through your app. There’s a lot of available, try it out, and let me know what creativity you come up with after writing your first KIF test! You can find the demo app with the KIF tests added in my GitHub repository.
Happy cleaning.