
I recently had the question posed to me, “how do I get started with unit testing on iOS?” I have a suggestion for your first iOS unit test, look for a piece of code that performs an operation on a String. Write your first iOS unit test for that method. Strings and their related manipulations are easy to unit test. They don’t have deep integration with other frameworks like UIKit or CoreData, and the behavior is usually easily understandable just by reading the code, thus making it easy to reverse engineer what “should” happen, in order to translate it into a unit test. Let’s work through an example.
A “Unit” Defined
The first thing to understand about “unit testing” is what a “unit” even is.

No, not a storage “unit.”
It’s a vague term for sure. I’d describe it as, “the smallest piece of code that actually does something useful.” It’s kind of like art, you know it when you see it. I’ve written dedicated unit tests for single lines of code before. I’ve written unit tests for entire methods before. Bigger than that, and you start to take on too much scope for the test. You want the test to be straightforward. You want the test to be easily troubleshootable when it fails. And you want to minimize the reasons it could fail, to only a few reasons. This keeps your tests well factored, and easily maintainable.
My suggestion for your first test is to look for a standalone method, aka a “unit” that performs an operation on a string. Here’s an example for your first iOS unit test:
The Code To Test
I wanted to come up with a straight forward example to help you visualize a piece of code that is easily verified with a unit test. Consider the following struct that represents a person with a name:
struct Person {

  let firstName:String
  let lastName:String
  let suffix:String?

  init(firstName: String, lastName: String) {
    self.firstName = firstName
    self.lastName = lastName
    self.suffix = nil
  }

  init(firstName: String, lastName: String, suffix: String) {
    self.firstName = firstName
    self.lastName = lastName
    self.suffix = suffix
  }

  func formattedName() -> String {
    if let suffix = suffix {
      return "\(firstName) \(lastName), \(suffix)"
    } else {
      return "\(firstName) \(lastName)"
    }
  }
}
The struct sets up a Person as a thing that is represented by three Strings, a firstName, a lastName, and an optional suffix.
formattedName jumps out as a prime candidate for a unit test. A standalone method that does some isolated logic based on some inputs, and returns a a new value based on those inputs.
Add An XCTestCase Your Project
Now that you know what you want to test, in order to test it, you need to leverage the XCTest framework to test it. Xcode makes this easy.
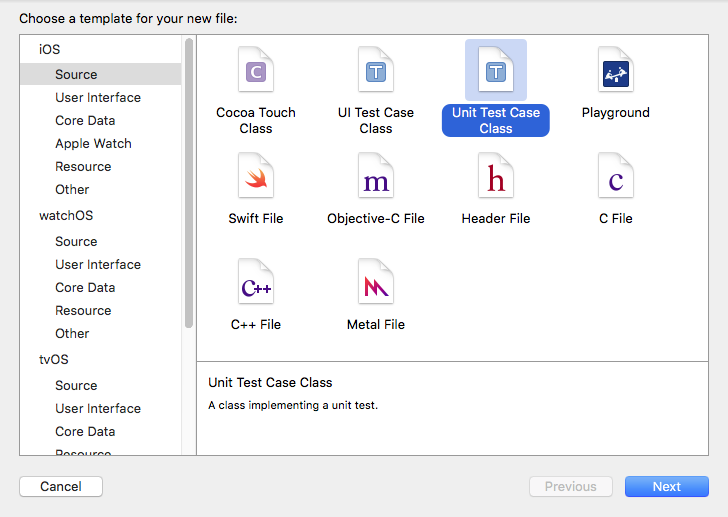
From your project, select File -> New -> File… and pick Unit Test Case Class.
Give it an appropriate name, usually ending in the convention of:
That’s it, a new file will be created containing a class that is a subclass of XCTestCase. Add your tests here. Anything function whose name begins with “test” will be executed when you run unit tests.
Writing The Unit Tests
Reviewing formattedName() in Person there are two flows through the code, when the Person has a suffix and when they don’t. Two flows through the “unit” means two tests – keep your tests small. Test one thing at a time.
Consider this test to verify that a Person‘s formattedName() is correct when they don’t have a suffix:
func testFormattedName_ProperlyFormats_WhenNoSuffix() {
  let theCleanSwifter = Person(firstName: "Andy", lastName: "Obusek")
  let expectedFormattedName = "Andy Obusek"
  XCTAssertEqual(expectedFormattedName, theCleanSwifter.formattedName())
}
First, a Person is setup without a suffix, then the expected output is defined, and finally XCTest is used to verify that the output matches the expectation.
Here’s a test for the opposite condition, when a Person does have a suffix:
func testFormattedName_ProperlyFormats_WhenSuffixPresent() {
  let theCleanSwifter = Person(firstName: "Andy", lastName: "Obusek", suffix: "Jr.")
  let expectedFormattedName = "Andy Obusek, Jr."
  XCTAssertEqual(expectedFormattedName, theCleanSwifter.formattedName())
}
This test is very similar to the prior test. The only differences are that a suffix is provided for the Person and the expectedFormattedName is different.
Running The Tests
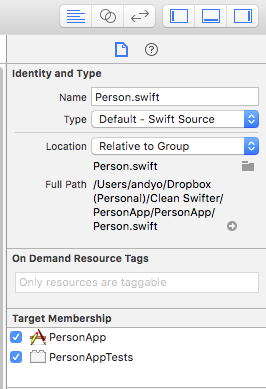
IMPORTANT: For your tests to compile, any files that you reference in the main target (eg. the code under test) need to be included in the test target. You specify this in the File Inspector:
To run the tests, use the keyboard shortcut Command-U (or if you want to be slow, select the menu item Product -> Test. The iOS Simulator will launch, the tests will run, and you’ll see the results in the Console. They look like this:
22:11:52.771 PersonApp[12486:9452629] _XCT_testBundleReadyWithProtocolVersion:minimumVersion: reply received
22:11:52.777 PersonApp[12486:9452629] _IDE_startExecutingTestPlanWithProtocolVersion:16
Test Suite 'Selected tests' started at 2016-04-19 22:11:52.785
Test Suite 'PersonTests' started at 2016-04-19 22:11:52.787
Test Case '-[PersonAppTests.PersonTests testFormattedName_ProperlyFormats_WhenNoSuffix]' started.
Test Case '-[PersonAppTests.PersonTests testFormattedName_ProperlyFormats_WhenNoSuffix]' passed (0.021 seconds).
Test Case '-[PersonAppTests.PersonTests testFormattedName_ProperlyFormats_WhenSuffixPresent]' started.
Test Case '-[PersonAppTests.PersonTests testFormattedName_ProperlyFormats_WhenSuffixPresent]' passed (0.000 seconds).


Test session log:
    /Users/andyo/Dropbox (Personal)/Clean Swifter/PersonApp/DerivedData/PersonApp/Logs/Test/78B021DC-E467-4F0E-8D95-EE44156AB2DE/Session-2016-04-19_22:11:43-ZVrKpY.log

Test Suite 'PersonTests' passed at 2016-04-19 22:11:52.810.
     Executed 2 tests, with 0 failures (0 unexpected) in 0.021 (0.023) seconds
Test Suite 'Selected tests' passed at 2016-04-19 22:11:52.811.
     Executed 2 tests, with 0 failures (0 unexpected) in 0.021 (0.025) seconds
Congratulations, You Did It!
BOOM! That’s it, you just wrote your first iOS unit test! Well, two of them. How does it feel? Trivial? Powerful? I can relate to both of those feelings. Starting out, you might be thinking, “That’s so simple, how does it even provide value?” Well, ya, if you write the test and never execute it again, chances are you’ll never get any value out of it. The power of tests comes with repeated execution of those tests. Anytime you make a change to your project, run the tests! (and add new tests too!) I guarantee you that at some point, your tests will eventually catch a bug that you didn’t otherwise notice. Then you’ll be sold on automated testing. You’ll never get there if you don’t start somewhere.
Thanks for reading, happy cleaning.
PS – Continuous integration tools like Xcode Server or Jenkins further magnify the power of your first iOS unit test by enabling automatic execution of builds and tests in response to events like source code repository commits. I’ll tackle this topic in a future post.
That is a good tip particularly to those fresh to the blogosphere.
Simple but very accurate info… Appreciate your sharing this one.
A must read post!
Thank you! What else can I help you learn about?
It is in point of fact a nice and useful piece of info.
I am glad that you just shared this useful information with us.
Please stay us up to date like this. Thanks for sharing.
I’m glad you enjoyed it. What would you like to hear about in the future?