
Dependency injection with storyboards is not always straightforward, yet there are a couple techniques that can help you achieve programming nirvana. Dependency injection is a great technique that can help enable more modular and easily testable code. Unfortunately, since Storyboards can often mask how things like transitioning from one view controller to another works under the covers, there aren’t always obvious hooks for implementing dependency injection with Storyboards. Don’t stray to the dark side, singletons are not the answer. There is a way to the light, and I’ll show you a couple techniques for using dependency injection with Storyboards.
What Dependency Injection Is
Have you heard colleagues or friends talk about “dependency injection” but you never really knew what it was? It’s a fancy term for a simple concept. James Shore sums it up really well:
Dependency injection means giving an object its instance variables. Really. That’s it.
Here’s an example view controller definition:
class FirstViewController: UIViewController {
  var persistenceStack: PersistenceStack?
}
FirstViewController defines an instance variable persistenceStack that is open to any other file in the same module. This means that any other class, struct, protocol, whatever, that has access to an instance of FirstViewController may provide it the persistenceStack. Voila, that’s dependency injection. It’s nothing more complicated like that. Said a different way, FirstViewController has a dependency on PersistenceStack and that dependency is provided, or injected, by something else.
Why Dependency Injection Is Important
Dependency injection is an important principle in clean software engineering. The most important reason that you should use dependency injection is that it detaches the implementation of behavior from the interface of behavior. Classes that are open to have their dependencies injected mean that they can be decoupled from the underlying implementation of those dependencies. It’s much easier to purely program to an interface or protocol if you don’t need to know anything about the underlying implementation of the dependency under use.
Imagine you are on a large development team working on a giant iOS application with hundreds of thousands of lines of code. You’re on the “Front-End” team where you focus on the development of the user interface. You spend most of your time in Interface Builder and view controllers. Elsewhere in the company, possibly in a different office, is the “Persistence-Tier” team. The Persistence-Tier team is responsible for writing the mission critical portion of the application that saves things to disk, and keeps those objects in synch with the server-side backend. The thing is, as smart as the Persistence-Tier is, they are constantly changing their mind about the underlying implementation for their piece of the application. Lucky for you, the team has agreed upon a protocol-based dependency injection implementation for access into the persistence layer. As a team member working on view controllers all day, dependency injection prevents you from needing to worry about things like:
- How to instantiate the persistence stack.
- Whether the persistence stack has been properly configured.
- What is the underlying implementation of the persistence stack (eg. CoreData, SQLite, Realm, etc.).
- How does using a persistence stack affect automated testing
Instead, you can trust that this dependency will be properly provided to your view controller from some other place, and all you have to do is use it. Remember, it’s just an instance variable that is populated by something else. Your view controller has one less responsibility, and thus is that much closer to achieving the Single Responsibility Principle.
Testability
If you’re reading this blog, you’re probably interested in automated testing. Dependency injection is probably the single easiest way to improve the testability of your iOS code, well any code really, but particularly your UIKit-ladden iOS code. Rather than be tied to the underlying implementation of dependencies, you can provide your own implementation from your test classes, just like you would between classes in the real application. You can now easily stub out things like that persistence layer.
Why Dependency Injection With Storyboards Is Hard
Break out of the role play and back to the real world where most apps are created by a few people on a small team, if not a single person. While the analogy of a giant organization no longer holds true, the need to be able to swap persistent store implementations is something frequently encountered. There’s always a hot new player in the game. Now that you’re bought-in to dependency injection, it’s time to consider how to use the in iOS applications. Storyboards were introduced in iOS 5. Storyboards provide a holistic Interface Builder oriented way to create the user interface for your application. Rather than creating one-off xibs per view controller that then require you the engineer to wire together, a Storyboard allows you to design all your view controllers in one place where you can view all of them at one time, and wire them together such that the relationships between the screens is easily comprehendible in a single glance.
One problem of Storyboards is that they obscure some underlying details of how view controllers actually connect together and communicate. Specifically, when working with a Storyboard-based application, you are rarely writing code in a view controller that manually creates another view controller and brings it onto the screen. Instead, you are relying on segues, and unless you go out of your way to write code to prepare for a segue to happen, or manually trigger a segue, it’s easy to think that the magic of the Storyboard does everything for you.
For example, here’s a Storyboard:
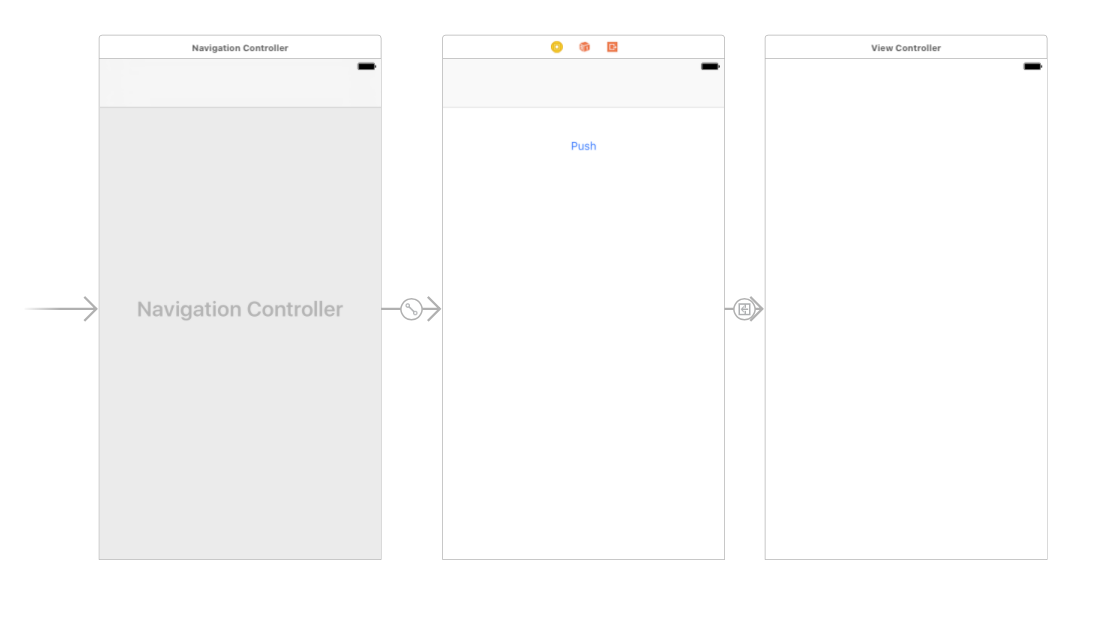
This Storyboard represents an application with a navigation controller stack where the root view controller has a button to push a deeper view controller onto the stack. All that behavior provided for free from the Storyboard. Now how in the world would you use dependency injection to provide a dependency to the view controllers in this application? Good question, there are a couple ways.
Dependency Injection with Storyboards
Here are several techniques for implementing dependency injection with Storyboards.
Passing a dependency to an initial view controller
A common pattern you’ll see in iOS applications that use dependency injection is that specific dependencies for the application are instantiated in the custom UIApplicationDelegate for the application. From there, they are then passed into the initial view controller for use throughout the application. Here’s how you can do that. Consider the following Storyboard:
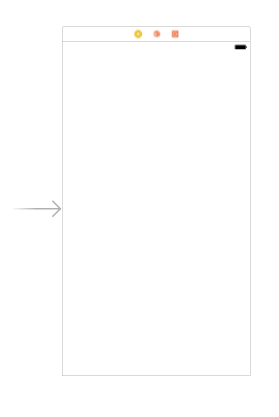
A single view controller is designated the Initial View Controller for the application. That means, that view controller will be the first one shown when the application is launched. There’s little corresponding code in the app’s custom UIApplicationDelegate:
func application(_ application: UIApplication, didFinishLaunchingWithOptions launchOptions: [UIApplicationLaunchOptionsKey: Any]?) -> Bool {

  return true
}
The Storyboard does all the magic for ensuring that view controller is shown on launch. To inject a dependency into that view controller, you need to first create the dependency, and then set it on the view controller. You can use the window and its corresponding rootViewController to get that hook onto the Initial View Controller, like this (assuming a similar implementation of FirstViewController from earlier in this article):
func application(_ application: UIApplication, didFinishLaunchingWithOptions launchOptions: [UIApplicationLaunchOptionsKey: Any]?) -> Bool {

  let persistenceStack = PersistenceStack()

  if let firstViewController = window?.rootViewController as? FirstViewController {
    firstViewController.persistenceStack = persistenceStack
  }
  return true
}
Simply use access the rootViewController through the window and then combine that with an if let to downcast it to the specific implementation you need, FirstViewController. Then you have the hook you need and you can inject the dependency.
Passing a dependency to tab bar view controllers
Passing a dependency to view controllers that are part of a tab bar is a little more involved, and the technique is totally inspired from Greg Heo via his awesome two-part raywenderlich.com video tutorial series on Core Data. Storyboards simplify the creation of UITabBar based applications to the point where there is no code representing the creation of the tab bar or its controller. Of course, you can go above and beyond and add code to customize behavior, but you have to know where to do it. Here’s a technique to inject dependencies into view controllers of a tab bar. Imagine an app with this basic Storyboard:
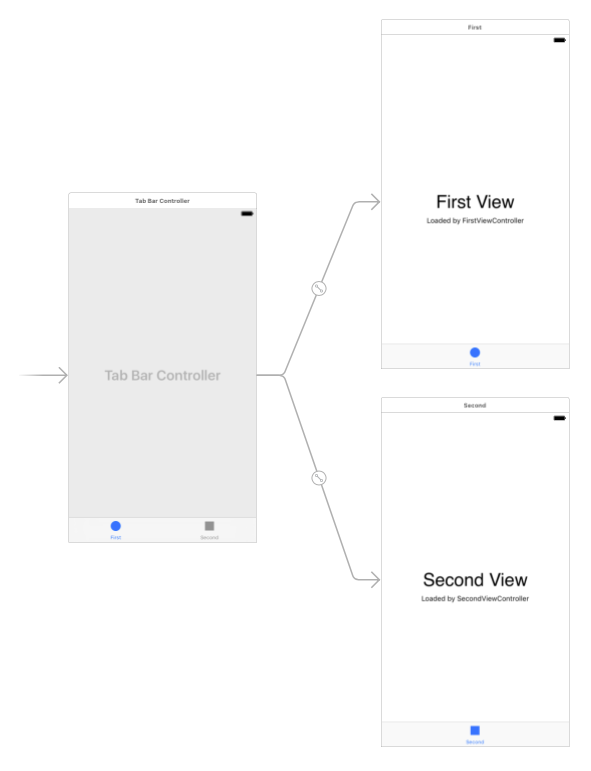
It’s nearly the project template for a Tab Based Application. Two view controllers coming off of a UITabBarController. The UITabBarController is designated the Initial View Controller in the Storyboard. In the same project, the AppDelegate has very little code at launch:
func application(_ application: UIApplication, didFinishLaunchingWithOptions launchOptions: [UIApplicationLaunchOptionsKey: Any]?) -> Bool {
  return true
}
There’s literally nothing happening in that method, the Storyboard is doing everything. Well, lucky for you, application(_:didFinishLaunchingWithOptions:) does actually get called, so it’s the perfect spot to instantiate meaty dependencies and provide them to the initial set of view controllers for the application. But before you modify that code, there’s an important intermediate step to take to ensure everything will be glued together properly, create a protocol! Create a protocol that each view controller will implement that indicates it can have it’s persistence dependency injected. This way, you can write polymorphic in the app delegate to inject the dependency, without needing to know the type of each and every view controller in the tab bar. Create this protocol somewhere:
protocol PersistenceStackClient {
  func setStack(stack: PersistenceStack)
}
Anything conforming to this protocol indicates that it can have a PersistentStack set on it.
Next, update any and all view controllers in the tab bar with an extension that indicates protocol conformance:
extension FirstViewController: PersistenceStackClient {
  func set(stack: PersistenceStack) {
    self.persistenceStack = stack
  }
}
And rinse repeat for each view controller in the tab bar. There are ways to further abstract this so as not to repeat code, but the sample will be simple for now.
Now you can add the magic glue to the app delegate:
func application(_ application: UIApplication, didFinishLaunchingWithOptions launchOptions: [UIApplicationLaunchOptionsKey: Any]?) -> Bool {

  let persistenceStack = PersistenceStack()

  if let tab = window?.rootViewController as? UITabBarController {
    for child in tab.viewControllers ?? [] {
      if let top = child as? PersistenceStackClient {
        top.set(stack: persistenceStack)
      }
    }
  }
  return true
}
It’s not doing much, but it’s a clever technique. Here’s what’s happening step by step:
- Instantiate the dependency.
- Grab the
rootViewController. - Loop through the child view controllers in the tab bar, and for each that is a
PersistentStackClient, set itspersistenceStack.
Boom, that’s it, dependency injected into a tab bar controller! See how the protocol allows you to set the PersistentStack in a loop without needing to know the exact type of the view controller?
Passing a dependency from view controller to view controller
Passing a dependency from one view controller to another can be done using:
prepare(for segue: UIStoryboardSegue, sender: AnyObject?)
prepare(for:sender:) is a method defined in UIViewController that may be overridden in your implementations. It’s specifically called right before a segue off of that view controller happens. The provided UIStoryboardSegue has details about specifically which segue was triggered since there could be more than one segue off of a view controller. Included with these details is the destination view controller.
Continuing our earlier example, imagine you have:
class FirstViewController: UIViewController {
  var persistenceStack: PersistenceStack?
}

class SecondViewController: UIViewController {
  var persistenceStack: PersistenceStack?
}
Each view controller has a dependency that may be injected, persistenceStack. Here’s how you may inject persistenceStack from FirstViewController into SecondViewController assuming that they are wired together with a segue in the Storyboard:
class FirstViewController: UIViewController {
  var persistenceStack: PersistenceStack?

  override func prepare(for segue: UIStoryboardSegue, sender: Any?) {
    if let destination = segue.destination as? SecondViewController {
      destination.persistenceStack = persistenceStack
    }
  }

}
In this implementation of prepare(for:sender:), the destination is retrieved from the UIStoryboarSegue and if it is a SecondViewController then it’s persistenceStack is set, and thus the dependency is injected!
Wrap up
These couple techniques for using dependency injection with Storyboards will bring the cleanliness of your iOS code to the next level. Bart Jacobs’ has a great quote about dependency injection: “It felt as if I graduated as a programmer and no longer needed the singleton pattern to glue the pieces of a project together.” Here’s another good resource titled Nuts and Bolts of Dependency Injection in Swift that you will find helpful, and goes much more in detail on the basics of dependency injection in Swift, and why you should use it. Are you a dependency injection zealot yet? Are you already using dependency injection with Storyboards? How are you using it in your Swift iOS apps? Let everyone know in the comments!
Happy cleaning!
Thanks for this. Good write-up. Very useful.
No problem, I’m glad you enjoyed it.