Did you know that improving Swift unit tests with Objective-C is something that is actually possible? Yes, it is, specifically when writing unit tests for legacy Objective-C code. One common definition of legacy code is “code without tests..”
A different definition of “legacy code” that might resonate with iOS app engineers is any code written in Objective-C. Swift is nearing its third anniversary of being announced to the world. It’s no longer the immature adolescent that can be passed by for the old reliable language, Objective-C. Instead, it’s now something that you can’t ignore as an iOS engineer. It’s the future direction of our platform. If you’re still writing Objective-C code, you should have a darn good reason as to why. Now that’s not to say you should never expect to work with Objective-C at the moment. In fact, working with Objective-C is a very real thing for most of us. Most of us don’t have the luxury of working entirely with a shiny new Swift code base. Most of us have to support older apps that have a large amount of Objective-C code. And whether or not you want to consider that “legacy code,” the fact of the matter is that it’s there, and you have to deal with it.
An Unexpected Case for Swift
Whether you’re an advanced Swifter who’s soaked in each release since the first version, to someone just getting familiar with the language, writing unit tests with Swift is something that anyone can do. Obviously you can write unit tests for Swift code with Swift code, but did you know that you can write unit tests for Objective-C code with Swift? Yep, it’s possible, and I recommend it. It’s both a low risk way to practice your Swift coding skills, while also ensuring that you aren’t creating new Objective-C code that will just need to be migrated later. And even if you already have a unit test suite for a particular Objective-C class, you can still add a Swift XCTestCase subclass and add new unit tests for that same Objective-C class. In fact, I use this approach all the time. This works especially well when working with Objective-C code bases where you’re forced to write new Objective-C to expand the functionality of the app because you need to modify existing code. You can create a new Swift unit test for verifying the new functionality added in Objective-C.
If you are setting out to add Swift tests to a project that is entirely Objective-C based, there’s one little quirk with Xcode 8 to work around. You need at least one Swift file with a bridging header in your main target for Xcode to allow you to import that target into your Swift unit tests as a module. Otherwise you will get an error, “No such module” when attempting to run your Swift test.
A Problem You’ll Encounter
After writing Swift for a while, it’s easy to to forget that back in the Objective-C world, each class generally had two files, a header file (.h) and an implementation file (.m). Best practice suggested that unless something needed to be exposed to other classes, it should go within the .m file alone. This went for method definitions and property declarations. For example, consider this UIViewController:
#import "ViewController.h"

@interface ViewController ()

@property (strong, nonatomic) UILabel *nameLabel;
@property (strong, nonatomic) UILabel *emailLabel;

@end

@implementation ViewController

- (void)viewDidLoad {
  [super viewDidLoad];

  self.nameLabel = [[UILabel alloc] initWithFrame:CGRectMake(10, 30, 200, 20)];
  self.emailLabel = [[UILabel alloc] initWithFrame:CGRectMake(10, 50, 200, 20)];

  [self.view addSubview:self.nameLabel];
  [self.view addSubview:self.emailLabel];

  self.nameLabel.text = [[NSUserDefaults standardUserDefaults] stringForKey:@"name"];
  self.emailLabel.text = [[NSUserDefaults standardUserDefaults] stringForKey:@"email"];
}

@end
viewDidLoad() sets two labels based on some values stored in NSUserDefaults. Lack of dependency injection aside, coming up with an approach for writing a unit test for this method is fairly straightforward, and just as easy to implement that approach in Objective-C:
#import <XCTest/XCTest.h>
#import "ViewController.h"

// Private Category Trick to expose private properties for testing
@interface ViewController (Test)

@property (strong, nonatomic) UILabel *nameLabel;
@property (strong, nonatomic) UILabel *emailLabel;

@end

@interface ViewControllerTests : XCTestCase

@end

@implementation ViewControllerTests

- (void)testViewDidLoad_SetsLabels_Always {
  NSString *name = @"Andy";
  NSString *email = @"andyo@notanemail.com";
  [[NSUserDefaults standardUserDefaults] setObject:name forKey:@"name"];
  [[NSUserDefaults standardUserDefaults] setObject:email forKey:@"email"];

  ViewController *toTest = [[ViewController alloc] init];
  [toTest viewDidLoad];
  XCTAssertEqualObjects(name, toTest.nameLabel.text);
  XCTAssertEqualObjects(email, toTest.emailLabel.text);
}

@end
Objective-C makes it really easy to get access to the private properties for nameLabel and emailLabel, just use a private category defined within the sample .m file for the XCTestCase subclass.
Now, let’s say you’re taking my advice, and trying to write this unit test in Swift for the same Objective-C class. You’d probably start with something like this:
import XCTest
@testable import SwiftTestsForObjC

class ViewControllerTests: XCTestCase {

  func testViewDidLoad_SetsLabels_Always() {
    let name = "Andy"
    let email = "andy@notanemail.com"
    UserDefaults.standard.set(name, forKey: "name")
    UserDefaults.standard.set(email, forKey: "email")

    let toTest = ViewController()
    toTest.viewDidLoad()

    XCTAssertEqual(name, toTest.nameLabel.text)
    XCTAssertEqual(email, toTest.emailLabel.text)
  }

}
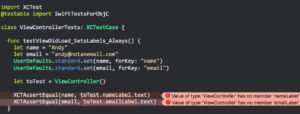
It’s a pretty straight forward translation from the Objective-C test. The only problem, there’s a compiler error:
The compiler is telling you that it can’t find the method definitions for nameLabel or emailLabel on ViewController. It’s actually the same problem that you would have experienced in Objective-C had the trick of using a private category not been in place. Some testing enthusiasts advocate that all code be testable. You have to balance this with other design principles. For me, I’m not going to violate the protection of encapsulation by exposing those two UILabel properties through the header file – they don’t need to be there.
So how do you fix it?
Solving The Problem, with Objective-C
Objective-C to the rescue. You can solve this problem by using a similar trick to the one that we originally used to get the Objective-C version of this test to work: a category. This time though, it won’t be a private category, instead it will be a test-target scoped Objective-C category that exposes the private properties from ViewController.
Here’s how you do it:
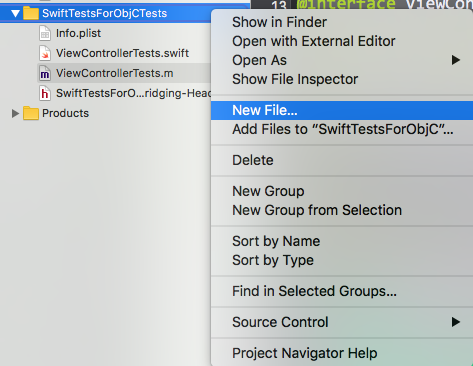
Step 1: Create a new header file in the group for your unit tests and name it ViewController+Testing.h (the prefix should match the class under test, and a suffix of +Testing isn’t technically required, but helps provide a context to the purpose of the file): 
Step 2: Add a private category that exposes the private properties on the class you need to test:
@interface ViewController (Test)

@property (strong, nonatomic) UILabel *nameLabel;
@property (strong, nonatomic) UILabel *emailLabel;

@end
Step 3: Import the header file from the bridging header for the test target:
#import "ViewController+Testing.h"
And 💥, that’s it! Go back and attempt to compile your Swift test where you are accessing those properties, and you’ll it works!
Despite this simple example, this strategy can be used any place that you would like to write a Swift test and access private methods or properties on an Objective-C class.
I wired all this up together into a final project where you can see how it all works and try for yourself here.
How about you?
Have you dipped your toes into the international waters of crossing the borders between writing tests between Objective-C and Swift? What challenges have you encountered? How have you found it? Leave a comment and let me know!


