Swift Partial Mocks are NOT an Antipattern

In today’s followup to Veronica Ray’s talk on “Real World Mocking in Swift,” she claims that partial mocks are an antipattern. I dispute that claim, especially with Swift partial mocks. I’ve gotten a ton of value out of Swift partial mocks in my mocking experience, and I think they are critical in the path towards 100% code coverage in the framework-laden world in which we live.

Partial Mocks Defined

Veronica defines a partial mock as “any actual object which has been wrapped or changed to provide artificial responses to some methods and not others.” I agree with this definition.

In as simple as an example as I could think of, the proverbial Person class, consider this code:

class Person {
  var firstName: String? = nil
  var lastName: String? = nil

  func fullName() -> String {
    return "\(firstName!) \(lastName!)"
  }

  func description() -> String {
    return "Hi, I'm \(fullName())"
  }

}

This class defines a Person as a thing that can have a firstName and a lastName. It also defines som behavior to create a the last name for Person.

One possible way to create a partial mock is through subclassing:

class MockPerson: Person {

  override func fullName() -> String {
    return "Andy Obusek"
  }
}

MockPerson extends Person as a subclass. It preserves all the behavior of the base class, while also wrapping Person to provide an artificial response as the fullName().

Now this example is really trivial, but it’s here to serve as an example to show what a partial mock is, and how you can use subclassing to create one.

Recognizing The Case Against Partial Mocks

Veronica Ray advocates that partial mocks are antipatterns for two reasons:

  1. They are challenging to setup.
  2. They decrease the comprehensibility of the test. How do you know what’s real? What’s fake?

I recognize these as valid concerns, especially for the newcomer to automated testing, or even using mock objects. That being said, I also think that the advanced engineer/team who is actually starting to investigate Swift partial mocks is up to the task for being able to comprehend “what’s real?” or “what’s fake?” in the context of the mock object.

And while subclassing has its own set of problems in production code (creates tight coupling between the parent and subclass), I’m totally fine using it in the context of my tests to gain the flexibility of using a partial mock. Swift actually makes this even easier through it’s Nested Types, let me show you. Consider the following test:

func testDescription() {

  class MockPerson: Person {

    override func fullName() -> String {
      return "Andy Obusek"
    }

  }

  let toTest = MockPerson()
  let expectedDescription = "Hi I'm Andy Obusek"
  XCTAssertEqual(expectedDescription, toTest.description())
}

This test verifies that description() actually returns the expected string, that comprises of the person’s last name. Using a Swift Nested Type, you can actually define the partial mock WITHIN THE TEST method itself! #mindblown By doing this, in my opinion, it totally eliminates any ambiguity in my mind as to confusion around “what’s real?” or “what’s fake?” with the partial mock. Since partial mock is defined right there, I can see it for myself.

Why You Should Use Swift Partial Mocks

If you aren’t sold on Swift partial mocks yet, let me give them one last pitch. There are often cases when using 3rd party framework classes (Apple’s or otherwise) in which you’ll need to write code for singletons, such as UIApplication.sharedApplication() or NSNotifcationCenter.defaultCenter(). These are perfect for partial mocking. For one, these are usually things that you don’t want to trigger their actual behavior from a test. By partially mocking them, you can override the behavior you’re verifying such that the real underlying functionality is disabled. Additionally, you can also actually make assertions that the code under test did the right thing.

For example, consider the following partial mock for NSNotificationCenter:

class MockNotificationCenter: NSNotificationCenter {

  var addObserverCalled = false

  override func addObserver(observer: AnyObject, selector aSelector: Selector, name aName: String?, object anObject: AnyObject?) {

    addObserverCalled = true
  }
}

This partial mock for NSNotificationCenter allows you to intercept and override the behavior for adding a notification observer. How useful! Now you can swap this implementation in whereever you need to write a test to verify that observers are getting added appropriately. You can even expand upon the overriden addObserver method to make further checks that the observer is added with the correct parameters.

I hope you see the value in Swift partial mocks. I know I’ve gotten a lot of benefit from them, especially back in the good ole OCMock days.

Happy cleaning!

Test Double – A generic term defined

“I’ll just a mock for that!” I can’t tell you the number of times that I’ve said that when I really meant a “stub” or a “fake” or a “partial mock” because it’s been so many. In her talk on “Real World Mock Objects in Swift” I heard Veronica Ray use a term that was new to me: “test double.”

What is a Test Double

According to Testing on the Toilet at Google: “A test double is an object that can stand in for a real object in a test, similar to how a stunt double stands in for an actor in a movie. These are sometimes all commonly referred to as “mocks”, but it’s important to distinguish between the different types of test doubles since they all have different uses. The most common types of test doubles are stubs, mocks, and fakes.”

I’ve been in total violation of this principle, that “it’s important to distinguish between the different types of test doubles” and have totally been one of those people who commonly refers to all test doubles as mocks. Maybe it’s because I’ve been working with the same colleagues for several years and we’ve come to an established lingo, but I certainly haven’t felt like something was missing by incorrectly using the term “mock.”

Types of Test Doubles Defined

Mock: An object written to verify that certain methods are called or not called.

Fake: A piece of code that can be swapped in to production code to provide an alternate, more reliable or faster implementation to be used from your tests.

Stub: A dumb object hard coded to return a specific result or value.

Working to get better

I’m definitely going to make an effort to correct my use of terminology, if only to just learn for myself. I’ll try to say “Let’s create a fake!” rather than “Let’s create a mock!” when I really mean a fake. Happy cleaning.

Implicitly Unwrapped Optionals and IBOutlets

Today I got burned by Xcode. It’s happened before and I’m sure it will happen again. I really do appreciate the help that you give me Xcode, but why are you such an enabler?

Implicitly Unwrapped Optionals as an IBOutlet goes BOOM The long story short: a tester noticed a crash in my app that ended up being due to the fact that Xcode’s Assistant Editor

helped me to create an implicitly unwrapped optional IBOutlet that ended up being nil in tester’s flow. When you try to access a nil implicitly unwrapped optional, your app goes BOOM (aka crash).

What went wrong My incorrect assumption was that the

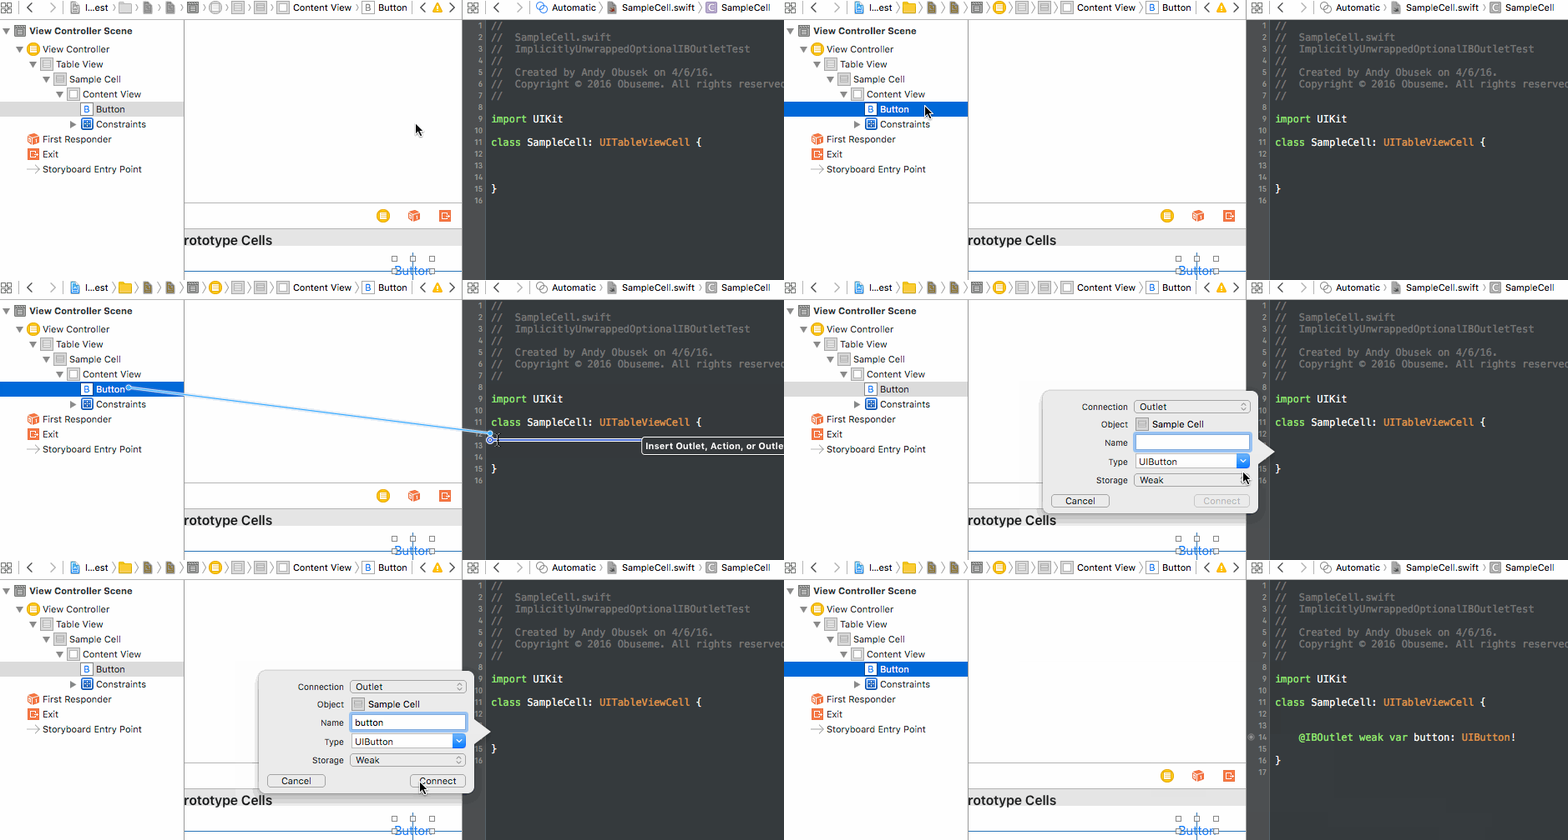
IBOutlet would never be nil. Turns out that isn’t a safe assumption. In my case, it was a slightly complicated UITableView where one cell was attempting an operation on another cell that was off the screen. While the UITableView was able to find the destination cell in question, that cell’s IBOutlets weren’t alive at that moment, aka they were nil. So why I tried to access them directly, without concern for their ability to be nil, an error results. Where Xcode steered me wrong, was in how it automatically created the IBOutlet for me. Take a look at this: implicitly unwrapped optionals When the Assistant Editor creates the corresponding variable, it’s defined as an implicitly unwrapped optional. In my opinion this is bad, and the root cause of this error. I would never think to write an automated test to verify flows in the code around those being nil – well I will going forward. And in my opinion, totally enables me the developer to go on thinking that I never need to worry about IBOutlets being nil. Since Apple built Xcode to do this, it’s like the a complicit in my crime of not worrying about whether my IBOutlet was nil or not.

The Fix

It’s a pretty easy fix, but one that’s easy to overlook. First, take a look at this risky code:

class SampleCell: UITableViewCell {

  @IBOutlet weak var button: UIButton!

  func styleCellWith(color: UIColor) {
    button.setTitleColor(color, forState: .Normal)
  }
}

It’s well within the rules of the Swift compiler to write that code. And in fact, Xcode even points you in the direction of writing this code. The bad part is that since

button is an implicitly unwrapped optional, that means any reference to it with a ? mark means that if it’s nil, your app will crash. If you don’t believe me, try setting it to nil right before the title color is set, and try to run an app. There’s a couple safer ways to do this. Any of these work:

@IBOutlet weak var button: UIButton?

Defining

button in this way will force you to explicitly treat the optional everywhere you use it. While it’s more verbose, I kind of like this technique because I think this is the essence of where Swift excels – it forces you to be a little more defensive or explicit with handling “anything that could go wrong.”

Writing a test for it My big gripe with this is that Xcode makes it so easy to write the faulty code based on how the Assistant Editor guides you to create the

IBOutlet in code. If I’m following my normal Test Driven Development flow, I’d never think to write a test first to verify that an IBOutlet was not nil. But of course, now that someone actually found the bug in my code, I need to add a test to ensure that this specific case doesn’t actually happen again. Luckily, it’s pretty easy:

class SampleCellTests: XCTestCase {

  func testStyleCellWith_DoesNotCrash_WhenButtonIsNil() {
    let toTest = SampleCell()
    toTest.styleCellWith(UIColor.blueColor())
    // No need to do an assert here , as long as the test doesn't crash, it will be marked passed
  }

}

Just setup the object with the

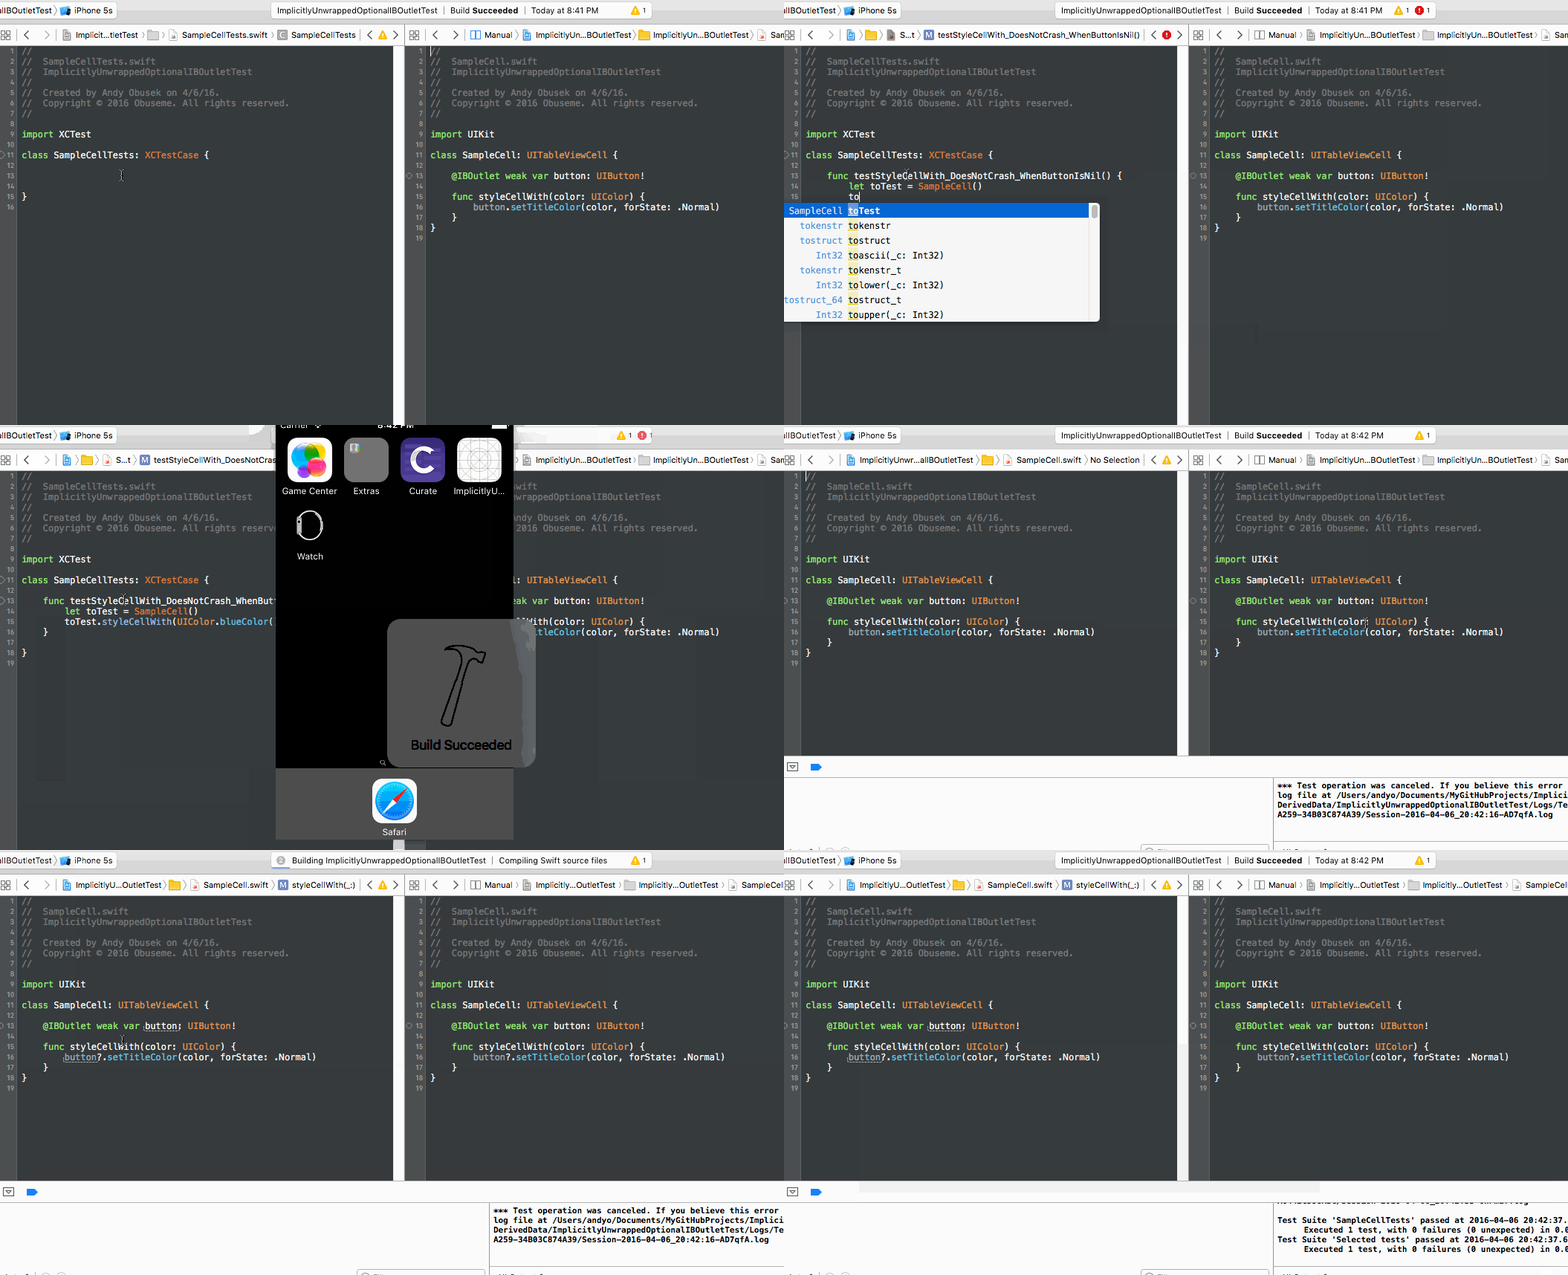
IBOutlet, call the method under test. No need for an assertion, as long as the test doesn’t crash, we can consider that a pass. Here’s a pseudo screencast of my test driven development flow for fixing this bug and adding a test: implicitly unwrapped optionals

Beat Xcode to Submission! Well not really, in fact, you should totally try to work

with Xcode. It’s important to be aware of it’s shortcomings though, and I totally got burned today! Luckily I had an awesome tester discover that there are cases when you can’t totally trust an IBOutlet to exist, despite connecting it right from the storyboard. In case you want to try out the sample code, I posted it on Github. Check it out here. You can read more about implicitly unwrapped optionals in Apple’s documentation here.