“What’s New In Swift” WWDC Session Highlights

I just finished watching What’s New in Swift from WWDC 2016 and wanted to pass on the highlights for you. “What’s New in Swift” is great session that I highly recommend you also watch for yourself. There are a couple things that jump out at me that I feel are worth writing about.

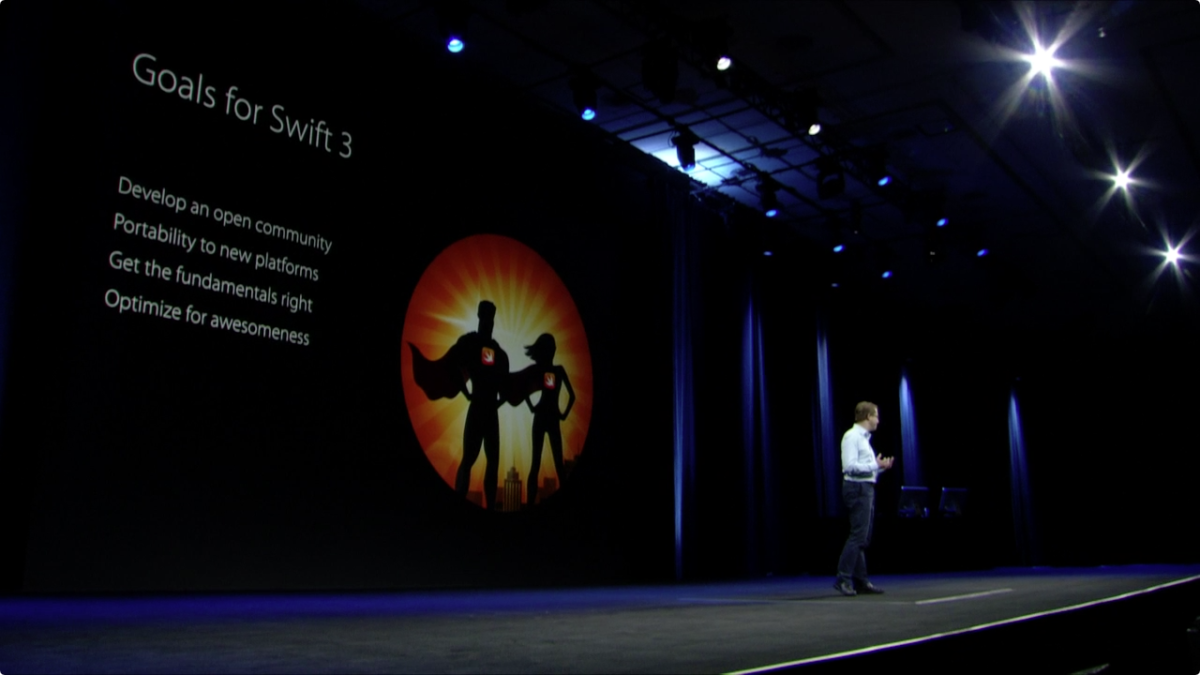
Goals For Swift 3

Unless you’re hiding under a rock, you’ll know that the big news in Swift is the upcoming release of Swift 3. This presentation kicks off immediately covering the goals for Swift 3:

  • Develop an open community
  • Portability to new platforms
  • Get core fundamentals into shape
  • Optimize Swift for awesomeness

Granted some of these are a little “soft” and not well defined, I really like the first goal. On stage, Apple did not hold back in describing that Swift 3 will be the result of total community involvement with the languages evolution – which is exactly the desired intention. This totally hits home for me. Even though I haven’t been an active participant in the language’s evolution, I’m a firm believer that the open source software model leads to better software, and for something as critical as the language that I could be using for the foreseeable future, I’m happy that it’s being evolved in such an open model.

Swift Adoption at Apple

This might be one of the first times that I’ve seen or heard Apple formally recognize and describe major uses of Swift internally in their own development. It was surprisingly extensive, and refreshing to hear them actually admit to it. Swift has been out almost two years now, and for me, one of the signs I’ve been looking for to represent Swift’s maturity is precisely this: Apple’s adoption of the language in their own products, and they finally hit the nail on the head for me. Here are some highlights:

Apple Products With Lots Of Swift

  • New Music app for iOS
  • Console app in Sierra
  • Dock app
  • Picture in Picture in Sierra (actually 100% Swift)
  • New documentation viewer in Xcode (actually 100% Swift)
  • Swift Playgrounds for iOS (actually 100% Swift)

The presenter then went on to talk further about the Dock with some really revealing information. Internally, there’s actually a lot of stuff I consider general “OS functionality” that Apple actually classifies as the Dock app. Can you believe all this is included in the Dock codebase?

  • Dock bar at the bottom
  • Mission Control
  • Command-Tab Application Switcher
  • Stacks
  • LaunchPad
  • Spaces
  • Dashboard
  • Some of Notification System

What’s interesting about the Dock app is that a significant amount of Swift code was written for it in the El Capitan release, 10s of thousand lines of Swift code out of a total of 200k lines of code total. This is interesting because it represents a case study of a non-trivial amount of code that will be migrated from Swift 2.2 to Swift 3.0, and Apple did just this. The migration resulted with about 15% less actual code! Not to mention that the engineers like the safety features of Swift as well as the more articulate code.

How To Contribute To Swift

Have you seen swift.org yet? It’s the home of Swift on the web, besides the actual repositories on GitHub. There is a ton of information on the site about everything from migrating to Swift 3, to information on how to get started with contributing to the language. It’s a lot to digest. During this WWDC session, What’s New in Swift, an extremely simple outline was provided what contributing to the Swift language looks like:

  1. Socialize your idea idea on the mailing list.
  2. Once critical mass is achieved, the idea becomes a formal proposal on GitHub.
  3. Formal review of the proposal happens once the pull request for the proposal merges into the repository. Formal review happens on the mailing list, out in the open.
  4. Core team arbitrates a decision. The rationale for the decision is always documented, regardless of whether the proposal was accepted or rejected.

All proposals, past and present, can be found in the swift-evolution repository.

Swift 3 Source Compatibility

The #1 goal for Swift 3, according to Chris Lattner, is API compatibility. This is no small task though, because decisions now will affect developers for years to come since the API will become stable. As a result, naming guidelines are carefully considered and many tweaks are made as a result. Swift 3 APIs should:

  • Strive for clarity, not terseness or verbosity
  • Capture essential information
  • Omit redundant info/boilerplate

A direct result of this is the libdispatch renaming that I wrote about a couple weeks ago. Additionally, one of the weirdest and hardest things to get used to in Objective-C for me (a prior Java developer) was it’s incredible verbosity for the sake of verbosity. Chris Latter provides a bunch of examples on stage of this new clarity, and I’m loving it.

Here’s two such examples:

array.insert(1, atIndex: 0)

becomes

array.insert(1, at: 0)

and

if url.fileURL {}

becomes

if url.isFileURL {}

I can’t wait.

There is a lot more information in this session, “What’s New in Swift”, especially some in-depth discussion of improvements and cleaning-up of Swift 3 syntax, as well as some information on tool improvements when using Swift.

One of the closing statements of “What’s New in Swift” recognized that Swift 2.3 will be a total interim step towards Swift 3, most notably, Apple recommends getting Swift 3 migration into your project plans. And certain tools like the Swift Playgrounds iOS app and the Thread Sanitizer already require Swift 3. Luckily Xcode 8 comes with a nifty converter.

Did you watch this session, “What’s new in Swift”? If so, what are your impressions?

Happy cleaning.

Swift Algorithm Club

I caught an article today on raywenderlich.com that pointed me to the Swift Algorithm Club. I had heard of the Swift Algorithm Club a couple times in the past, but never got the chance to take a peak. Today, I got that chance, and what I saw was really cool. Algorithms classes during my education were some of the most challenging, yet fulfilling classes that I took. Being able to dissect or create a complicated algorithm is a unique feeling. Something that I don’t think I’ve flexed enough since being out of school.

Big Oh

I really like how the Swift Algorithm Club has frequent references to Big-Oh notation, eg O(n). In particular, it’s so easy to get caught up in the high level APIs that we are often using when building our iOS apps, that it’s easy to lose focus on the basics of algorithm effectiveness and efficiency. Being able to spot an optimization to move from quadratic (O(n^2)) to linear (O(n) to even constant (O(1)) efficiency can have vast performance improvements in everything from network usage, to battery usage, to simple responsiveness of your app. One drawback, is that with the ease of learning how to “code iPhone apps” from the vast amount of tutorials out there, often these course cover nothing about algorithmic efficiency. So if all this is new to you, go do some Googling. Here’s a recorded course from MIT.

Go Contribute

I also appreciate how the article also puts an offer out recruiting contributors. I think for newcomers to the field, finding a project to be able to contribute to, or even just know how to contribute, can be daunting. It was nice that the article made some pointers on how to get started.

Wrap Up

Open source, and algorithms, how can you get any better? The Swift Algorithm Club is awesome. Take a look, and I’d love to know, do you consider Big-Oh efficiency when building your apps?

Happy cleaning.

Swift OOP Patterns and Principles

I’m always fascinated how to best apply the intersection of object oriented programming (OOP) and functional programming that is made available in Swift. Having come from a Java background, I’m much more inclined to flex my object oriented skills when a problem arises. I came across two great GitHub repos today from the same author, Oktawian Chojnacki. These repos are actually more of a reference than an open source code base. Oktawian created one repo that shows Swift OOP Patterns, and another for Swift OOP Principles. I actually had my own failed attempt at documenting Swift OOP Patterns here. I’m just including that for laughs as I abandoned the project, but it’s good to know that the idea was relevant and it’s exciting to come across someone else who was able to successfully execute it. I’ll definitely be starring and bookmarking these projects from Oktawian for future reference. And what’s even cooler about these pages and playgrounds is that Oktawian actually links out to more formal definition and further reading about each principle and pattern. It’s great having all this documentation consolidated within one easy to reference resource.

The Swift Patterns and Principles

I know I need to develop those functional programming muscles, but it’s too exciting not to pass along cool resources for Swift OOP patterns and principles when I find them. How are you making out with your balance of OOP and functional paradigms in your Swift? Do you have any similar resources for getting up to speed or improving your functional programming toolset? If so, you absolutely must send them to me, because I’m looking for anything and everything available on that topic.

6 days until WWDC 2016… The countdown continues.

Until next time, happy cleaning.

iOS Environment Configuration

Many Environments To Manage

Have you ever worked on an iOS app that needed multiple environments to support it through development? I have. For me, almost every app I have ever worked on has had some sort of web based API supporting the app. And for these apps, I’ve tried a variety of techniques to consolidate and improve how I manage the urls for these web APIs across different test infrastructures. This kind of iOS environment configuration can become tricky. For example, at one place I worked, we had the following “test environments” or different web backends intermingled throughout the release pipeline:

  • Local (url of localhost, sometimes an IP address_
  • DEV (Development testing)
  • INT (Integration testing)
  • SAT (Systems acceptance testing)
  • PERF (Performance testing)
  • CAT (Client Acceptance Testing)
  • Pilot (Alternate Production servers – including different urls for each node behind the F5 load balancer)
  • Production (including different urls for each node behind the F5 load balancer)

This amounts to more than 10 different environments that I would need to provide builds for various testers throughout the development cycle.

Summary Of Options

Needless to say, 10 environments is a lot and need to be managed somehow. I was thinking of writing up each technique I’ve tried, but then I came across a useful article on “The App Business” blog, titled “A robust multi-environment build setup.” that clearly describes a couple of the most popular ways to do this.

Automating It

iOS environment configuration

The majority of “The App Business” blog article recognizes some manual ways to manage your builds and the environments they are configured to connect to, including other iOS environment configuration. Later in the article though, “The App Business” goes a further extra mile by announcing an actual tool they created to help accomplish this, it’s called configen. configen takes a configuration file, and actually generates a Swift class to help manage selecting environments during build configurations.

Schemes Aren’t Bad

One qualm I have with the article. Using separate Xcode Schemes for different environment variables is a useful way to help separate our your iOS environment configuration. One thing I like about using separate Schemes that the article doesn’t mention, is that non-developer-types, like product managers or designers, may feel comfortable knowing where the dropdown is in Xcode to build for a separate scheme, while they may not feel comfortable having to modify code or run schemes to change environment options.

iOS environment configuration

User Controlled

One thing I would have liked configen to take farther is the ability for the end user of the app to be able to change the environment variables and other iOS environment configuration used for a given session of the app. I’ve seen this done several ways, but none that I’m happy with. The last time I did it, I actually coded my own interface for the user to select which environment to use. I wasn’t happy with how intertwined the resulting user interface code was the rest of my code base, there wasn’t good decoupling. Ideally, there’s a third party package, that can be modularly loaded, such that it is a drop-in solution.

Getting More Clean

What’s on your wish list for iOS environment configuration? What aren’t I thinking of? How have you fared? I’d love to hear.

Happy cleaning.

Philly CocoaHeads Testing Talk – Where to Go From Here

I want to thank Philly CocoaHeads for an awesome opportunity to spread the word on automated iOS testing. I’m happy with how the presentation turned out, it was a great audience, and there was some really insightful conversation throughout the night. It turns out, the presentation was recorded and will be hosted online for anyone to watch. As soon as it’s up, I’ll link to it here and share it with you all.

If you’re looking to get more information about automated testing outside of this site, here’s some useful resources:

Tools Mentioned

  • XCTest – Apple’s main test framework, that is the foundation of unit tests, and a lot of other test tools.
  • Xcode UI Tests – WWDC 2015 video introducing the revamped UI testing framework from Apple.
  • OCMock – If you’re testing Objective-C code and need to write mocks, THIS IS AWESOME. Unfortunately, doesn’t totally work with Swift.
  • KIF – What I’m currently using for UI tests.
  • FBSnapshotTestCase – Use it for your snapshot tests.
  • Your Fingers – Useful for manual testing.
  • Fabric – Useful for a lot of stuff, including beta distribution, crash reporting, and app analytics
  • OHHTTPStubsCorey Floyd’s suggestion for stubbing network requests
  • NocillaCorey Floyd’s other sugggestion for stubbing network requests
  • ChairsCurtis Herbert’s suggestion for setting up the simulator with preset data for testing
  • Martin Fowler’s Test Pyramid – Not a tool, but the original documentation.
  • AWeber – The company I work for.

Sample Project

The project I used tonight represents a bare bones project configured with 4 targets. The main target, a target for unit testing, a target for KIF testing (UI/Functional tests), and a target for FBSnapshotTestCase testing. I used Carthage to setup the dependencies.

If you’re looking for the project, you can find it on my GitHub at: https://github.com/obuseme/CocoaHeadsTestingPresentation.

Other Resources

PS – Did you know where the term “Where to Go From Here” comes from? Every tutorial on raywenderlich.com closes with a section of the same title. I found it fitting to use here (almost as a tribute). :]

Happy Cleaning.

Computed Property Stubs: Easy to Create in Swift

Using mock objects is an easy way to increase your test coverage in any code base, especially with a technique I use that I coined, “computed property stubs”. For years, in the Objective-C that powered my iOS applications, I used the hell out of OCMock. I even wrote a couple articles on it. As much as I used OCMock, I definitely had a love hate relationship with it. In one way, it totally enables a test driven development workflow in a UIKit driven codebase. On the other hand, sometimes you end up writing super nitpicky tests that end up verifying each line of code, rather than overall behavior in an application. At the end of the day though, I think I do sleep better knowing that I had the test coverage (it’s kind of like eating your vegetables).

It was disappointing to learn that OCMock would not work with Swift, nor is it even possible to create a mock framework in the nature of OCMock in Swift. Read this article for more information about why OCMock won’t work with Swift. Fortunately, there’s a couple different ways that you can actually write your own mock objects in Swift. Notice, I’m proposing that you can write your own mock objects, on a case by case basis, NOT write an entire dynamic mocking framework like OCMock.

There’s two primary uses for a mock object:

  1. Stubbing a value – creating a “fake” object that behaves in a specific and predictable way that enables testing of other code.
  2. Verifying that an expected method is called with the correct parameters.

Eli Perkins wrote a great article where he covered some techniques on how to use protocols in Swift to do the later – verify that an expected method is called with the correct parameters.

In this article, I’ll show you how to do #1, create computed property stubs to return values using Swift.

Why Stub?

You might first be wondering, why stub anything in the first place? Well, let me show you through example. Consider the following super simple UIViewController:

class ViewController: UIViewController {
  @IBOutlet weak var aLabel: UILabel!
  @IBOutlet weak var aTextField: UITextField!

  @IBAction func changeLabelFromTextField(sender: AnyObject) {
    aLabel.text = "Hi " + aTextField.text!
  }
}

How would you write a unit test for changeLabelFromTextField? In my mind, I’d write a test that initializes a value in aTextField, then calls changeLabelFromTextField and then verifies that the resulting text in aLabel is correct. On the surface, that’s a great test that achieves 100% coverage on this piece of code.

Something like this:

func testChangeLabelFromTextField_ActuallySetsLabel() {
  let toTest = ViewController()
  toTest.aTextField = UITextField()
  toTest.aLabel = UILabel()

  toTest.aTextField.text = "Andy"
  toTest.aLabel.text = ""

  toTest.changeLabelFromTextField(UIButton())

  XCTAssertEqual("Hi Andy", toTest.aLabel)
}

There’s one problem, those pesky weak properties in ViewController.

Since ViewController only has weak ownership of those IBOutlets, that means you are going to have a problem when you try to set an actual instance of an object on the property – it will immediately be “released” and the property will go back to being nil.

If you don’t believe me, here’s a Playground for proof:

computed property stubs

OCMock made this easy

Back in the good ole days of using OCMock, it would have been easy to create a mock and stub those properties out.

ViewController *toTest = [[ViewController alloc] init];
id mockVC = [OCMockObject partialMockForObject:toTest];
[[[mockVC stub] andReturn:[[UILabel alloc] init]] aLabel];

Computed Property Stubs Are Also Easy

In order to stub these properties out in Swift, it isn’t that hard either. You just have to manually create your mock and specify what is to be stubbed, in a technique I call, “computed property stubs”, like this:

class MockViewController: ViewController {
  let stubbedLabel: UILabel! = UILabel()
  let stubbedTextField: UITextField! = UITextField()

  override var aLabel: UILabel! {
    get {
      return stubbedLabel
    }
    set {
      // Nothing to do here
    }
  }

  override var aTextField: UITextField! {
    get {
      return stubbedTextField
    }
    set {
      // Nothing to do here
    }
  }
}

Basically, you just create a subclass of the class that you want to mock, and then override the weak properties with a custom getter that allows you to return an actual hard instance of an object. It’s even okay to create one of these mocks for an object under test, just don’t get your wires crossed and accidentally mock or stub behavior that you actually want to verify (test driven development, and fail first FTW here).

Now, make sure that in the test, you instantiate the mock and use that, rather than the base class.

Again, for proof, here’s a playground where you can see that by using the mock, you can actually get the object-under-test’s weak properties to behave:

computed property stubs

Not the only way to test this

One could argue that testing behavior and values of UIKit driven properties like labels and text fields is something better left to black box based testing tools like Xcode UI Tests or KIF. I would agree with you. And I would add on that redundant coverage is even better! Which is why I usually end up writing both my unit tests to verify this behavior, and then complement that with a more UI oriented test to verify it from an end user perspective. Plus, there’s plenty of other times where you might be using weak properties that aren’t part of a user interface.

You can find the Swift playground that I referenced in this article in my GitHub at: https://github.com/obuseme/PlaygroundWithSwiftMocks

Thank You

A big thanks to Jon Reid for inspiring me to come up with this approach. I credit his talk on Test Driven Development for iOS at MCE 2014 for giving me the push to try mocking on my own without a framework.

Happy Cleaning!

Test Double – A generic term defined

“I’ll just a mock for that!” I can’t tell you the number of times that I’ve said that when I really meant a “stub” or a “fake” or a “partial mock” because it’s been so many. In her talk on “Real World Mock Objects in Swift” I heard Veronica Ray use a term that was new to me: “test double.”

What is a Test Double

According to Testing on the Toilet at Google: “A test double is an object that can stand in for a real object in a test, similar to how a stunt double stands in for an actor in a movie. These are sometimes all commonly referred to as “mocks”, but it’s important to distinguish between the different types of test doubles since they all have different uses. The most common types of test doubles are stubs, mocks, and fakes.”

I’ve been in total violation of this principle, that “it’s important to distinguish between the different types of test doubles” and have totally been one of those people who commonly refers to all test doubles as mocks. Maybe it’s because I’ve been working with the same colleagues for several years and we’ve come to an established lingo, but I certainly haven’t felt like something was missing by incorrectly using the term “mock.”

Types of Test Doubles Defined

Mock: An object written to verify that certain methods are called or not called.

Fake: A piece of code that can be swapped in to production code to provide an alternate, more reliable or faster implementation to be used from your tests.

Stub: A dumb object hard coded to return a specific result or value.

Working to get better

I’m definitely going to make an effort to correct my use of terminology, if only to just learn for myself. I’ll try to say “Let’s create a fake!” rather than “Let’s create a mock!” when I really mean a fake. Happy cleaning.