
Using mock objects is an easy way to increase your test coverage in any code base, especially with a technique I use that I coined, “computed property stubs”. For years, in the Objective-C that powered my iOS applications, I used the hell out of OCMock. I even wrote a couple articles on it. As much as I used OCMock, I definitely had a love hate relationship with it. In one way, it totally enables a test driven development workflow in a UIKit driven codebase. On the other hand, sometimes you end up writing super nitpicky tests that end up verifying each line of code, rather than overall behavior in an application. At the end of the day though, I think I do sleep better knowing that I had the test coverage (it’s kind of like eating your vegetables).
It was disappointing to learn that OCMock would not work with Swift, nor is it even possible to create a mock framework in the nature of OCMock in Swift. Read this article for more information about why OCMock won’t work with Swift. Fortunately, there’s a couple different ways that you can actually write your own mock objects in Swift. Notice, I’m proposing that you can write your own mock objects, on a case by case basis, NOT write an entire dynamic mocking framework like OCMock.
There’s two primary uses for a mock object:
- Stubbing a value – creating a “fake” object that behaves in a specific and predictable way that enables testing of other code.
- Verifying that an expected method is called with the correct parameters.
Eli Perkins wrote a great article where he covered some techniques on how to use protocols in Swift to do the later – verify that an expected method is called with the correct parameters.
In this article, I’ll show you how to do #1, create computed property stubs to return values using Swift.
Why Stub?
You might first be wondering, why stub anything in the first place? Well, let me show you through example. Consider the following super simple UIViewController:
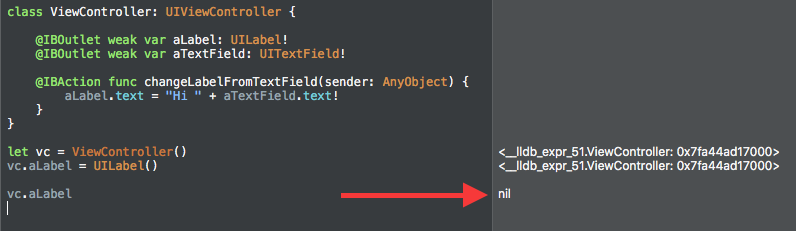
class ViewController: UIViewController {
  @IBOutlet weak var aLabel: UILabel!
  @IBOutlet weak var aTextField: UITextField!

  @IBAction func changeLabelFromTextField(sender: AnyObject) {
    aLabel.text = "Hi " + aTextField.text!
  }
}
How would you write a unit test for changeLabelFromTextField? In my mind, I’d write a test that initializes a value in aTextField, then calls changeLabelFromTextField and then verifies that the resulting text in aLabel is correct. On the surface, that’s a great test that achieves 100% coverage on this piece of code.
Something like this:
func testChangeLabelFromTextField_ActuallySetsLabel() {
  let toTest = ViewController()
  toTest.aTextField = UITextField()
  toTest.aLabel = UILabel()

  toTest.aTextField.text = "Andy"
  toTest.aLabel.text = ""

  toTest.changeLabelFromTextField(UIButton())

  XCTAssertEqual("Hi Andy", toTest.aLabel)
}
There’s one problem, those pesky weak properties in ViewController.
Since ViewController only has weak ownership of those IBOutlets, that means you are going to have a problem when you try to set an actual instance of an object on the property – it will immediately be “released” and the property will go back to being nil.
If you don’t believe me, here’s a Playground for proof:
OCMock made this easy
Back in the good ole days of using OCMock, it would have been easy to create a mock and stub those properties out.
ViewController *toTest = [[ViewController alloc] init];
id mockVC = [OCMockObject partialMockForObject:toTest];
[[[mockVC stub] andReturn:[[UILabel alloc] init]] aLabel];
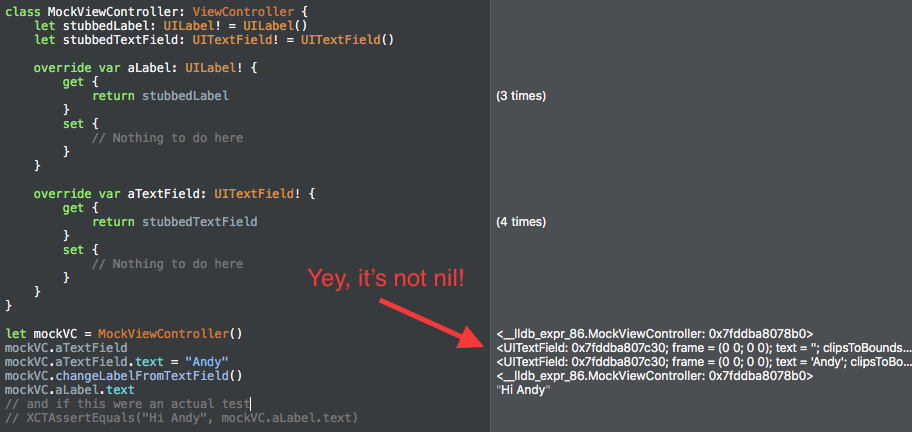
Computed Property Stubs Are Also Easy
In order to stub these properties out in Swift, it isn’t that hard either. You just have to manually create your mock and specify what is to be stubbed, in a technique I call, “computed property stubs”, like this:
class MockViewController: ViewController {
  let stubbedLabel: UILabel! = UILabel()
  let stubbedTextField: UITextField! = UITextField()

  override var aLabel: UILabel! {
    get {
      return stubbedLabel
    }
    set {
      // Nothing to do here
    }
  }

  override var aTextField: UITextField! {
    get {
      return stubbedTextField
    }
    set {
      // Nothing to do here
    }
  }
}
Basically, you just create a subclass of the class that you want to mock, and then override the weak properties with a custom getter that allows you to return an actual hard instance of an object. It’s even okay to create one of these mocks for an object under test, just don’t get your wires crossed and accidentally mock or stub behavior that you actually want to verify (test driven development, and fail first FTW here).
Now, make sure that in the test, you instantiate the mock and use that, rather than the base class.
Again, for proof, here’s a playground where you can see that by using the mock, you can actually get the object-under-test’s weak properties to behave:
Not the only way to test this
One could argue that testing behavior and values of UIKit driven properties like labels and text fields is something better left to black box based testing tools like Xcode UI Tests or KIF. I would agree with you. And I would add on that redundant coverage is even better! Which is why I usually end up writing both my unit tests to verify this behavior, and then complement that with a more UI oriented test to verify it from an end user perspective. Plus, there’s plenty of other times where you might be using weak properties that aren’t part of a user interface.
You can find the Swift playground that I referenced in this article in my GitHub at: https://github.com/obuseme/PlaygroundWithSwiftMocks
Thank You
A big thanks to Jon Reid for inspiring me to come up with this approach. I credit his talk on Test Driven Development for iOS at MCE 2014 for giving me the push to try mocking on my own without a framework.
Happy Cleaning!