If I haven’t driven it home yet this week, I love KIF for writing functional iOS tests. I want to cultivate that love in you as well, so here’s a walkthrough on installing KIF with CocoaPods for Swift Apps. Installation of KIF isn’t totally straightforward for Swift apps, I walk you through some of the finer points of installation with CocoaPods basics for getting up and running with KIF.
To help you get started with KIF, I created a demo project with the basic application code for which you’ll be able to write the functional tests. You can find it on GitHub at: https://github.com/obuseme/KIFDemoApp or download in a zip file here. We’ll use this project for the rest of the week as I go deeper and deeper into the capabilities of KIF with the next couple posts.
Installation
I recommend installing KIF with CocoaPods for Swift apps. Ensure you have CocoaPods 1.0 installed, I specifically used 1.0.0.beta.8 when writing this up. First start by creating a new target that will be dedicated for your functional tests. Open KIFDemoApp.xcodeproj in Xcode. Then, in Xcode, select File -> New -> Target…. Select iOS -> Test -> iOS Unit Testing Bundle. Name it “KIFDemoAppFunctionalTests”.
Next, create a new text file in the root of the demo project called Podfile. Add this text to it:
source 'https://github.com/CocoaPods/Specs.git'
platform :ios, '9.0'

project 'KIFDemoApp'

target :KIFDemoAppFunctionalTests do
        pod 'KIF'
end
This podfile sets up KIF to ONLY be included in the dedicated target, KIFDemoAppFunctionalTests. This is incredibly important because KIF uses private APIs, and if you accidentally include KIF in your main app target that you ship to Apple for review for the App Store, you’ll be rejected.
Then, from the command line, in the root of the project run:
pod install
and you’ll see this output:
KIFDemoApp|master⚡ ⇒ pod install
Analyzing dependencies
Downloading dependencies
Installing KIF (3.4.2)
Generating Pods project
Integrating client project

[!] Please close any current Xcode sessions and use `KIFDemoApp.xcworkspace` for this project from now on.
Sending stats
Pod installation complete! There is 1 dependency from the Podfile and 1 total pod installed.
KIFDemoApp|master⚡ ⇒
Follow the instructions, and close KIFDemoApp.xcodeproj and open KIFDemoApp.xcworkspace. Now KIF is installed in the workspace.
We will be writing our KIF tests in Swift. Since KIF is written in Objective-C, you must include KIF’s header file from a bridging header file in the KIFDemoAppFunctionalTests target.
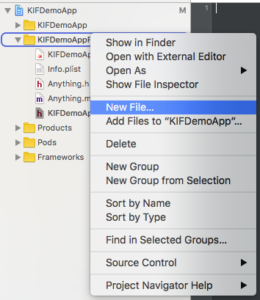
To do this, right-click the group KIFDemoAppFunctionalTests and select New File.
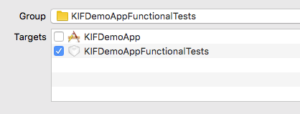
Then select iOS -> Source -> Cocoa Touch Class, Next. Name it anything, literally anything you want but ensure that the Language is specified as Objective-C, we’ll delete it right afterwards, click Next. On the next screen, ensure that only the KIFDemoAppFunctionalTests target is selected:
And click Create.
Select the option in the resulting prompt to “Create Bridging Header.”
You’ll have two Objective-C files created, as well as new file called KIFDemoAppFunctionalTests-Bridging-Header. Delete the two Objective-C files – their only purpose served to help create the bridging header.
You can verify that everything is working now by selecting Product -> Test. Everything should compile, and an empty implementation of KIFDemoAppFunctionalTests should run (and pass).
After installing KIF with CocoaPods for Swift apps, you are all set to create your first KIF test case!
Wrap Up
I hope you found this walkthrough of installing KIF with CocoaPods for Swift apps useful. In case something didn’t work out for you, you can find the final demo project at https://github.com/obuseme/KIFDemoApp/tree/kif-installed or here. Tomorrow, we’ll go through the basics of actually writing some functional tests for the demo app. And Friday, I’m going to share a couple advanced tips and tricks to leverage when writing your KIF test cases. Be sure to check back.
Happy KIF’ing!


Hi. Thanks for your tutorials. Not sure if I missed something in your “Installing KIF with CocoaPods for Swift Apps” tutorial, but it seems like a crucial step is missing (It’s also possible that things have changed, since I’m using Swift 3). I had to add `#import “KIF.h”` to the KIFDemoAppFunctionalTests-Bridging-Header file in order to get everything working in the next tutorial (the step when adding the extensions in the KIF+Swift.swift file).
Thanks