How to Disable Tests in Xcode

It’s easy to disable tests in Xcode, but not entirely obvious. A lot of people give Xcode flack in terms of how far behind other IDEs it is with regard to its support for automated testing. I don’t entirely disagree with this. On the other hand, it’s come so far from just five years ago and I’m thankful for that.

Why Disable Tests

You might be wondering, if I’ve spent all this time writing tests, why would I ever want to disable tests in Xcode? I’m not advocating permanently disabling them, instead, I’m advocating disabling them temporarily to speed up your development or to unblock progress. Just this week, I returned to an old project of mine, one that hasn’t had an app store update in over a year. It still uses CocoaPods version 0.33.0, and Swift 1. Needless to say, it needed some work getting it up to speed. (Side note: I have a lot of ammunition for future blog posts on how to NOT let a project get this stale, but we’ll save those for a future camp fire). First, I needed to get the project to actually compile. Second, I needed to get the tests passing. And finally, I needed to update our continuous integration machines and jobs to also compile and successfully run the tests. I had my work cut out for me.

When working with a project this old, sometimes advanced techniques like TDD aren’t immediately useful if you can’t even get the project to simply compile. When working through compilation errors and test failures at a large scale, it’s useful to selectively turn off a subset of the errors or test failures so you can eliminate noise, focus on a piece of the problem, and make progress. You can easily disable tests in Xcode in two ways: disable compilation, and disable test execution. Both of these are scheme changes. Here’s how:

How To Disable Tests

Disable Tests From Building

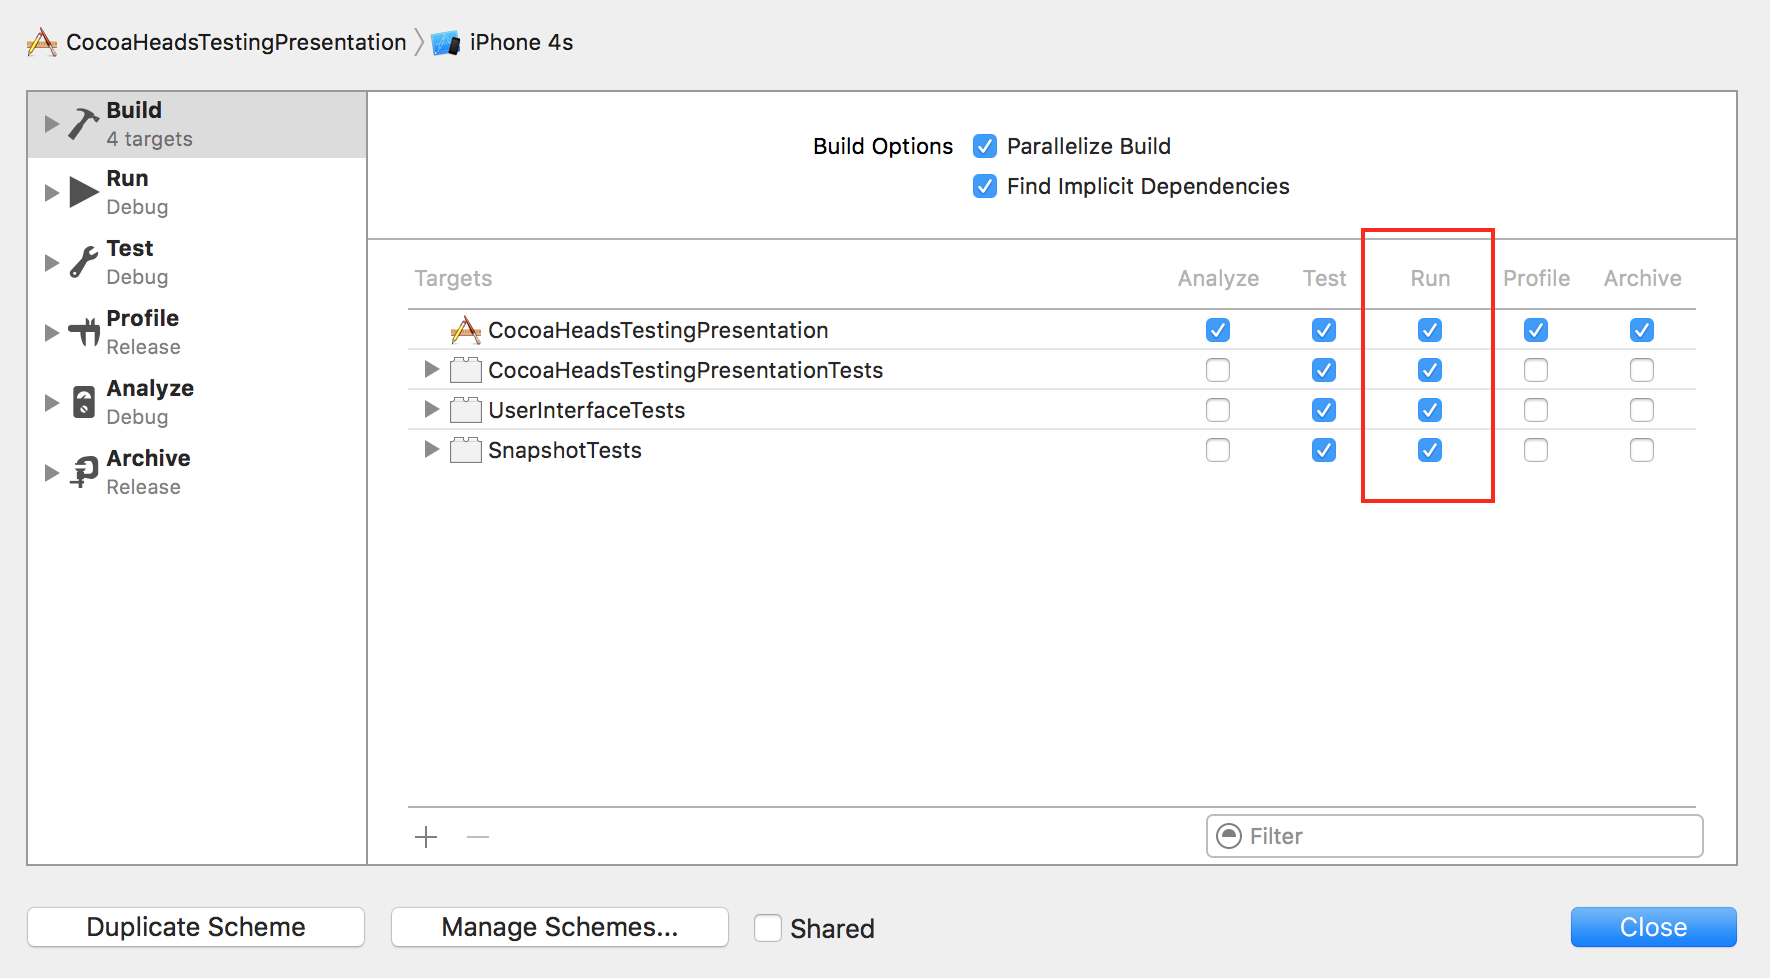
To simply disable all your tests from building, you can do this in the Scheme editor. From the menu bar, select Product -> Scheme -> Edit Scheme.

In the left hand bar, select Build.

Then in the main pane, you can disable tests from compiling for any action in your project. If you’re project is in a really bad state, you can disable tests from compiling when running your application.

disable tests in Xcode

By disabling any of those checkboxes, when you run your application, anything in the associated targets will not be compiled.

Disable Tests From Running

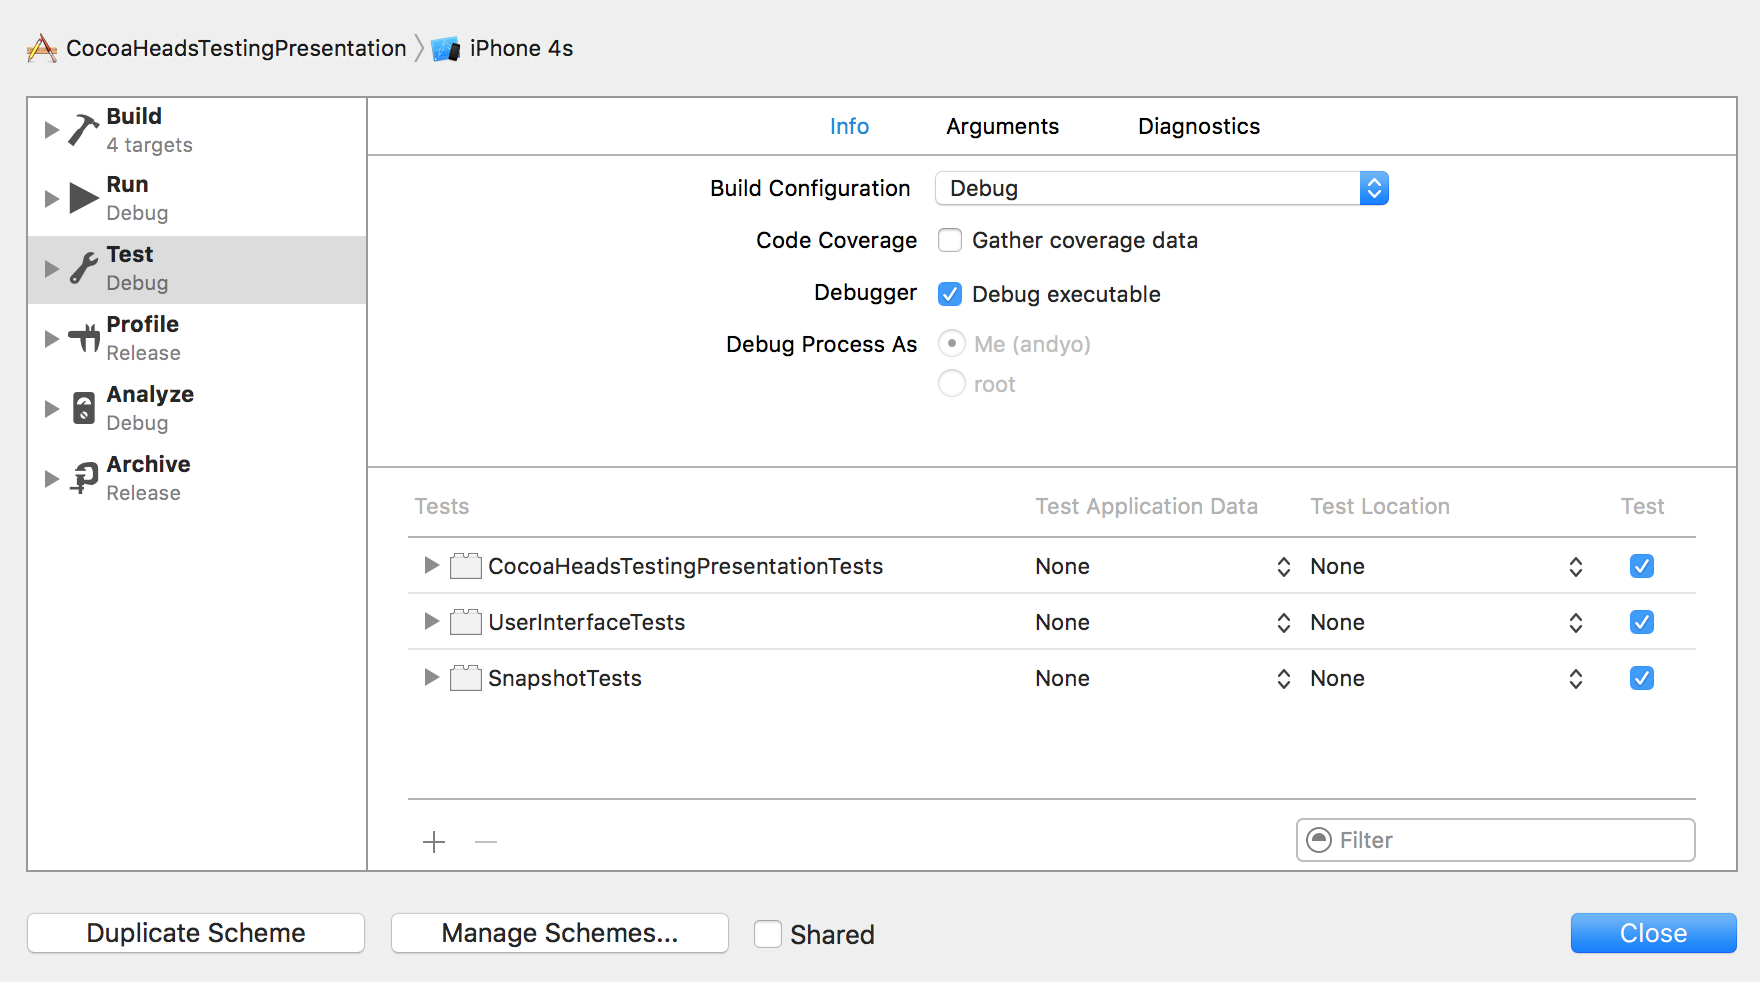
Similarly, you can use the Scheme Editor for selectively turning tests and off. Still in the Scheme Editor, select Test in the left hand bar. Then, in the main pane, you’ll see each target associated with tests. The checkbox will let you enable or disable the tests from being run when you run tests for your project (Command-U, or Product -> Test).

disable tests in Xcode

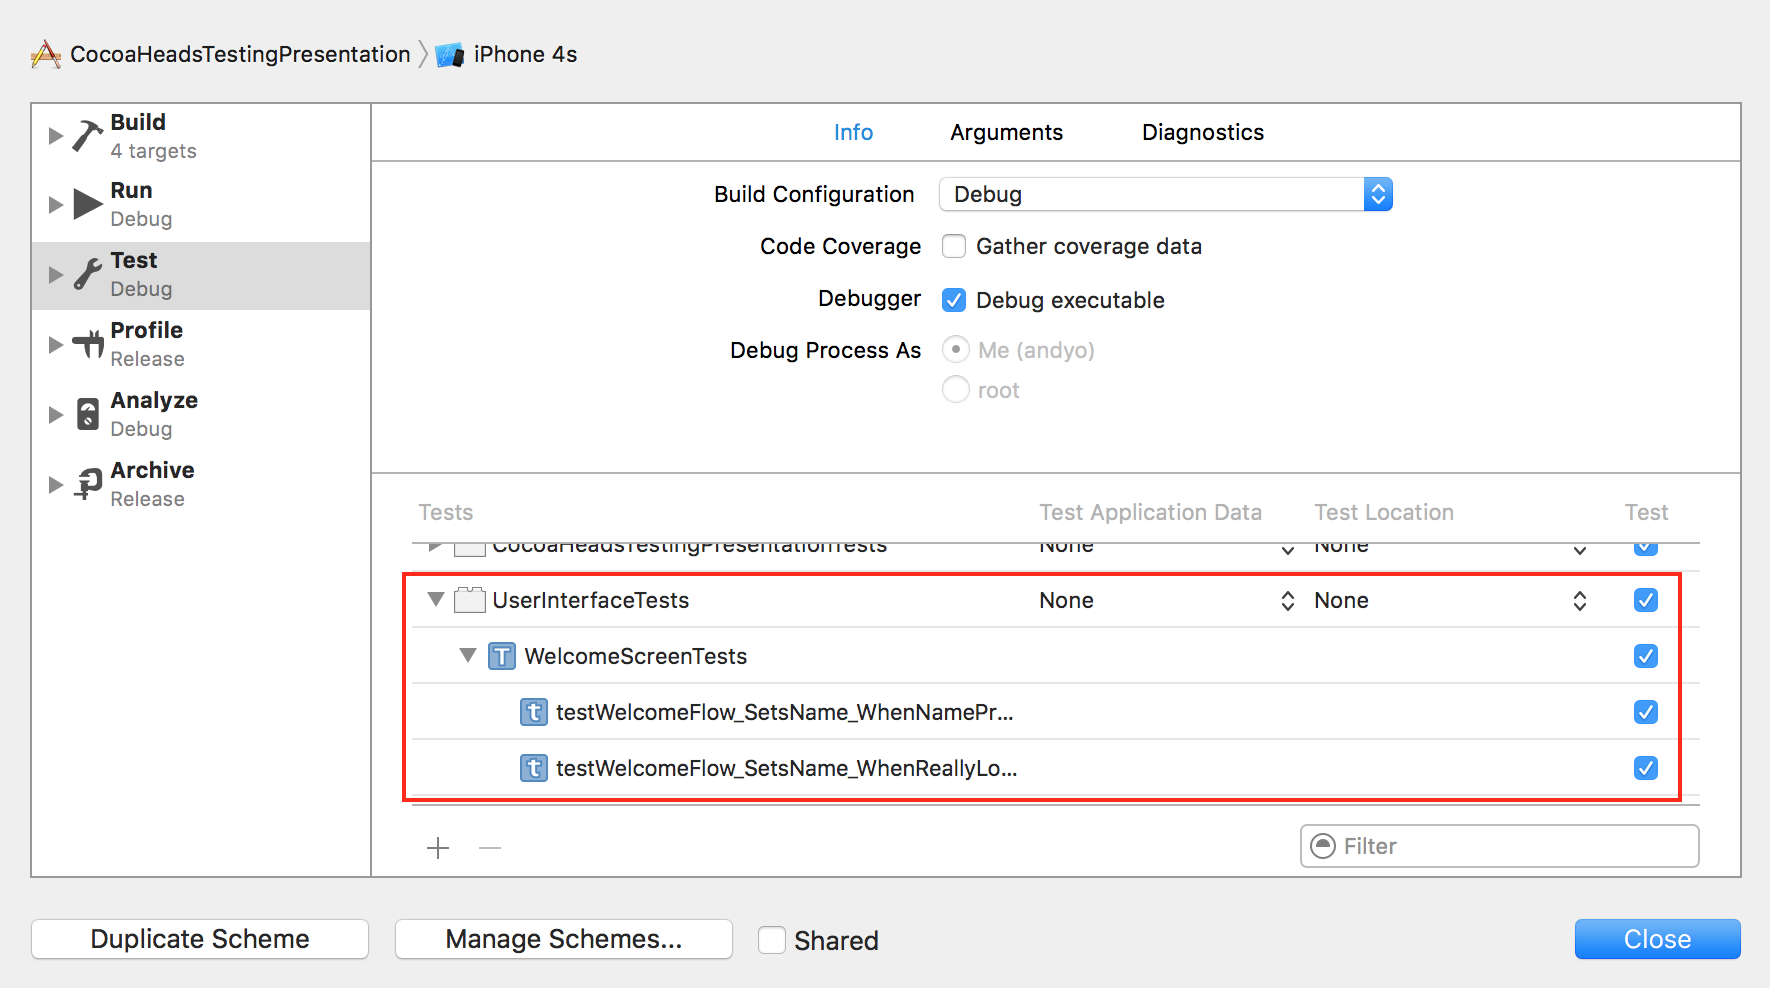
Disabling an entire target may not be as granular as you’d like. In fact, it’s pretty coarse. You can expand any of the targets in that list and see specific test classes, and then selectively enable or disable tests by test class. And if that isn’t granular enough, you can drill one level deeper and then selectively turn tests on or off by test method!

disable tests in Xcode

Give it a try.

xcodebuild in Xcode 8

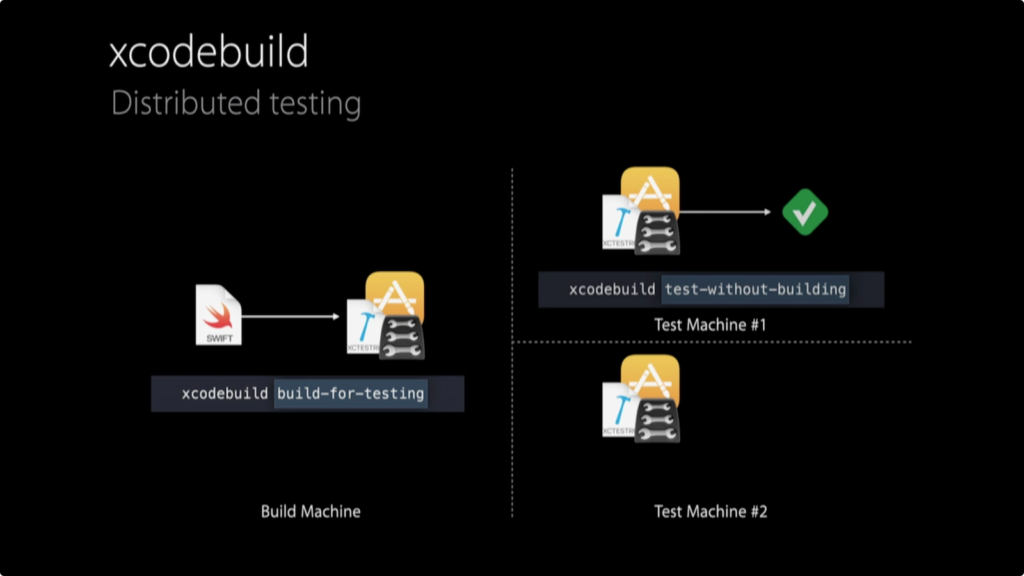
One thing I’m really excited for in Xcode 8 is that xcodebuild, the command line interface for building Xcode projects, was updated with similar functionality. With xcodebuild in Xcode 8 you can selectively pick which tests are built and executed. The use case is a little different for this tool. xcodebuild is often used as part of a continuous integration setup. With the new changes, you no longer need to compile tests to run them. xcodebuild will be able to run tests previously compiled. This means that you can compile your app and tests on one machine, and then distribute the load of testing it across other machines!

disable tests in Xcode

To build you app for testing, but not actually run the tests:

xcodebuild build-for-testing -workspace <path>
                             -scheme <name>
                             -destination <specifier>

Then you can use the produced bundle on different machines to run the tests without compiling! Combine that with the following steps for selectively running tests, and you’ll be able to distribute the execution of your test suite across different machines, in parallel!

To selectively specify which tests to run for xcodebuild:

xcodebuild test -workspace <path>
                -scheme <name>
                -destination <specifier>
                -only-testing:TestBundleA/TestSuiteA/TestCaseA
                -only-testing:TestBundleB/TestSuiteB
                -only-testing:TestBundleC

You can also specify tests to be skipped:

xcodebuild test -workspace <path>
                -scheme <name>
                -destination <specifier>
                -skip-testing:TestBundleA/TestSuiteA/TestCaseA

Don’t Abuse It

With great power comes great responsibility. Please don’t disable tests in Xcode, either from running or compiling, and leave it that way. That’s like driving without a seatbelt. Only do it if you are working in effort to improve your project. I know that working with a dusty and stale project isn’t the only time that it may be useful to disable tests in Xcode. I’m sure you’ll find your own reasons. I’d love to hear what they are.

Happy cleaning.

Amazon Device Farm XCTest Tutorial

Amazon Device Farm has been on my radar for some time now. It offers the ability to remotely test your iOS apps on physical devices that are located somewhere else. Remember my post about cattle vs pets, and how your continuous integration box should not be a pet? I wanted to test out how well Amazon Device Farm XCTest actually worked, and report back here on my experience so you know how to do it as well.

Extensive List of Supported Devices

Not only does moving your automated testing to the cloud move you away from owning a “pet” build box, but it is also a cost effective way of testing your application across a large number of devices and OS versions. You won’t need to go buying old iOS devices on eBay. Amazon Device Farm supports all the way back to iOS 7. Ever accidentally upgrade your old iOS8 test device, only to realize that you can’t downgrade? With cloud based testing, you no longer need to worry about that. Amazon Device Farm supports many devices and OS versions, across iOS AND Android. You can take a look at the actual list of supported devices here.

The Goal

The goal is to evaluate and document getting a project executing Amazon Device Farm XCTest runs. I’m going to reuse my sample project from my CocoaHeads presentation, you can find it here. The project actually has three test targets setup: unit tests with XCTest, KIF tests, and FBSnapshotTestCase tests. My primary goal here get Amazon Device Farm XCTest running for unit tests. Getting the other two test targets running would be icing on the cake.

Running Amazon Device Farm XCTest Cases

TLDR

If you’ve gone through Amazon’s documentation, and are still stuck, there are two key things that I discovered that made this work for me:

  1. Properly create the .ipa file – I achieved this by Archive -> Save for Adhoc Deployment, etc.
  2. Properly create and find the .xctest folder – I had a hard time finding the .xctest folder to zip up. It’s buried in your Derived Data folder. I used the command line find command to locate it. Also, Amazon Device Farm requires you to include any class under test in the test bundle as well.

More details on those two steps later, so read on!

Overview of Amazon Device Farm

Amazon Device Farm breaks down your work into Projects and Runs. Amazon describes a Project as:

A project in Device Farm represents a logical workspace in Device Farm that contains runs, one run for each test of a single app against one or more devices. Projects enable you to organize workspaces in whatever way you choose. For example, there can be one project per app title, or there can be one project per platform. You can create as many projects as you need.

You basically have the freedom to use Projects as wide or as narrow as you want. I’m imagine a Project to be analogous to a Jenkins job. Just like a Jenkins job, a Project will consist of any number of Runs, which are basically just an execution of a given test script.

Access Your Account

To use Amazon Device Farm, you’ll need a Amazon Web Services account. Follow the instructions here for creating an account and setting it up. It’s a little more involved than just registering. You can actually create additional users within your AWS account to help segregate identities and access management, and it’s recommended that you do this to be used with Amazon Device Farm.

Once you have your account setup, sign in to the Amazon Device Farm at https://console.aws.amazon.com/devicefarm.

Create Your Project

Now that you’re logged in, you’ll need to create your first Project.
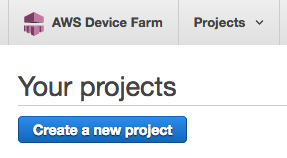
amazon device farm xctest

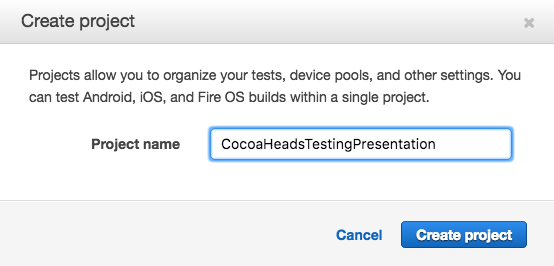
For this simple trial, I reused my Xcode project name for my Amazon Device Farm project name, “CocoaHeadsTestingPresentation”.
amazon device farm xctest

After you’ve created your project, you’ll see it in the list of projects:
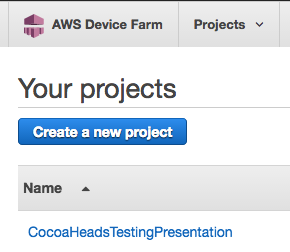
amazon device farm xctest

Create Your Run

Select your project from the project list, and you’ll see a page that will eventually show your test runs. Since you have no test runs at this point, the page is empty. Now, you’ll create your first Run. Select Create a new run.
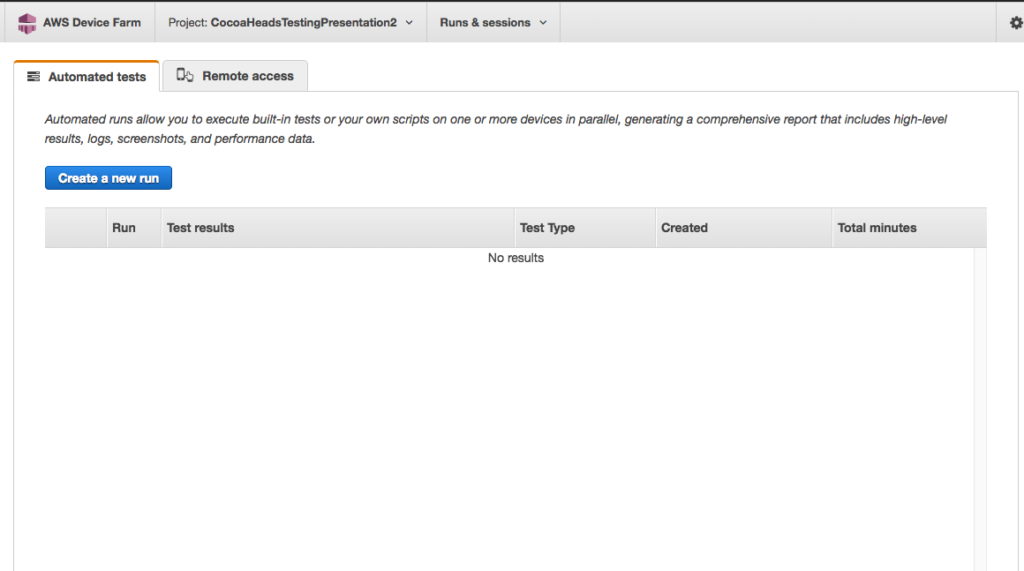
amazon device farm xctest

On Step 1, select the button that shows the Android and Apple icons to indicate that you are going to create a run for a native app.

Prepare And Upload Your Build

Now you need to prepare your application for execution within the Amazon Device Farm XCTest Run. This was a little tricky, and under documented in Amazon’s documentation, so I think this part will really help you. Jump over to Xcode, and Archive a build. Archiving a build will inherently enforce you to make sure you are building for device, as this is also a requirement of running Amazon Device Farm XCTest cases, since they actually run on devices. Once your build has finished archiving, select the build and **Export…* it from Xcode:
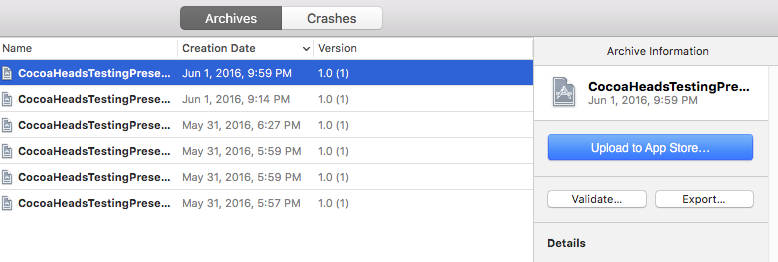
amazon device farm xctest

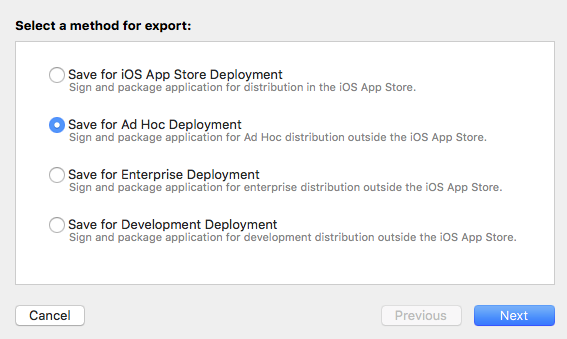
Select Save for Ad Hoc Deployment:

amazon device farm xctest

Ensure that the same identify as your build settings is used for code signing:
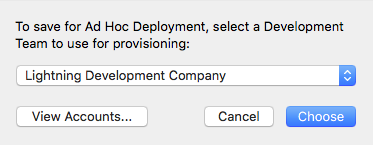
amazon device farm xctest

And then ensure that you Export one app for all compatible devices:
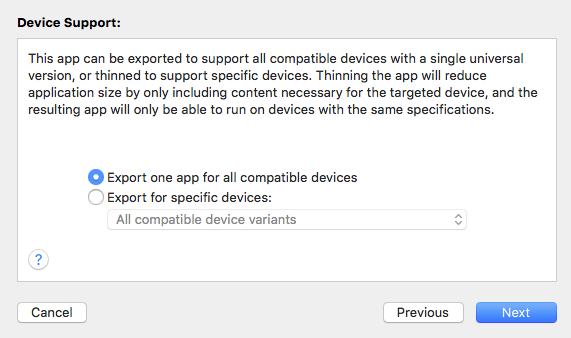
amazon device farm xctest

After selecting Next, follow through another couple prompts selecting the default options, and specify a location for your .ipa file and Xcode will code sign your application and create an .ipa file that will be uploaded to Amazon Device Farm. Go back into your browser that was left off on Step 1 of Create a new run in your first Amazon Device Farm project. Click Upload and navigate to your new .ipa file, and upload it.

You’ll know it was successful when Amazon Device Farm shows you information about the .ipa file:
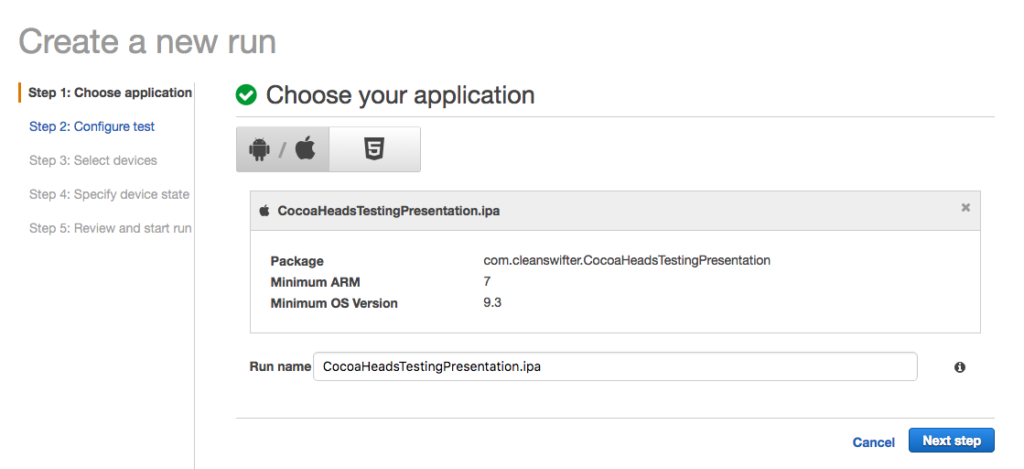
amazon device farm xctest

Click Next step.

Specify and upload your XCTests

On Step 2, select XCTest as the test type, and then you’ll need to upload your XCTests. This was the hardest part of the process to get right, and also the most under-documented in Amazon’s documentation. Here’s a couple things to tweak and double check in Xcode to make sure you are setup:

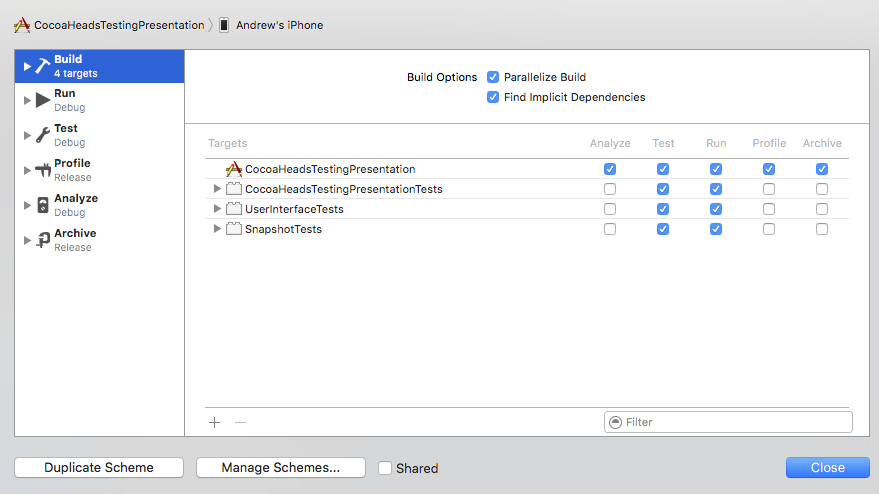
  • Unit tests will compile with each build – This should be the default setting, but it’s worth double checking. Open the Build action settings for the scheme in the Scheme Editor. Verify that in the Run column, your test targets are checked. This means that when you type Command-B or even run your app, your tests will be compiled too. amazon device farm xctest
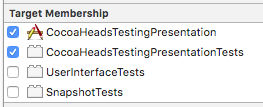
  • SUT Classes are included with the test target – In order for your classes under test (aka SUT) to be available within the test bundle, you need to ensure they are included with test target membership. In my project, WelcomeViewController.swift was a class under test, so I needed to actually add it to the test target membership since this isn’t technically required in a Swift world with the @testable annotation for importing modules. amazon device farm xctest
  • Build tests for devices – Your XCTest bundle must be built for device, not simulator. Select a device, rather than a simulator. amazon device farm xctest

Now that you are all setup, build your tests with Command-B. Now, you need to find the .xctest folder, compress it, and then upload it. I used a find command from Terminal to find it:

CocoaHeadsTestingPresentation|⇒ find . -type d -name '*.xctest'
./Carthage/Checkouts/ios-snapshot-test-case/DerivedData/FBSnapshotTestCase/Build/Products/Release-iphoneos/FBSnapshotTestCase iOS Tests.xctest
./Carthage/Checkouts/ios-snapshot-test-case/DerivedData/FBSnapshotTestCase/Build/Products/Release-iphonesimulator/FBSnapshotTestCase iOS Tests.xctest
./DerivedData/CocoaHeadsTestingPresentation/Build/Products/Debug-iphoneos/CocoaHeadsTestingPresentation.app/PlugIns/CocoaHeadsTestingPresentationTests.xctest
./DerivedData/CocoaHeadsTestingPresentation/Build/Products/Debug-iphoneos/CocoaHeadsTestingPresentation.app/PlugIns/SnapshotTests.xctest
./DerivedData/CocoaHeadsTestingPresentation/Build/Products/Debug-iphoneos/CocoaHeadsTestingPresentation.app/PlugIns/UserInterfaceTests.xctest
./DerivedData/CocoaHeadsTestingPresentation/Build/Products/Debug-iphonesimulator/CocoaHeadsTestingPresentation.app/PlugIns/CocoaHeadsTestingPresentationTests.xctest
./DerivedData/CocoaHeadsTestingPresentation/Build/Products/Debug-iphonesimulator/CocoaHeadsTestingPresentation.app/PlugIns/SnapshotTests.xctest
./DerivedData/CocoaHeadsTestingPresentation/Build/Products/Debug-iphonesimulator/CocoaHeadsTestingPresentation.app/PlugIns/UnitTestBundle2.xctest
./DerivedData/CocoaHeadsTestingPresentation/Build/Products/Debug-iphonesimulator/CocoaHeadsTestingPresentation.app/PlugIns/UserInterfaceTests.xctest
CocoaHeadsTestingPresentation|⇒ 

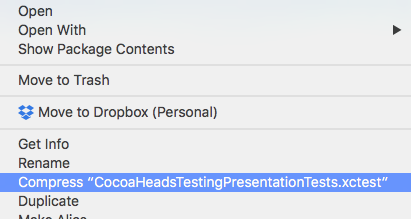
Remember, you want the bundle built for device, not simulator. That means you’ll use the one in the directory Debug-iphoneos, not Debug-iphonesimulator. The directory you need to compress to a zip file is:

./DerivedData/CocoaHeadsTestingPresentation/Build/Products/Debug-iphoneos/CocoaHeadsTestingPresentation.app/PlugIns/CocoaHeadsTestingPresentationTests.xctest

Compress it as a standard zip file (you can use Finder for this), and Upload it back in the Amazon Device Farm browser.
amazon device farm xctest

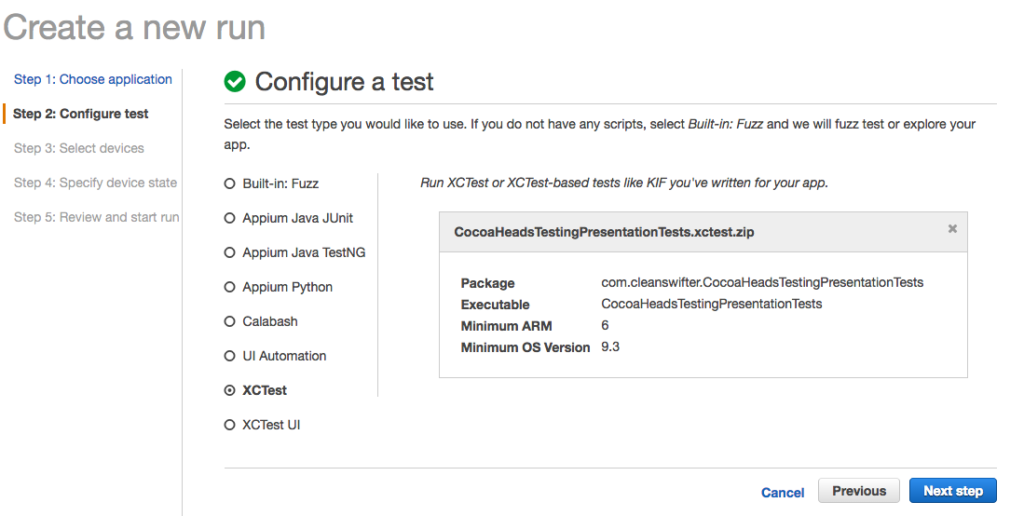
You’ll know the upload was successful when you see details about the XCTest zip file:
amazon device farm xctest

Click Next step to select your devices for the run.

Select Devices

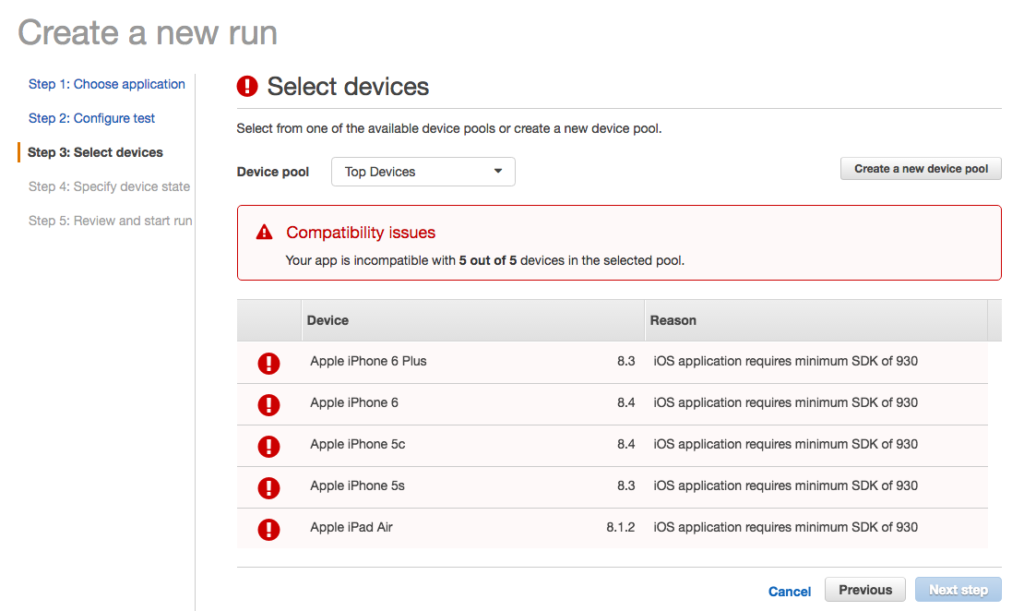
One thing that annoyed me with setting up my first Run for an Amazon Device Farm XCTest was that when I finally got to the screen to select which devices to execute my Run on, the default list contained five devices, none of which were supported by my app. I would have rather’d some smarts on Amazon’s part to look at the lowest iOS version supported by my app, and then only show me “Top Devices” for that minimum iOS version.

Since the suggested list didn’t work for me, the first thing to do was Create a new device pool, which is what you should click to do that:
amazon device farm xctest

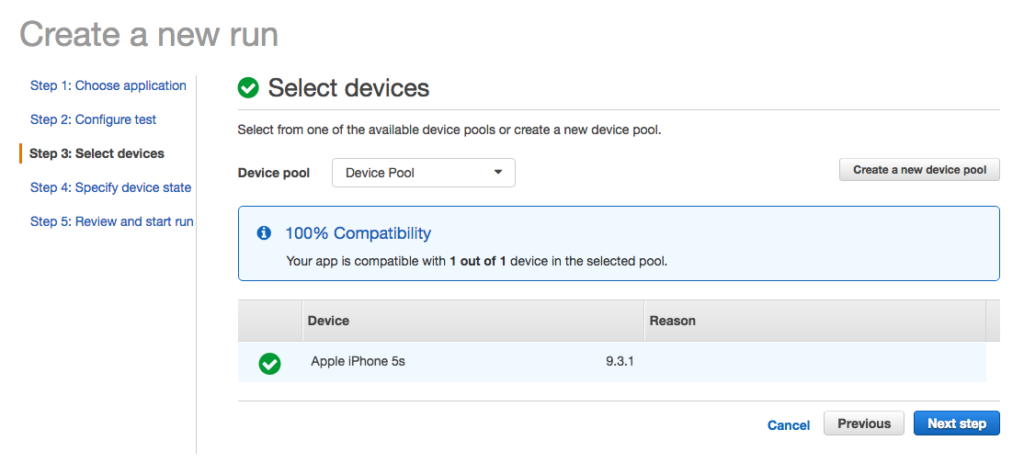
On the resulting screen, it’s obvious enough to select devices for a new “pool” – just make sure you select devices compatible with your app’s minimum version, because you won’t be prevented from doing that.

Once you create a pool of compatible devices, you’ll see a message about “100% Compatibility”
amazon device farm xctest

Select Next step to specify initial device state.

Specify Device State

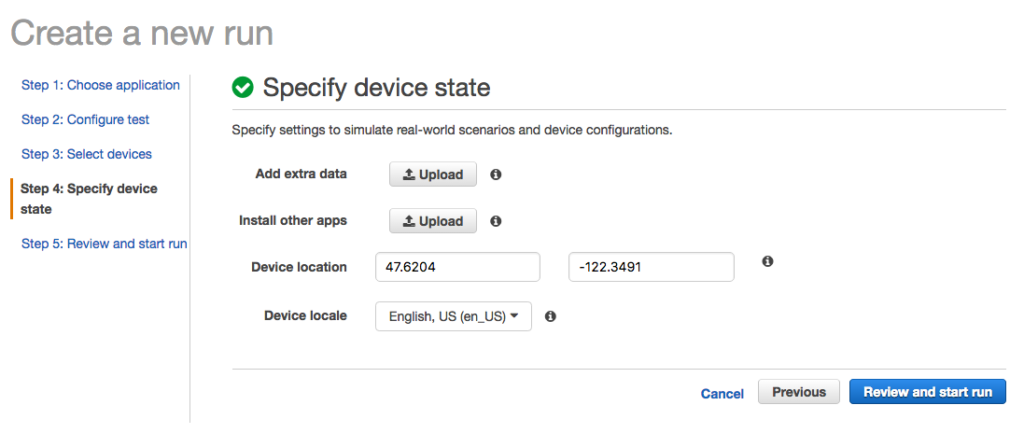
In Step 4, you can specify other initial aspects of the device’s initial state, like other apps to load, a geographic location, or which locale to use:
amazon device farm xctest

I didn’t change any of these values from the default for my app.

Next, click Review and start run. The next page reviews your Run’s settings, and allows you to start it. Click “Confirm and start run” to start it.

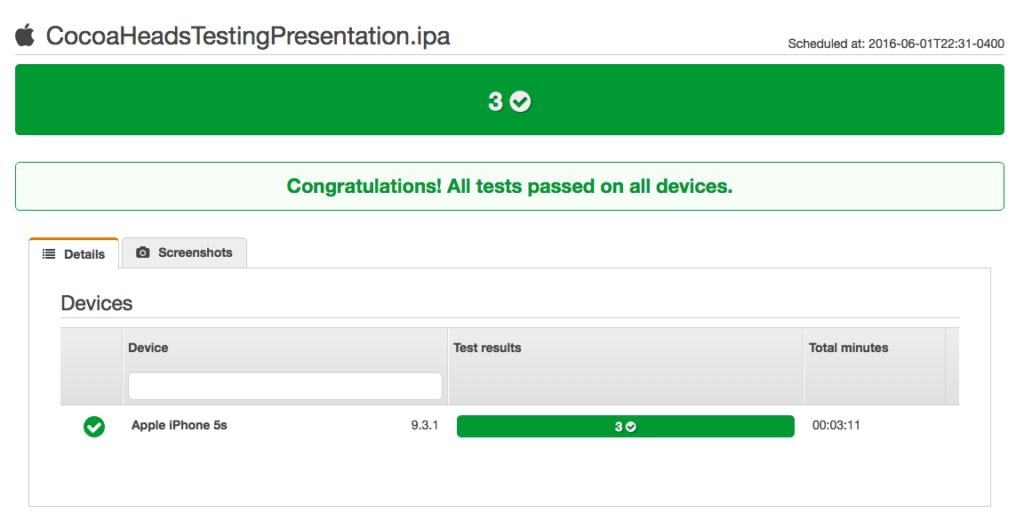
Boom, that’s it! At this point, you’re basically done. If all is configured correctly, your Amazon Device Farm XCTest will be running. Congrats!
amazon device farm xctest

Observations of Amazon Device Farm XCTest

Here’s a couple observations from going through this setup for Amazon Device Farm XCTest.

Setup Is Too Manual

Next, I really need to investigate automating this. There’s no way I would frequently go through this in order to run my tests. It’s so much faster to run it from Xcode locally. There’s just too much clicking through prompts. Ideally, I want to connect this with my continuous integration server, so that’s the next thing I’ll look into.

Tests Are Slow

Just the simple act of running tests is really slow. For my sample project, that is totally bare bones, with ONE XCTest unit test, it took just over three minutes to run in Amazon Device Farm. That’s compared to like one second locally in Xcode. I’d like to try this with a larger code base and observe how long it takes. I hope the duration doesn’t lengthen with the size of the project or number of tests, but it probably will. At this point, I don’t think I’d put such long running tests in the middle of my code review workflow, but rather integrate these as nightly builds across a large number of devices.

Documentation Lacked Key Steps

The hardest part of getting this setup was getting the precise build settings right, both for the app binary ipa itself, and the .xctest bundle as well. Amazon totally glossed over this in their documentation, which really prompted me to write this article. The good news is that in Googling around, I noticed Amazon support employees actually answering questions on Stack Overflow, and also participating in Amazon’s own dedicated form for supporting Amazon Device Farm.

Wrap Up

I noticed that there is a command line reference for Amazon Device Farm. In order to integrate Amazon Device Farm XCTest with my continuous integration procedures, I know I need to test this with more complicated projects, and also automate it. I’ll do that in a future post.

Happy cleaning.

Buddybuild Review

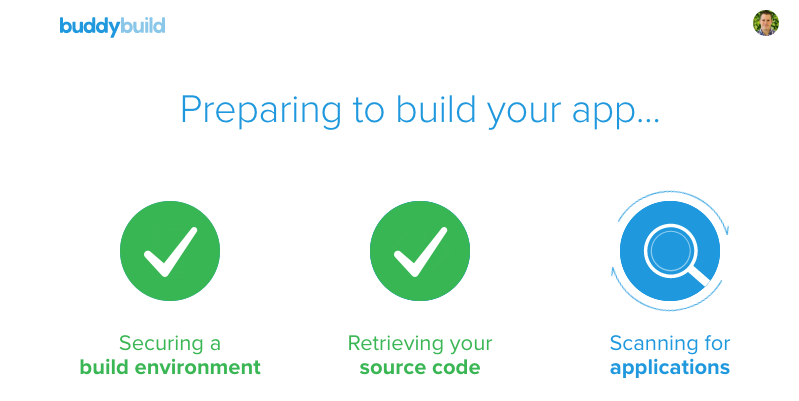
Buddybuild self describes itself as a system that “ties together and automates building, deploying and gathering feedback for mobile apps.” I’m always on the lookout for something that makes the process of developing my apps easier. I wanted to give it a try and write a buddybuild review. I know fastlane is really popular now for the automation it provides, but I wanted to peek at something at a higher level where some of the legwork is taken care of for me.

buddybuild review

Lately, I’ve been bouncing between TestFlight and Fabric for some of this functionality, but those solutions fall short in one specific area: automatic builds with tests (whenever I say “build” in this buddybuild review, I’m talking about both compilation and test execution). Since I’ve been on a continuous integration kick lately with the posts here on cleanswifter.com, I figured I’d give you a full rundown with a buddybuild review.

buddybuild review

A couple specific things I was looking for in my buddybuild review:

  • A hosted continuous integration solution – In case you didn’t see my post from yesterday, I’m tired of trying to maintain a physical build server. The idea of hosted continuous integration is very attractive to me.
  • Integration With GitHub – I’m all in on GitHub, both github.com and the hosted enterprise instance. I want deep integration with GitHub from my automation solution. I rely on pull requests, and I need my build automation system to integrate with that workflow.
  • Solid Documentation – In my opinion, when you invest your time in using a 3rd party product, you don’t want to waste your time with poor documentation.
  • Any Other Bonuses – If there are any other niceties I discovered, I wanted to report out on those as well.

My Approach For My Buddybuild Review

Whenever trying out new supporting infrastructure for software that you write, never use your “real” code base to begin with. I suggest creating a fake project to use so you can feel out how to use the tool before then applying it to your real code base. As such, I setup two apps in buddybuild: BuddyBuildSampleProject which started with a single test target for unit tests, and my CocoaHeadsTestingPresentation project which has three test targets: one for unit tests, one for KIF tests, and one for FBSnapshotTestCases.

buddybuild review

Feature List

This probably isn’t comprehensive, but it’s what jumped out at me during my buddybuild review:

  • Automatic builds, triggered by pushes to code repositories
  • Tests can run as part of builds, YAY
  • Wide variety of source control systems and repositories supported. Full list here
  • Integration with Apple Developer Portal and Google Play Developer Console for automatically uploading builds, synchronize provisioning profiles, and run App Store readiness tests (wow, I didn’t even know this was possible)
  • Support for both iOS and Android applications (I only tried iOS)
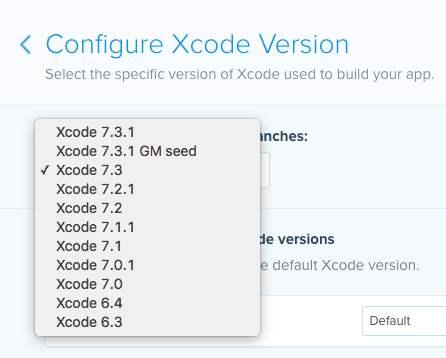
  • Manual control over which Xcode version is used for building (I wouldn’t use this, but I guess I could see a use case)
  • Status badges to show on your source code repository to indicate build status (I wish there was a way to show build result on an actual Pull Request)
  • Beta distribution of your app including analytics, and ability for testers to annotate and submit screenshots of issues
  • Crash reporting (Who doesn’t offer this these days?)
  • REST API for programmatically triggering a build (Only one endpoint so far, but a good start)
  • Team supported, invite others to collaborate on your apps and builds (This is done really well)
  • Lots of integrations: Automatically create JIRA and GitHub issues, post notifications to Slack or HipChat (It’s a nice list)

buddybuild review

The Good

Beautiful and Easy To Use

Initial impressions are always important, and buddybuild exceeded the bar for me. It’s an entirely web-based experience, and it’s beautifully designed. Not only is it visually appealing, but I had no problem figuring out where to find different options to do accomplish tasks. Also, there was a really nice first user experience that helps walk you through all the features of buddybuild. They even built a sample app that you actually download, just like a real beta tester so you can understand features that the buddybuild SDK can enable your beta testers to use.

Great Documentation

The buddybuild documentation is out of this world and crazy good. It’s comprehensive, well-written, and even goes out of its way to teach you about best practices about things like CocoaPods, Git Submodules, and Code Signing 101.

Awesome Support

As I worked through a couple problems getting my builds up and running, I had near immediate chat access with support personnel. They were very helpful in getting my issues fixed. Additionally, they were even open minded and sought feedback on how to make things better. Shout out to Dennis, Sid, and Rashin!

There Will Always Be A Free Tier

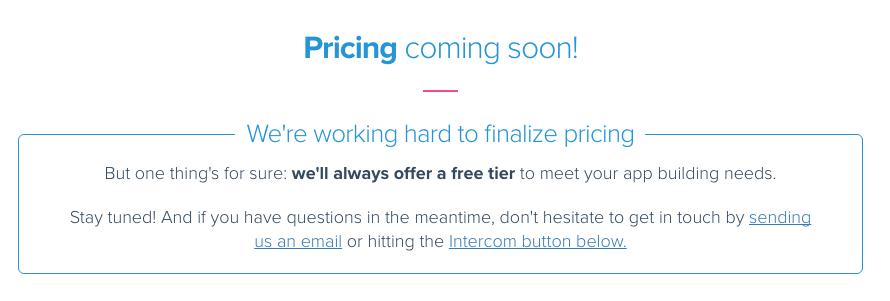
Despite not having specific pricing information available at the moment (which I see as a bad thing), they guarantee that they “will always offer a free tier.” That’s awesome.

buddybuild review

Flexible Beta Tester Deployments

I’ve tried both other hosted build automation solutions as well as having rolled my own, and I really like how buddybuild allows you to create different groups of app testers. And then for each group, you can specify the frequency that they will receive a build: Every build, nightly, or manually. This is really cool especially if you want to segment your tester base between developers, other internal stakeholders, and external public testers. You can verify the right people get the right builds at the right time.

The Improvement Areas

Full Read and Write Access On Your Repo

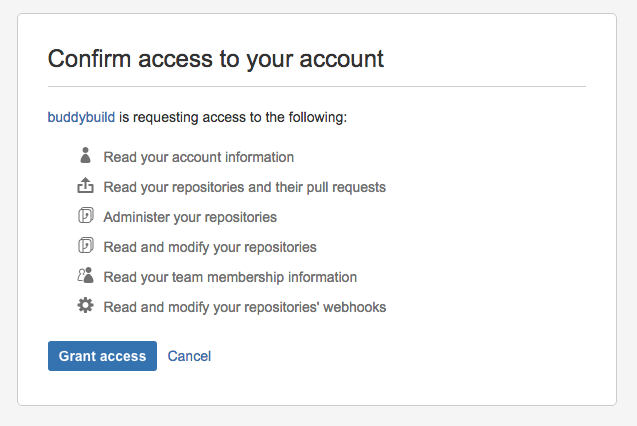
In setting up buddybuild, one thing that concerned me is that it asked for a lot of access to my source code repositories. Whether I was connecting GitHub or Bitbucket, buddybuild required full read and write access to my repositories with no explanation as to why.

buddybuild review

(I would have included a GitHub screenshot, but after having initially connected my account, I couldn’t find anywhere to disconnect it).

No Pricing Information Yet

Ya, I see this as a bad thing. No good thing in life is free. If I’m going to spend time building out a critical piece of my development and distribution workflow on something, I want to know that there’s a formal business relationship in place. I’m not looking to pay thousands of dollars, but rather just make sure that things are on the up and up, and that I’m not going to be left out to dry because buddybuild disappeared overnight, or that I can’t get support at some point.

Slow Builds

Right now, the builds on buddybuild are really slow. Using my vanilla Xcode project that literally had nothing else in it but the template provided code and unit tests, it took several minutes to build on buddybuild, where locally it was done in less than 10 seconds. My project with three test targets took five minutes. I can’t imagine how long these builds would take with a more substantial project with hundreds of tests.

Open Your Firewall If You Use GitHub Enterprise

I don’t really have a good solution here, besides selling a instance of buddybuild that you could host internally in your own datacenter, but that starts to become a lot of work. If you are using hosted enterprise GitHub, you need to open a hole in your firewall so buddybuild has access to your code repository. This scares me, again, I don’t have a good solution here.

No Test Device Configuration

There is no ability to specify which iOS version, or which device your tests will run on. This is crucial functionality for me in my continuous integration workflow. For a universal app that supports iOS8 and higher, I want to at least be able to run my tests on iOS8 iPhone, iOS9 iPhone, iOS8 iPad, and iOS8 iPad. Furthermore, running on device is even better than simulator. There’s no control for this right now exposed to me, the end user. Luckily, support was very responsive in helping me change the configuration behind the scenes. Ideally I don’t want to rely on them though. Furthermore, I’ll forget what I had him set this to, and there’s no place in the buddybuild UI for me to check.

Other Suggestions From My Buddybuild Review

With Twitter acquiring Crashlytics and fastlane it’s going to be hard to catch up in a couple areas. I do really like the idea of having buddybuild abstract another layer of automation on top of tools like this though where I can just quickly click a GUI to configure things. My suggestion would be to go through fastlane’s suite of tools and add a similar feature into buddybuild. I think fastlane’s maturity is a good representation of exactly what developers are looking for in automating their workflow of creating applications.

I’d also love to see code coverage reports, and static code analysis, and even other code-health metrics integrated with buddybuild’s dashboard.

Final Recommendation

After my buddybuild review, as cool as buddybuild is, until they resolve some of my improvement areas, I can’t recommend it for use in a business critical application. The lack of pricing is a major red flag to me. As polished as their site is, and how well it works, the fact that there isn’t official pricing to establish a business to business relationship makes me feel like they are operating out of a garage with the possibility that they will shutdown at any moment (disclaimer: I got stuck when something similar happened with ship.io disappeared overnight – another hosted CI solution). I also don’t want to wait around for my builds to happen. I also really want to be able to configure which devices, simulators, and iOS versions that my tests run on- this is important in any CI stack. I need that to verify that my code works well, everywhere.

The good news out of my buddybuild review is that buddybuild is working on all of these improvement areas so the outlook is good. I’ll keep an eye out for developments in this area and report back in the future.

I hope you found this buddybuild review useful, if you want to try out buddybuild and either make your own impression, or use it for something non-mission-critical, I think you’ll be impressed with what they have to offer.

Happy cleaning.

An iOS Continuous Integration Machine Is Not A Pet

An iOS continuous integration machine should not be a pet. Do you know what I mean by a “pet?” Have you heard the analogy for determining whether a server is a pet or cattle? Continuous integration machines should be treated like cattle, not pets.

iOS Continuous Integration

Without trying to sound cruel or inhumane, when cattle get sick, you can quickly replace it. When pets get sick, you spend a lot of time and money to try and help them get better. Now apply this to your continuous integration machine. If you have a dusty old Mac Mini sitting next to you that is acting as your continuous integration machine, eventually the hard drive is going to die or any other myriad of problems. Do you want to be in the business of resuscitating the machine when that happens? Not me, I’d much rather be focusing on what matters, writing awesome new features for my end users.

CI Should Not Get In Your Way

Imagine this scenario: you’ve been coding all night, and finally you get that hot new feature done, tests pass locally, and you’re ready to open a pull request. You push your branch, and for some reason Wolfie, your build server, isn’t powered on and won’t start up. Now your choice is to either spend time trying to fix Wolfie, or skip your whole iOS continuous integration workflow. What would you do?

Regardless of the choice that you made in that scenario, the point is, your CI server should be waiting to serve your needs, perfectly, every time. And if you are relying on some old piece of hardware lying around your home or office or home office, chances are, you’re going to spend more time caring and feeding for it, that you would if you had managed it as a disposable resource that can easily be replaced.

Don’t Waste Your Time

As tempting as it is to tryout Xcode Server on that old Mac you have lying in your garage collecting dust and rusting, I propose that you don’t waste your time keeping old Wolfie the build server around or even introducing him in the first place, and instead consider approaches where you aren’t in the business of maintaining your own hardware or an isolated build software stack. There’s two paths you can take towards this: all-in-one hosted CI solutions, or configuring an automated deployment of your CI environment to use something like Mac Mini colocation where you can spin up Mac Minis on demand to build your application. Here’s an overview how DayOne used macminicolo.net in conjunction with Jenkins for their builds. Want to run your tests on actual devices? Well then you could even write a script to automatically provision devices from Amazon Device Farm and run your tests on them. This approach grants you the most granularity and flexibility in your configuration, but takes a lot more effort to develop. You need to write the scripts that do the server provisioning, so that they are available and dependable in a repeatable fashion.

Sound like too much work? Alternatively, hosted iOS continuous integration solutions have been coming onto the scene lately and look very promising in that they advertise simplistic wizard-based setup of your CI jobs. Basically, login with your GitHub credentials (or Bitbucket), select your project, and click Build. Tomorrow, I’m going to give you an overview of buddybuild which is one of the hottest players on the market now in this area.

In the meantime, happy cleaning.
Continuous Integration Workflow For iOS

Cheaper Than A Dollar A Day

I came across this article today, called “Continuous Integration on a Dollar a Day” since Jon Reid of qualitycoding.org mentioned it on his Facebook page. I first want to recognize that this article was originally written back in 2006, so no need to repeat the obvious in case you discover this fact yourself. A lot has changed in 10 years, and a lot remains the same. For one, I absolutely recommend using continuous integration. The author also clarifies that the article is intended for people new to continuous integration, so some of the principles are introductory. While I recognize that, I think there are better introductory solutions for your continuous integration workflow For iOS.

Continuous Integration Workflow For iOS

To me, if you were to ask me on the street, off the top of my head, continuous integration ensures that: – Code that’s committed to your repository always compiles – Code always has tests passing

Having lived with it for so long, it’s not fathomable to consider anything else. To think that I could potentially check out what’s in the source code repository and it not compile is unthinkable. If clean code is your desired end state, then continuous integration can help you achieve it.

A Proposed Continuous Integration Workflow For iOS

I am in love with Github pull requests. A past version of me scoffed at thinking that my code must go through code review before it could be considered “done” or merged. I remember using Subversion back in 2010-ish and committing directly to the main trunk of code, with no one review it, and no automated builds. YIKES! Today though, I feel that a combination of test driven development, code review, and continuous integration truly remove the need for dedicated testers on the product team. That’s not to see we don’t manually test, I’m just saying that it removes the need for something dedicated in that role.

I don’t want to git into (pun intended) the pros and cons of other version control systems, I know there are plenty. I use GitHub for all my projects, and I love it. I think you’ll love it too.

To sum up pull requests, you work locally in a branch of code. When you’re ready to share it with others, you “push” the branch to the remote repository, and open a “pull request.” An open pull request is basically a proposed change set. Other team members can review the changes, chat about them, suggest improvements. Ultimately, the proposed change set can be accepted, and then is merged into the destination branch where you intended the code to end up.

If you want more detail, this is a great writeup directly from GitHub describing the process of using pull requests in your workflow to enable pre-merge code review.

So where does continuous integration fit into this? I propose that anytime code is about to change somewhere, continuous integration jobs should verify that the incoming change will compile AND pass tests. The thing is, as you move up the iOS testing pyramid, tests will run slower and slower. Your wait time can really grow if these gate parts of your development.

Setting Up Your Jobs

Continuous integration for iOS projects is a delicate balance between enough test coverage across OS versions and devices, running all your tests, and the putting the checks in just the right places. Here’s how I recommend striking this balance:

  • Run your full suite of tests on one device/OS combination each time code is pushed to the repo – I prefer to do this on the lowest iOS version that the app supports. I also usually do this on an iPhone for my Universal apps (no real reason, and I’ve gotten bit by iPad only bugs, so probably worth mentioning that some reasonable amount of thought is worth it here for your situation).
  • Run your full suite again on a different device/OS combination each time code merges on the result of the merge.
  • Each night, run the full suite of tests on every possible combination of devices and OS that you support that is possible within your means.

Let’s play this over the GitHub pull request model:

  1. I push a branch to the repository and open a pull request.
  2. CI server detects the push, runs all tests (unit, UI, and snapshot) on an iOS8 iPhone 5.
  3. CI build either fails or passes.
  4. CI machine puts a flag in the pull request based on the result of the build. If the build does not pass, it should not be merged.
  5. If build is successful, once code merges, a new build is triggered on the destination branch using the result of the merge to run the full suite of tests. If this build fails, manual intervention is necessary to understand why, and be addressed.
  6. Starting around 11pm, a sequence of dependent jobs kick off running the full suite of tests across every device that I own – iPhones, iPads, iOS7 (if supported), iOS8, iOS9, etc.
  7. Results from “nightlies” are reviewed in the morning.

Anytime a build fails, it should be immediately addressed. Failing builds tend to build up over time, especially with the nightlies. If a nightly fails, make fixing it the first thing you do in the morning when you arrive. It usually represents a bug in your code.

Room For Improvement

There is definitely some manual intervention needed in this workflow, it’s not full proof. Ideally, continuous integration works along side you and prevents you from doing anything stupid. Removing any manual steps from your workflow is paramount, and something I’m still working on. I’d love to hear from you, have you tried a continuous integration workflow for iOS? How has it worked out? Or if not, why not?

Happy cleaning.