Ellen Shapiro on Code Coverage

Source: Fabio Oliveira, Twitter

I caught this great picture on Twitter of Ellen Shapiro presenting at UIKonf last week in Berlin.

Now, I’m not totally sure of the topic of the talk, but having heard first hand of Ellen’s passion on automated testing, and seeing this slide, I’m pretty sure it’s content would be something that I would endorse here at cleanswifter.com.

If you aren’t following Ellen, you should be. I’ve seen her present several times, and she is my colleague on the raywenderlich.com iOS team. Besides Twitter, here’s an appearance of her’s on the raywenderlich.com podcast that you’ll enjoy.

I’ll even leave you with a fun story from the first time that I met her. This was back at a CocoaConf in the fall of 2014 in Boston. During an impromptu lunch time session where developers could show off their own apps, Ellen stepped up to give a demo of Hum. It’s an app for musicians to help record little bits of audio so they can remember it later, for use when you’re songwriting. A major part of the app has to do with recording audio so you can listen to it later. Ellen blew people away in the demo by belting out, herself, solo and acapella, the opening line to Black Dog by Led Zeppelin. I think I speak on behalf of the whole room, that I was blown away by its awesomeness. I was a fan for life, and that’s before I came to learn about her passion for high quality iOS code.

If you ever get to meet Ellen, tell her the Clean Swifter says Hi.

Happy cleaning.

PS – Thirsting for a tutorial? I’ve got something good planned for tomorrow- how to run your first XCTest on Amazon Device Farm. Be sure to come back and check it out.

iOS Environment Configuration

Many Environments To Manage

Have you ever worked on an iOS app that needed multiple environments to support it through development? I have. For me, almost every app I have ever worked on has had some sort of web based API supporting the app. And for these apps, I’ve tried a variety of techniques to consolidate and improve how I manage the urls for these web APIs across different test infrastructures. This kind of iOS environment configuration can become tricky. For example, at one place I worked, we had the following “test environments” or different web backends intermingled throughout the release pipeline:

  • Local (url of localhost, sometimes an IP address_
  • DEV (Development testing)
  • INT (Integration testing)
  • SAT (Systems acceptance testing)
  • PERF (Performance testing)
  • CAT (Client Acceptance Testing)
  • Pilot (Alternate Production servers – including different urls for each node behind the F5 load balancer)
  • Production (including different urls for each node behind the F5 load balancer)

This amounts to more than 10 different environments that I would need to provide builds for various testers throughout the development cycle.

Summary Of Options

Needless to say, 10 environments is a lot and need to be managed somehow. I was thinking of writing up each technique I’ve tried, but then I came across a useful article on “The App Business” blog, titled “A robust multi-environment build setup.” that clearly describes a couple of the most popular ways to do this.

Automating It

iOS environment configuration

The majority of “The App Business” blog article recognizes some manual ways to manage your builds and the environments they are configured to connect to, including other iOS environment configuration. Later in the article though, “The App Business” goes a further extra mile by announcing an actual tool they created to help accomplish this, it’s called configen. configen takes a configuration file, and actually generates a Swift class to help manage selecting environments during build configurations.

Schemes Aren’t Bad

One qualm I have with the article. Using separate Xcode Schemes for different environment variables is a useful way to help separate our your iOS environment configuration. One thing I like about using separate Schemes that the article doesn’t mention, is that non-developer-types, like product managers or designers, may feel comfortable knowing where the dropdown is in Xcode to build for a separate scheme, while they may not feel comfortable having to modify code or run schemes to change environment options.

iOS environment configuration

User Controlled

One thing I would have liked configen to take farther is the ability for the end user of the app to be able to change the environment variables and other iOS environment configuration used for a given session of the app. I’ve seen this done several ways, but none that I’m happy with. The last time I did it, I actually coded my own interface for the user to select which environment to use. I wasn’t happy with how intertwined the resulting user interface code was the rest of my code base, there wasn’t good decoupling. Ideally, there’s a third party package, that can be modularly loaded, such that it is a drop-in solution.

Getting More Clean

What’s on your wish list for iOS environment configuration? What aren’t I thinking of? How have you fared? I’d love to hear.

Happy cleaning.

Chris Eidhof on Table View Controllers

Are you following Chris Eidhof? If you’re not, you should be. He first came across my radar a couple years ago when was part of the founding team behind objc.io. I loved the monthly issues of objc.io, and I definitely recommend going to check out their back catalog if you haven’t already (despite some of it being written in Objective-C). I also really like Deckset, an app Chris made for easily creating beautiful presentations. And finally, I also read his book Functional Swift which honestly might have been my first formal introduction to real world functional programming outside of some academic exercises during my education.

Recently, Chris gave a talk at try! Swift in Japan titled Table View Controllers in Swift. I wanted to bring the talk to your attention because I think it’s a good example of refactorings and improvements you can make while implementing a table view controller in Swift. Go take a look.

My Highlights

Custom Initializers For View Controllers

It’s so easy to get sucked into the world of Interface Builder. Don’t forget that there is life outside it. Chris provides some solid examples of how you can leverage custom initializers for UITableViewControllers to provide the initial set of data, and even closures for populating table view cells. Nothing revolutionary here, but again, something easy to forget if you are always living in a world of Interface Builder.

Fix All In Scope

Do you know about this magical Xcode tool? I didn’t until I watched this talk. In a lot of ways, this is why watching talks are worth their time in gold. Even if the talk itself isn’t on a topic you’re totally into, just watching someone else code can yield so many little tips and tricks that will help you improve your own development. During this presentation, I learned from Chris of the option in Xcode to “Fix All In Scope.” I’ve only tried this in a couple cases, and it is magical. As you are coding, you’ll forget to force unwrap an optional, or something that was originally declared a constant with let now needs to be a variable with var. Xcode can automatically fix a lot of these issues for you, and there’s actually a menu option with an accompanying keyboard shortcut- Command-Option-Control-F. Give it a try.

Screen Shot 2016-05-26 at 8.58.48 PM

Refactoring View Controllers Crosses a Line

Watching this video with a co-worker, he said something that I agreed with. A lot of videos you watch, and blog posts you read, about refactoring view controllers, eventually cross a line from being useful to academic. I feel like this happened in the later part of this talk. Eventually the generalizing and refactoring led to a point where no two screens in an app are going to be so similar that you can use a single view controller implementation and be able to entirely reuse it. Despite that, there are plenty of things to be learned from “academic” implementations.

Refactor Out State

One pattern I really love in Swift that comes from functional programming is being able to use computed properties to help define the “truth.” Here’s an example:

var history:[String]? = nil
var canUndo: Bool {
  get {
    return (history == nil)
  }
}

This is similar to what Chris shows in his presentation for managing a history of changes to an editable table view. What I like about this, is that pre-functional programming, and back in Objective-C, I would create a instance boolean variable canUndo that gets set to true or false throughout the flow of code based on changes to the table view’s contents. That code is super prone to bugs, particularly because ensuring that canUndo is the correct value in all cases. By using a computed property like this to consolidate the truth in one place helps remove that uncertainty and proneness to bugs.

Refactoring A Complicated Initializer

As Chris moves through his refactoring of a table view controller, at one point he arrives at a custom initializer for the table view controller that has many parameters. Besides being hard to read, it also doesn’t really lend itself to testing that well. Chris’s refactoring creates a struct that represents each parameter in the custom initializer. Now, just one thing to pass as a value to the initializer whether from calling code, or the tests. Easy, and concise.

Try It Yourself

I’d love to hear what you think after watching the video, what were your takeaways?

Happy cleaning.

libdispatch in Swift 3, an evolutionary step

Are you following any of the lists.swift.org mailing lists? You can subscribe for emails to follow the open source development of Swift. I’m on the swift-evolution-announce list, and it ends up with a couple emails a day. To me, that’s a reasonable volume. The thing I like about that list is that it’s a broadcast of the approved or rejected changes, no discussion. While it would probably be interesting, I don’t have the bandwidth to be reading through in-depth discussions about how Swift should evolve. Simply catching the end result of the discussion and decision is good enough for me now. When the email arrives, I usually just do a quick glance at the subject to see if it’s something I’m interested in, and recently, oh boy, was there one that caught my eye, it’s related to libdispatch in Swift 3.

Modernize libdispatch for Swift 3 naming conventions

Proposal SE-0088 was accepted to modernize libdispatch in Swift 3 naming conventions. libdispatch, aka Grand Central Dispatch is a modern and easy way to add multithreading to your applications. If you want to learn about it, here’s a great tutorial on Ray Wenderlich’s site (the tutorial is in Objective-C).

libdispatch in Swift 3
Grand central….

For whatever reason, I have such a hard time memorizing any of the C APIs that we use when building our apps. For me, most commonly this is libdispatch. I must have written this code hundreds of times:

Old Way

dispatch_async(dispatch_get_main_queue(),{
    // do something UI-ish on the main thread, like dismiss a view controller
})

but for some reason, I’m never confident in being able to write it based on memory. I almost always have to either lean on code completion, or even go look up a different place I wrote it to copy and paste. And this just scratches the surface of Grand Central Dispatch.

Now, this will all change with Swift 3, as there will be a modernized API available for libdispatch in Swift 3. So that old C code I wrote above will be written as:

New Way

let queue = DispatchQueue.main
queue.asynchronously {
    // do something UI-ish on the main thread, like dismiss a view controller
}

That makes me so happy. Hopefully this modernization of libdispatch in Swift 3 gives you a gist of the cool developments that are happening on the Swift mailing lists and you might even go sign up for them yourself. Let me know, what cool things did you discover?

Happy cleaning.

Asynchronous iOS Unit Test Tutorial

By default, iOS unit tests in Xcode execute just like any other method, from top to bottom, in serial order. This is fine most of the time. Occasionally though, you’ll find the need to write a unit test for asynchronous code. And with the prevalence of closures in Swift, writing an asynchronous iOS unit test will become even more common place.

The Method To Test

Consider this method under test:

class Parser {

  func parse(toParse: String, success: () -> Void, failure: () -> Void) {
    // code omitted
  }

}

It requires some imagination, but envision that this is some kind of complicated parsing routine that takes a long amount of time to complete. Depending on the outcome of parsing the input, either a closure success() or ‘failure()` (that are provided to the method) are guaranteed to be called at some asynchronous, non-deterministic point in the future.

Why This Is Hard To Test

At the core of this method, an input string will be parsed, probably on a different thread. In some cases that will pass, and in some cases that will fail. We need to figure out how to write tests to verify that.

Initially, one might think to try a test like this:

func testParse_Succeeds() {
  let toTest = Parser()
  toTest.parse("Something that will parse", success: {
    // do nothing, test will pass
  }) { 
    // if failure parsing, fail test
    XCTFail()
  }
}

The problem with this approach, is that assuming the long running code in parse(_:success:failure) is executed on another thread, `testParse_Succeeds()’ will likely complete before the parsing actually completes, thus never giving the test the chance to perform the actual verification. This will result in false positives, with no way to actually see the test fail.

asynchronous iOS unit test

The Solution – Expectations

There’s a really cool API provided in an XCTestCase extension that makes testing asynchronous code possible.

public func expectationWithDescription(description: String) -> XCTestExpectation

and

public func waitForExpectationsWithTimeout(timeout: NSTimeInterval, handler: XCWaitCompletionHandler?)

Here’s how you can use this with the previous example to verify the asynchronous code:

func testParse_Succeeds() {
  // 1
  let expectation = expectationWithDescription("Parsing Succeeds")
  let toTest = Parser()
  toTest.parse("Something that will parse", success: {
      // 2
      expectation.fulfill()
    }) { 
      // 3
      XCTFail()
  }

  // 4
  waitForExpectationsWithTimeout(1.0) { (_) -> Void in
  }
}

Looking at this line by line:

  1. Create an expectation for parsing to succeed
  2. When parsing succeeds, mark the expectation as fulfilled (and optionally perform any other verification)
  3. Explicitly fail the test if parsing does not succeed
  4. Tell XCTest to wait 1.0 second for the expectation to be fulfilled, or otherwise fail the test. (Good thing the timeout is configurable).

That’s it, now you can write an asynchronous iOS unit test!

Getting Cleaner

Now you know how to write an asynchronous iOS unit test. Take a minute to try out these sweet extensions on XCTestCase. I think you’ll find a lot of creative uses for them. Keep in mind, it doesn’t necessarily need to be long running code that needs this solution, but rather any code that is going to execute in an asynchronous fashion. Do you unit test your web service API calls?

Happy cleaning.

Other References:

Swift Pattern Matching Is Powerful

In Natasha The Robot’s weekly Swift newsletter, I caught a pretty awesome series of articles written by Olivier Halligon on Swift pattern matching. After reading this four-post series, my mind is sufficiently blown in thinking about all these new ways to use Swift pattern matching.

swift pattern matching
]4 Pattern matching in the real world.

Here are the articles:

According to Apple’s documentation on Swift Patterns:

A pattern represents the structure of a single value or a composite value. For example, the structure of a tuple (1, 2) is a comma-separated list of two elements. Because patterns represent the structure of a value rather than any one particular value, you can match them with a variety of values. For instance, the pattern (x, y) matches the tuple (1, 2) and any other two-element tuple. In addition to matching a pattern with a value, you can extract part or all of a composite value and bind each part to a constant or variable name.

Basically, this means that if you have a value like a struct, the struct can be represented by any number of “patterns” that generally describe the type. You can then use patterns in conditional checks to selectively filter for values that match the pattern.

Switches, Not Just Integers

From Olivier’s articles:

In Swift, you’re not restricted to use switch on integer values or enums like in ObjC. You can actually switch on a lot of stuff, including (but not restricting to) tuples.

This was an incredible discovery for me. It’s little nuggets of discovery like this that so easily slip through the cracks when learning new languages.

This Is Scary

Switch case statements are evaluated in order. This feels scary to me.

Here’s Olivier’s example:

let point = CGPoint(x: 7, y: 0)
switch (point.x, point.y) {
  case (0,0): print("On the origin!")      // 1
  case (0,_): print("x=0: on Y-axis!")     // 2
  case (_,0): print("y=0: on X-axis!")     // 3
  case (let x, let y) where x == y: print("On y=x")
  default: print("Quite a random point here.")
}

This gets my nerves going big time. You could easily inadvertently swap the order of lines 1, 2, and 3, with no compiler warning, and have vastly different functionality of your code. You MUST pair code like this with tests, or just avoid relying on the order of the cases altogether.

Exhaustive, no defaulting

One of the things I like best about Swift is how the language easily enables you to be totally explicit about how you intend for things to behave. switch statements are another example in that the compiler simply won’t let you write a switch statement there may be a condition that doesn’t match. Furthermore, I also like this advice from Olivier:

I strongly recommend you to not use default when possible, and instead make your switch exhaustive, this way if you happen to add a new value to your enum you’ll be forced to think about what to do with it instead of it being ignored or eaten up by the default without you realizing.

In other words, Command-Shift-F for “default” and inspect any switch statement you find that uses it, and do everything possible to refactor it out.

Your Own Objects

If you want to use Swift pattern matching on your own objects, just override the ~= operator as:

func ~= (lhs: Affine, rhs: Int) -> Bool

When doing that though, keep in mind this advice from Olivier:

Don’t mix up the parameters order: the first parameter of the infix ~= operator (commonly named lhs, for left-hand side) is the object you’re gonna use in your case statements. The second parameter (commonly named rhs for right-hand side) is the object you’re switch-ing over.

A Real World Example

A lot of this blog series focused on theoretical uses of value types like Movies or Books. I really like when Olivier brought it back to the real world, or at least my real world with an example of using guard case let for checking the HTTP response code for a remote API call.

Looking Forward

I’m really excited to find uses for Swift pattern matching in my own code now that I know all about it. I recommend Olivier’s full article series and guarantee that you’ll learn something along the way. It’s a concise read and won’t take much of your time. Come back and let me know what you learned.

Happy cleaning.

Creating Effective iOS New User Experiences

I wrote a post for the AWeber Engineering Blog that I also wanted to pass on to you via the cleanswifter.com. The post is titled “Creating Effective iOS New User Experiences” and it’s all about what it took to build the first user experience in our latest app from AWeber, Curate. You can find the post here. I don’t want to spoil anything in the article, go take a look.

Behind The App

That post is also part of a series of blog posts we’re working on called “Behind the App.” As part of the mobile team at AWeber, we’re trying to tell some interesting parts of the story behind building Curate. You can find all the posts here.

Here’s an awesome video that tells the story behind Curate as well.

I have something really exciting coming next week, stay tuned.

Buddybuild Review

Buddybuild self describes itself as a system that “ties together and automates building, deploying and gathering feedback for mobile apps.” I’m always on the lookout for something that makes the process of developing my apps easier. I wanted to give it a try and write a buddybuild review. I know fastlane is really popular now for the automation it provides, but I wanted to peek at something at a higher level where some of the legwork is taken care of for me.

buddybuild review

Lately, I’ve been bouncing between TestFlight and Fabric for some of this functionality, but those solutions fall short in one specific area: automatic builds with tests (whenever I say “build” in this buddybuild review, I’m talking about both compilation and test execution). Since I’ve been on a continuous integration kick lately with the posts here on cleanswifter.com, I figured I’d give you a full rundown with a buddybuild review.

buddybuild review

A couple specific things I was looking for in my buddybuild review:

  • A hosted continuous integration solution – In case you didn’t see my post from yesterday, I’m tired of trying to maintain a physical build server. The idea of hosted continuous integration is very attractive to me.
  • Integration With GitHub – I’m all in on GitHub, both github.com and the hosted enterprise instance. I want deep integration with GitHub from my automation solution. I rely on pull requests, and I need my build automation system to integrate with that workflow.
  • Solid Documentation – In my opinion, when you invest your time in using a 3rd party product, you don’t want to waste your time with poor documentation.
  • Any Other Bonuses – If there are any other niceties I discovered, I wanted to report out on those as well.

My Approach For My Buddybuild Review

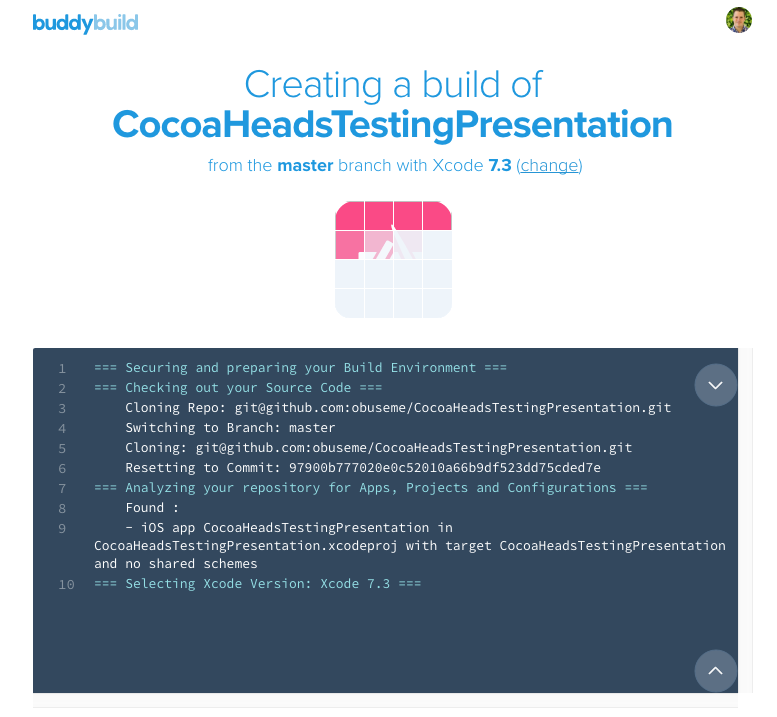
Whenever trying out new supporting infrastructure for software that you write, never use your “real” code base to begin with. I suggest creating a fake project to use so you can feel out how to use the tool before then applying it to your real code base. As such, I setup two apps in buddybuild: BuddyBuildSampleProject which started with a single test target for unit tests, and my CocoaHeadsTestingPresentation project which has three test targets: one for unit tests, one for KIF tests, and one for FBSnapshotTestCases.

buddybuild review

Feature List

This probably isn’t comprehensive, but it’s what jumped out at me during my buddybuild review:

  • Automatic builds, triggered by pushes to code repositories
  • Tests can run as part of builds, YAY
  • Wide variety of source control systems and repositories supported. Full list here
  • Integration with Apple Developer Portal and Google Play Developer Console for automatically uploading builds, synchronize provisioning profiles, and run App Store readiness tests (wow, I didn’t even know this was possible)
  • Support for both iOS and Android applications (I only tried iOS)
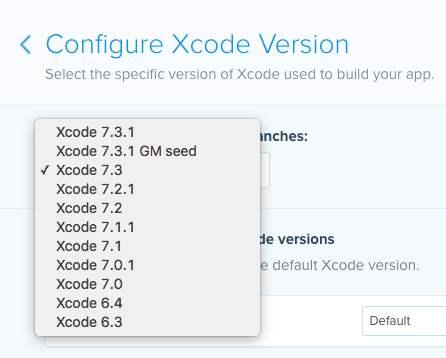
  • Manual control over which Xcode version is used for building (I wouldn’t use this, but I guess I could see a use case)
  • Status badges to show on your source code repository to indicate build status (I wish there was a way to show build result on an actual Pull Request)
  • Beta distribution of your app including analytics, and ability for testers to annotate and submit screenshots of issues
  • Crash reporting (Who doesn’t offer this these days?)
  • REST API for programmatically triggering a build (Only one endpoint so far, but a good start)
  • Team supported, invite others to collaborate on your apps and builds (This is done really well)
  • Lots of integrations: Automatically create JIRA and GitHub issues, post notifications to Slack or HipChat (It’s a nice list)

buddybuild review

The Good

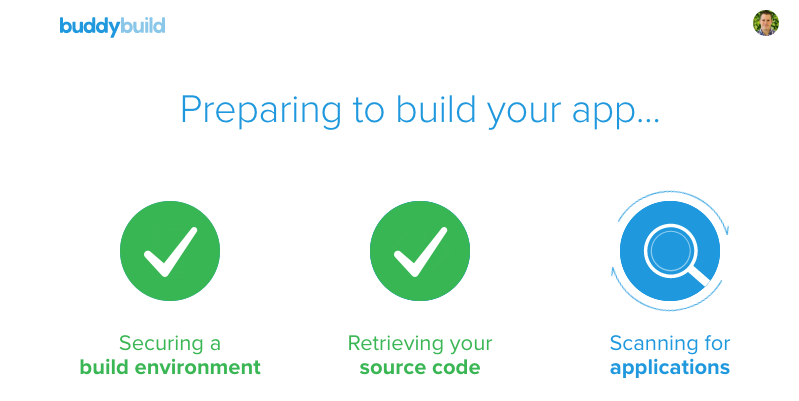
Beautiful and Easy To Use

Initial impressions are always important, and buddybuild exceeded the bar for me. It’s an entirely web-based experience, and it’s beautifully designed. Not only is it visually appealing, but I had no problem figuring out where to find different options to do accomplish tasks. Also, there was a really nice first user experience that helps walk you through all the features of buddybuild. They even built a sample app that you actually download, just like a real beta tester so you can understand features that the buddybuild SDK can enable your beta testers to use.

Great Documentation

The buddybuild documentation is out of this world and crazy good. It’s comprehensive, well-written, and even goes out of its way to teach you about best practices about things like CocoaPods, Git Submodules, and Code Signing 101.

Awesome Support

As I worked through a couple problems getting my builds up and running, I had near immediate chat access with support personnel. They were very helpful in getting my issues fixed. Additionally, they were even open minded and sought feedback on how to make things better. Shout out to Dennis, Sid, and Rashin!

There Will Always Be A Free Tier

Despite not having specific pricing information available at the moment (which I see as a bad thing), they guarantee that they “will always offer a free tier.” That’s awesome.

buddybuild review

Flexible Beta Tester Deployments

I’ve tried both other hosted build automation solutions as well as having rolled my own, and I really like how buddybuild allows you to create different groups of app testers. And then for each group, you can specify the frequency that they will receive a build: Every build, nightly, or manually. This is really cool especially if you want to segment your tester base between developers, other internal stakeholders, and external public testers. You can verify the right people get the right builds at the right time.

The Improvement Areas

Full Read and Write Access On Your Repo

In setting up buddybuild, one thing that concerned me is that it asked for a lot of access to my source code repositories. Whether I was connecting GitHub or Bitbucket, buddybuild required full read and write access to my repositories with no explanation as to why.

buddybuild review

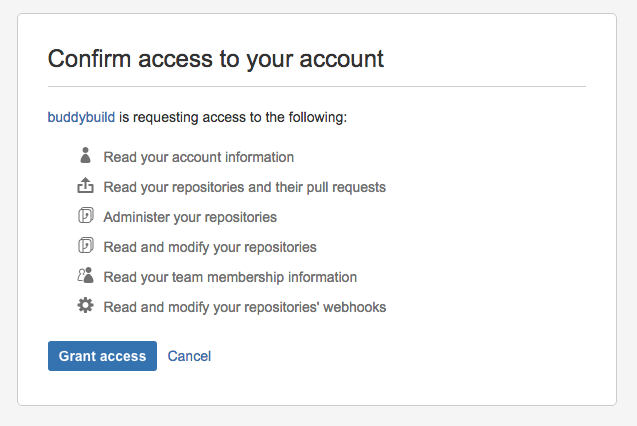
(I would have included a GitHub screenshot, but after having initially connected my account, I couldn’t find anywhere to disconnect it).

No Pricing Information Yet

Ya, I see this as a bad thing. No good thing in life is free. If I’m going to spend time building out a critical piece of my development and distribution workflow on something, I want to know that there’s a formal business relationship in place. I’m not looking to pay thousands of dollars, but rather just make sure that things are on the up and up, and that I’m not going to be left out to dry because buddybuild disappeared overnight, or that I can’t get support at some point.

Slow Builds

Right now, the builds on buddybuild are really slow. Using my vanilla Xcode project that literally had nothing else in it but the template provided code and unit tests, it took several minutes to build on buddybuild, where locally it was done in less than 10 seconds. My project with three test targets took five minutes. I can’t imagine how long these builds would take with a more substantial project with hundreds of tests.

Open Your Firewall If You Use GitHub Enterprise

I don’t really have a good solution here, besides selling a instance of buddybuild that you could host internally in your own datacenter, but that starts to become a lot of work. If you are using hosted enterprise GitHub, you need to open a hole in your firewall so buddybuild has access to your code repository. This scares me, again, I don’t have a good solution here.

No Test Device Configuration

There is no ability to specify which iOS version, or which device your tests will run on. This is crucial functionality for me in my continuous integration workflow. For a universal app that supports iOS8 and higher, I want to at least be able to run my tests on iOS8 iPhone, iOS9 iPhone, iOS8 iPad, and iOS8 iPad. Furthermore, running on device is even better than simulator. There’s no control for this right now exposed to me, the end user. Luckily, support was very responsive in helping me change the configuration behind the scenes. Ideally I don’t want to rely on them though. Furthermore, I’ll forget what I had him set this to, and there’s no place in the buddybuild UI for me to check.

Other Suggestions From My Buddybuild Review

With Twitter acquiring Crashlytics and fastlane it’s going to be hard to catch up in a couple areas. I do really like the idea of having buddybuild abstract another layer of automation on top of tools like this though where I can just quickly click a GUI to configure things. My suggestion would be to go through fastlane’s suite of tools and add a similar feature into buddybuild. I think fastlane’s maturity is a good representation of exactly what developers are looking for in automating their workflow of creating applications.

I’d also love to see code coverage reports, and static code analysis, and even other code-health metrics integrated with buddybuild’s dashboard.

Final Recommendation

After my buddybuild review, as cool as buddybuild is, until they resolve some of my improvement areas, I can’t recommend it for use in a business critical application. The lack of pricing is a major red flag to me. As polished as their site is, and how well it works, the fact that there isn’t official pricing to establish a business to business relationship makes me feel like they are operating out of a garage with the possibility that they will shutdown at any moment (disclaimer: I got stuck when something similar happened with ship.io disappeared overnight – another hosted CI solution). I also don’t want to wait around for my builds to happen. I also really want to be able to configure which devices, simulators, and iOS versions that my tests run on- this is important in any CI stack. I need that to verify that my code works well, everywhere.

The good news out of my buddybuild review is that buddybuild is working on all of these improvement areas so the outlook is good. I’ll keep an eye out for developments in this area and report back in the future.

I hope you found this buddybuild review useful, if you want to try out buddybuild and either make your own impression, or use it for something non-mission-critical, I think you’ll be impressed with what they have to offer.

Happy cleaning.

An iOS Continuous Integration Machine Is Not A Pet

An iOS continuous integration machine should not be a pet. Do you know what I mean by a “pet?” Have you heard the analogy for determining whether a server is a pet or cattle? Continuous integration machines should be treated like cattle, not pets.

iOS Continuous Integration

Without trying to sound cruel or inhumane, when cattle get sick, you can quickly replace it. When pets get sick, you spend a lot of time and money to try and help them get better. Now apply this to your continuous integration machine. If you have a dusty old Mac Mini sitting next to you that is acting as your continuous integration machine, eventually the hard drive is going to die or any other myriad of problems. Do you want to be in the business of resuscitating the machine when that happens? Not me, I’d much rather be focusing on what matters, writing awesome new features for my end users.

CI Should Not Get In Your Way

Imagine this scenario: you’ve been coding all night, and finally you get that hot new feature done, tests pass locally, and you’re ready to open a pull request. You push your branch, and for some reason Wolfie, your build server, isn’t powered on and won’t start up. Now your choice is to either spend time trying to fix Wolfie, or skip your whole iOS continuous integration workflow. What would you do?

Regardless of the choice that you made in that scenario, the point is, your CI server should be waiting to serve your needs, perfectly, every time. And if you are relying on some old piece of hardware lying around your home or office or home office, chances are, you’re going to spend more time caring and feeding for it, that you would if you had managed it as a disposable resource that can easily be replaced.

Don’t Waste Your Time

As tempting as it is to tryout Xcode Server on that old Mac you have lying in your garage collecting dust and rusting, I propose that you don’t waste your time keeping old Wolfie the build server around or even introducing him in the first place, and instead consider approaches where you aren’t in the business of maintaining your own hardware or an isolated build software stack. There’s two paths you can take towards this: all-in-one hosted CI solutions, or configuring an automated deployment of your CI environment to use something like Mac Mini colocation where you can spin up Mac Minis on demand to build your application. Here’s an overview how DayOne used macminicolo.net in conjunction with Jenkins for their builds. Want to run your tests on actual devices? Well then you could even write a script to automatically provision devices from Amazon Device Farm and run your tests on them. This approach grants you the most granularity and flexibility in your configuration, but takes a lot more effort to develop. You need to write the scripts that do the server provisioning, so that they are available and dependable in a repeatable fashion.

Sound like too much work? Alternatively, hosted iOS continuous integration solutions have been coming onto the scene lately and look very promising in that they advertise simplistic wizard-based setup of your CI jobs. Basically, login with your GitHub credentials (or Bitbucket), select your project, and click Build. Tomorrow, I’m going to give you an overview of buddybuild which is one of the hottest players on the market now in this area.

In the meantime, happy cleaning.

Continuous Integration Workflow For iOS

Cheaper Than A Dollar A Day

I came across this article today, called “Continuous Integration on a Dollar a Day” since Jon Reid of qualitycoding.org mentioned it on his Facebook page. I first want to recognize that this article was originally written back in 2006, so no need to repeat the obvious in case you discover this fact yourself. A lot has changed in 10 years, and a lot remains the same. For one, I absolutely recommend using continuous integration. The author also clarifies that the article is intended for people new to continuous integration, so some of the principles are introductory. While I recognize that, I think there are better introductory solutions for your continuous integration workflow For iOS.

Continuous Integration Workflow For iOS

To me, if you were to ask me on the street, off the top of my head, continuous integration ensures that: – Code that’s committed to your repository always compiles – Code always has tests passing

Having lived with it for so long, it’s not fathomable to consider anything else. To think that I could potentially check out what’s in the source code repository and it not compile is unthinkable. If clean code is your desired end state, then continuous integration can help you achieve it.

A Proposed Continuous Integration Workflow For iOS

I am in love with Github pull requests. A past version of me scoffed at thinking that my code must go through code review before it could be considered “done” or merged. I remember using Subversion back in 2010-ish and committing directly to the main trunk of code, with no one review it, and no automated builds. YIKES! Today though, I feel that a combination of test driven development, code review, and continuous integration truly remove the need for dedicated testers on the product team. That’s not to see we don’t manually test, I’m just saying that it removes the need for something dedicated in that role.

I don’t want to git into (pun intended) the pros and cons of other version control systems, I know there are plenty. I use GitHub for all my projects, and I love it. I think you’ll love it too.

To sum up pull requests, you work locally in a branch of code. When you’re ready to share it with others, you “push” the branch to the remote repository, and open a “pull request.” An open pull request is basically a proposed change set. Other team members can review the changes, chat about them, suggest improvements. Ultimately, the proposed change set can be accepted, and then is merged into the destination branch where you intended the code to end up.

If you want more detail, this is a great writeup directly from GitHub describing the process of using pull requests in your workflow to enable pre-merge code review.

So where does continuous integration fit into this? I propose that anytime code is about to change somewhere, continuous integration jobs should verify that the incoming change will compile AND pass tests. The thing is, as you move up the iOS testing pyramid, tests will run slower and slower. Your wait time can really grow if these gate parts of your development.

Setting Up Your Jobs

Continuous integration for iOS projects is a delicate balance between enough test coverage across OS versions and devices, running all your tests, and the putting the checks in just the right places. Here’s how I recommend striking this balance:

  • Run your full suite of tests on one device/OS combination each time code is pushed to the repo – I prefer to do this on the lowest iOS version that the app supports. I also usually do this on an iPhone for my Universal apps (no real reason, and I’ve gotten bit by iPad only bugs, so probably worth mentioning that some reasonable amount of thought is worth it here for your situation).
  • Run your full suite again on a different device/OS combination each time code merges on the result of the merge.
  • Each night, run the full suite of tests on every possible combination of devices and OS that you support that is possible within your means.

Let’s play this over the GitHub pull request model:

  1. I push a branch to the repository and open a pull request.
  2. CI server detects the push, runs all tests (unit, UI, and snapshot) on an iOS8 iPhone 5.
  3. CI build either fails or passes.
  4. CI machine puts a flag in the pull request based on the result of the build. If the build does not pass, it should not be merged.
  5. If build is successful, once code merges, a new build is triggered on the destination branch using the result of the merge to run the full suite of tests. If this build fails, manual intervention is necessary to understand why, and be addressed.
  6. Starting around 11pm, a sequence of dependent jobs kick off running the full suite of tests across every device that I own – iPhones, iPads, iOS7 (if supported), iOS8, iOS9, etc.
  7. Results from “nightlies” are reviewed in the morning.

Anytime a build fails, it should be immediately addressed. Failing builds tend to build up over time, especially with the nightlies. If a nightly fails, make fixing it the first thing you do in the morning when you arrive. It usually represents a bug in your code.

Room For Improvement

There is definitely some manual intervention needed in this workflow, it’s not full proof. Ideally, continuous integration works along side you and prevents you from doing anything stupid. Removing any manual steps from your workflow is paramount, and something I’m still working on. I’d love to hear from you, have you tried a continuous integration workflow for iOS? How has it worked out? Or if not, why not?

Happy cleaning.