Write Small Mocks

In my final piece of commentary regarding Veronica Ray’s talk on “Real World Mocking in Swift” I wanted to chime in with agreement on her claim that you should write small mocks. Create mocks that “should be relatively short and don’t contain tons of info that you don’t need.”

Why You Should Write Small Mocks

Writing mocks, or any kind of test double, can become tedious. There’s certainly been times when writing my unit tests and manual mocks in Swift that I’ve started to feel dragged down by how much required code I had to write just to repeatedly create the mocks, for test after test… Of course you can factor your code nicely to reduce redundant code, but you’ll find that the need for subtle differences in your mocks can lead to a lot of code!

Or just copy and paste mocks from test to test, it’s only tests right, JUST KIDDING!

write small mocks

Another reason why you should keep your mocks as lean as possible, is that they often mirror your production code. One of the main benefits of high test coverage is that it enables confident refactoring. If you are writing extensive and complicated mocks that do a ton of things, chances are, you are tightly coupling your mocks with your production code in a way that inhibits quick refactoring.

A Real World Example – Mocking UIViewControllerTransitionCoordinator

I was working on some code where I needed to override willTransitionToTraitCollection in a UIViewController. I was basically adding a single line of code in the method to reposition a view’s frame when Auto Layout had finished its calculations after a trait collection transition. Simple enough. Here’s the code

override func willTransitionToTraitCollection(newCollection: UITraitCollection, withTransitionCoordinator coordinator: UIViewControllerTransitionCoordinator) {

  coordinator.animateAlongsideTransition(nil) { (context) in     
    self.playerLayer!.frame = CGRect(x: self.videoView.bounds.origin.x, y: self.videoView.bounds.origin.y, width: self.videoView.bounds.size.width, height: self.videoView.bounds.size.height) 
  }

}

I wanted to write a unit test to ensure that coordinator was told to animateAlongsideTransition. The only way I could think of to do this was to mock out coordinator which is a UIViewControllerTransitionCoordinator and set an expectation that animateAlongsideTransition would be called.

I set out to create a mock UIViewControllerTransitionCoordinator. It’s protocol with three methods. One of those three will be the “expected” method, and the other two will be no-ops. That’s well within my loose guidelines of a “small mock.” I started out with this:

class MockUIViewControllerTransitionCoordinator: UIViewControllerTransitionCoordinator {

  var animatedCalled = false

  @objc func animateAlongsideTransition(animation: ((UIViewControllerTransitionCoordinatorContext) -> Void)?, completion: ((UIViewControllerTransitionCoordinatorContext) -> Void)?) -> Bool {

    animatedCalled = true
  }

  @objc func animateAlongsideTransitionInView(view: UIView?, animation: ((UIViewControllerTransitionCoordinatorContext) -> Void)?, completion: ((UIViewControllerTransitionCoordinatorContext) -> Void)?) -> Bool {

    // NO OP - don't need this method, but I need to return something
    return false
  }

  @objc func notifyWhenInteractionEndsUsingBlock(handler: (UIViewControllerTransitionCoordinatorContext) -> Void) {
    // NO OP - don't need this method
  }
}

I thought this would compile, until I learned that UIViewControllerTransitionCoordinator extends UIViewControllerTransitionCoordinatorContext which conforms to NSObjectProtocol… Uh oh. NSObjectProtocol requires 14 methods to be implemented, 14 methods!!! I would have to create implementations of 14 methods just to get my mock to work, and that’s on top of the 3 methods I already had to override for the basic UIViewControllerTransitionCoordinator behavior.

I don’t really have any hard and fast rules as to how many empty methods are too many when mocking something out, but creating at least 16 empty methods just for a mock seems overkill to me, just to verify a single line of code.

In the end, I decided against mocking out UIViewControllerTransitionCoordinator and decided against writing the test. Ya, I’m not going to hit 100% coverage with this project. I’m also not going to have this really wacky, mostly empty mock sitting in my test. It’s a tradeoff I need to live with.

Happy cleaning!

Computed Property Stubs: Easy to Create in Swift

Using mock objects is an easy way to increase your test coverage in any code base, especially with a technique I use that I coined, “computed property stubs”. For years, in the Objective-C that powered my iOS applications, I used the hell out of OCMock. I even wrote a couple articles on it. As much as I used OCMock, I definitely had a love hate relationship with it. In one way, it totally enables a test driven development workflow in a UIKit driven codebase. On the other hand, sometimes you end up writing super nitpicky tests that end up verifying each line of code, rather than overall behavior in an application. At the end of the day though, I think I do sleep better knowing that I had the test coverage (it’s kind of like eating your vegetables).

It was disappointing to learn that OCMock would not work with Swift, nor is it even possible to create a mock framework in the nature of OCMock in Swift. Read this article for more information about why OCMock won’t work with Swift. Fortunately, there’s a couple different ways that you can actually write your own mock objects in Swift. Notice, I’m proposing that you can write your own mock objects, on a case by case basis, NOT write an entire dynamic mocking framework like OCMock.

There’s two primary uses for a mock object:

  1. Stubbing a value – creating a “fake” object that behaves in a specific and predictable way that enables testing of other code.
  2. Verifying that an expected method is called with the correct parameters.

Eli Perkins wrote a great article where he covered some techniques on how to use protocols in Swift to do the later – verify that an expected method is called with the correct parameters.

In this article, I’ll show you how to do #1, create computed property stubs to return values using Swift.

Why Stub?

You might first be wondering, why stub anything in the first place? Well, let me show you through example. Consider the following super simple UIViewController:

class ViewController: UIViewController {
  @IBOutlet weak var aLabel: UILabel!
  @IBOutlet weak var aTextField: UITextField!

  @IBAction func changeLabelFromTextField(sender: AnyObject) {
    aLabel.text = "Hi " + aTextField.text!
  }
}

How would you write a unit test for changeLabelFromTextField? In my mind, I’d write a test that initializes a value in aTextField, then calls changeLabelFromTextField and then verifies that the resulting text in aLabel is correct. On the surface, that’s a great test that achieves 100% coverage on this piece of code.

Something like this:

func testChangeLabelFromTextField_ActuallySetsLabel() {
  let toTest = ViewController()
  toTest.aTextField = UITextField()
  toTest.aLabel = UILabel()

  toTest.aTextField.text = "Andy"
  toTest.aLabel.text = ""

  toTest.changeLabelFromTextField(UIButton())

  XCTAssertEqual("Hi Andy", toTest.aLabel)
}

There’s one problem, those pesky weak properties in ViewController.

Since ViewController only has weak ownership of those IBOutlets, that means you are going to have a problem when you try to set an actual instance of an object on the property – it will immediately be “released” and the property will go back to being nil.

If you don’t believe me, here’s a Playground for proof:

computed property stubs

OCMock made this easy

Back in the good ole days of using OCMock, it would have been easy to create a mock and stub those properties out.

ViewController *toTest = [[ViewController alloc] init];
id mockVC = [OCMockObject partialMockForObject:toTest];
[[[mockVC stub] andReturn:[[UILabel alloc] init]] aLabel];

Computed Property Stubs Are Also Easy

In order to stub these properties out in Swift, it isn’t that hard either. You just have to manually create your mock and specify what is to be stubbed, in a technique I call, “computed property stubs”, like this:

class MockViewController: ViewController {
  let stubbedLabel: UILabel! = UILabel()
  let stubbedTextField: UITextField! = UITextField()

  override var aLabel: UILabel! {
    get {
      return stubbedLabel
    }
    set {
      // Nothing to do here
    }
  }

  override var aTextField: UITextField! {
    get {
      return stubbedTextField
    }
    set {
      // Nothing to do here
    }
  }
}

Basically, you just create a subclass of the class that you want to mock, and then override the weak properties with a custom getter that allows you to return an actual hard instance of an object. It’s even okay to create one of these mocks for an object under test, just don’t get your wires crossed and accidentally mock or stub behavior that you actually want to verify (test driven development, and fail first FTW here).

Now, make sure that in the test, you instantiate the mock and use that, rather than the base class.

Again, for proof, here’s a playground where you can see that by using the mock, you can actually get the object-under-test’s weak properties to behave:

computed property stubs

Not the only way to test this

One could argue that testing behavior and values of UIKit driven properties like labels and text fields is something better left to black box based testing tools like Xcode UI Tests or KIF. I would agree with you. And I would add on that redundant coverage is even better! Which is why I usually end up writing both my unit tests to verify this behavior, and then complement that with a more UI oriented test to verify it from an end user perspective. Plus, there’s plenty of other times where you might be using weak properties that aren’t part of a user interface.

You can find the Swift playground that I referenced in this article in my GitHub at: https://github.com/obuseme/PlaygroundWithSwiftMocks

Thank You

A big thanks to Jon Reid for inspiring me to come up with this approach. I credit his talk on Test Driven Development for iOS at MCE 2014 for giving me the push to try mocking on my own without a framework.

Happy Cleaning!

Swift Partial Mocks are NOT an Antipattern

In today’s followup to Veronica Ray’s talk on “Real World Mocking in Swift,” she claims that partial mocks are an antipattern. I dispute that claim, especially with Swift partial mocks. I’ve gotten a ton of value out of Swift partial mocks in my mocking experience, and I think they are critical in the path towards 100% code coverage in the framework-laden world in which we live.

Partial Mocks Defined

Veronica defines a partial mock as “any actual object which has been wrapped or changed to provide artificial responses to some methods and not others.” I agree with this definition.

In as simple as an example as I could think of, the proverbial Person class, consider this code:

class Person {
  var firstName: String? = nil
  var lastName: String? = nil

  func fullName() -> String {
    return "\(firstName!) \(lastName!)"
  }

  func description() -> String {
    return "Hi, I'm \(fullName())"
  }

}

This class defines a Person as a thing that can have a firstName and a lastName. It also defines som behavior to create a the last name for Person.

One possible way to create a partial mock is through subclassing:

class MockPerson: Person {

  override func fullName() -> String {
    return "Andy Obusek"
  }
}

MockPerson extends Person as a subclass. It preserves all the behavior of the base class, while also wrapping Person to provide an artificial response as the fullName().

Now this example is really trivial, but it’s here to serve as an example to show what a partial mock is, and how you can use subclassing to create one.

Recognizing The Case Against Partial Mocks

Veronica Ray advocates that partial mocks are antipatterns for two reasons:

  1. They are challenging to setup.
  2. They decrease the comprehensibility of the test. How do you know what’s real? What’s fake?

I recognize these as valid concerns, especially for the newcomer to automated testing, or even using mock objects. That being said, I also think that the advanced engineer/team who is actually starting to investigate Swift partial mocks is up to the task for being able to comprehend “what’s real?” or “what’s fake?” in the context of the mock object.

And while subclassing has its own set of problems in production code (creates tight coupling between the parent and subclass), I’m totally fine using it in the context of my tests to gain the flexibility of using a partial mock. Swift actually makes this even easier through it’s Nested Types, let me show you. Consider the following test:

func testDescription() {

  class MockPerson: Person {

    override func fullName() -> String {
      return "Andy Obusek"
    }

  }

  let toTest = MockPerson()
  let expectedDescription = "Hi I'm Andy Obusek"
  XCTAssertEqual(expectedDescription, toTest.description())
}

This test verifies that description() actually returns the expected string, that comprises of the person’s last name. Using a Swift Nested Type, you can actually define the partial mock WITHIN THE TEST method itself! #mindblown By doing this, in my opinion, it totally eliminates any ambiguity in my mind as to confusion around “what’s real?” or “what’s fake?” with the partial mock. Since partial mock is defined right there, I can see it for myself.

Why You Should Use Swift Partial Mocks

If you aren’t sold on Swift partial mocks yet, let me give them one last pitch. There are often cases when using 3rd party framework classes (Apple’s or otherwise) in which you’ll need to write code for singletons, such as UIApplication.sharedApplication() or NSNotifcationCenter.defaultCenter(). These are perfect for partial mocking. For one, these are usually things that you don’t want to trigger their actual behavior from a test. By partially mocking them, you can override the behavior you’re verifying such that the real underlying functionality is disabled. Additionally, you can also actually make assertions that the code under test did the right thing.

For example, consider the following partial mock for NSNotificationCenter:

class MockNotificationCenter: NSNotificationCenter {

  var addObserverCalled = false

  override func addObserver(observer: AnyObject, selector aSelector: Selector, name aName: String?, object anObject: AnyObject?) {

    addObserverCalled = true
  }
}

This partial mock for NSNotificationCenter allows you to intercept and override the behavior for adding a notification observer. How useful! Now you can swap this implementation in whereever you need to write a test to verify that observers are getting added appropriately. You can even expand upon the overriden addObserver method to make further checks that the observer is added with the correct parameters.

I hope you see the value in Swift partial mocks. I know I’ve gotten a lot of benefit from them, especially back in the good ole OCMock days.

Happy cleaning!

Test Double – A generic term defined

“I’ll just a mock for that!” I can’t tell you the number of times that I’ve said that when I really meant a “stub” or a “fake” or a “partial mock” because it’s been so many. In her talk on “Real World Mock Objects in Swift” I heard Veronica Ray use a term that was new to me: “test double.”

What is a Test Double

According to Testing on the Toilet at Google: “A test double is an object that can stand in for a real object in a test, similar to how a stunt double stands in for an actor in a movie. These are sometimes all commonly referred to as “mocks”, but it’s important to distinguish between the different types of test doubles since they all have different uses. The most common types of test doubles are stubs, mocks, and fakes.”

I’ve been in total violation of this principle, that “it’s important to distinguish between the different types of test doubles” and have totally been one of those people who commonly refers to all test doubles as mocks. Maybe it’s because I’ve been working with the same colleagues for several years and we’ve come to an established lingo, but I certainly haven’t felt like something was missing by incorrectly using the term “mock.”

Types of Test Doubles Defined

Mock: An object written to verify that certain methods are called or not called.

Fake: A piece of code that can be swapped in to production code to provide an alternate, more reliable or faster implementation to be used from your tests.

Stub: A dumb object hard coded to return a specific result or value.

Working to get better

I’m definitely going to make an effort to correct my use of terminology, if only to just learn for myself. I’ll try to say “Let’s create a fake!” rather than “Let’s create a mock!” when I really mean a fake. Happy cleaning.

“Real World Mocking in Swift” talk by Veronica Ray

Today I watched a talk “Real World Mocking in Swift” by Veronica Ray hosted on realm.io. Mocks are something that I have found a TON of use for while striving to reach that elusive 100% code coverage from my unit tests. I have conflict on my mind on what the “right” amount of mock usage is, and I think Veronica hit a lot of important points in her talk.

A Tradeoff of Using Mock Objects

When using mock objects in your unit tests, there’s certainly a point at which readability and maintainability of your tests suffers in exchange for reaching 100% coverage. The tradeoff in my mind though, which is where I end up okay with these sacrifices, is that I rarely find the need to go back and change the code under test in such a minor way that the resulting changes to the tests are either minor tweaks, or major surgery to rewrite the tests. To say that another way, I feel better about the higher code coverage, despite less maintainable tests.

I Miss You OCMock

I used the hell out of OCMock during my days as an Objective-C developer. I loved how easy its API enabled me to quickly mock out 3rd party classes in order to test edge cases in my own code. I was bummed when I learned that the runtime hackery that enables OCMock simply isn’t possible in Swift. Since then though, I’ve come around to making my own mocks. It really isn’t that hard, it does take a little but more time, but I think it forces me to make some more protocol oriented choices in your code than I would otherwise have thought about.

Benefits of Mock Objects

Veronica specifically calls out three benefits of using mock objects that I totally agree with:

  1. It will make your tests faster.
  2. It will increase the coverage of your test suite.
  3. It will make your tests more robust.

Regarding #1, imagine you have a complicated method that runs a time consuming algorithm to tell you if some model object matches some criteria. When writing a unit test for a class that uses this algorithm, you don’t want to have to rely on this slow processing each time your tests run. By using mocks, you can simply force a response of true or false depending on what you’re trying to test, BOOM, FASTER!

As #2 states, mocks will increase the coverage of your test suite. I find this to be true especially with testing error handling. Often, some third party code I’m using will provide hooks for custom error handling in the event that things go wrong (imagine a failed object initialization). Without needing to reverse engineer the third party code, and intentionally code up a scenario in which the error handling will be triggered, you can simply code up a mock that forces the specific error scenario to trigger so you can write tests for your error handling code, BOOM, MORE TEST COVERAGE!

Along the same lines as writing a mock to simulate an error case for a failed web service connection, simply using a mock to provide a static API response is a great way that the #3 benefit is realized. You can then write tests that don’t depend on making a slow network connection and instead use the 100% reliable mock to always simulate expected response.

I don’t think anyone would dispute the value of mocks. I think it’s more of a cost/benefit tradeoff in one’s mind to buy in that the additional amount of coding is worth it.

Going Deeper on Mocking in Swift

There are a couple other topics that jumped out at me in this video that I’m going to save for dedicated posts throughout the rest of the week. Here’s a teaser:

  1. My reaction to Veronica’s claim that partial mocks are an antipattern.
  2. Veronica gives some guidelines as to “what makes a good mock.” I agree, and I’ll give you an anecdote of a time that I learned this lesson the hard way.
  3. Veronica talks about dependency injection. I learned of a cool way to do this with protocols when needing a different implementation per target.
  4. My opinion of using the term “mocking” to mean anything that is a “test double.”
  5. Veronica references some Swift mocking frameworks. I’ll provide getting started examples.

Implicitly Unwrapped Optionals and IBOutlets

Today I got burned by Xcode. It’s happened before and I’m sure it will happen again. I really do appreciate the help that you give me Xcode, but why are you such an enabler?

Implicitly Unwrapped Optionals as an IBOutlet goes BOOM The long story short: a tester noticed a crash in my app that ended up being due to the fact that Xcode’s Assistant Editor

helped me to create an implicitly unwrapped optional IBOutlet that ended up being nil in tester’s flow. When you try to access a nil implicitly unwrapped optional, your app goes BOOM (aka crash).

What went wrong My incorrect assumption was that the

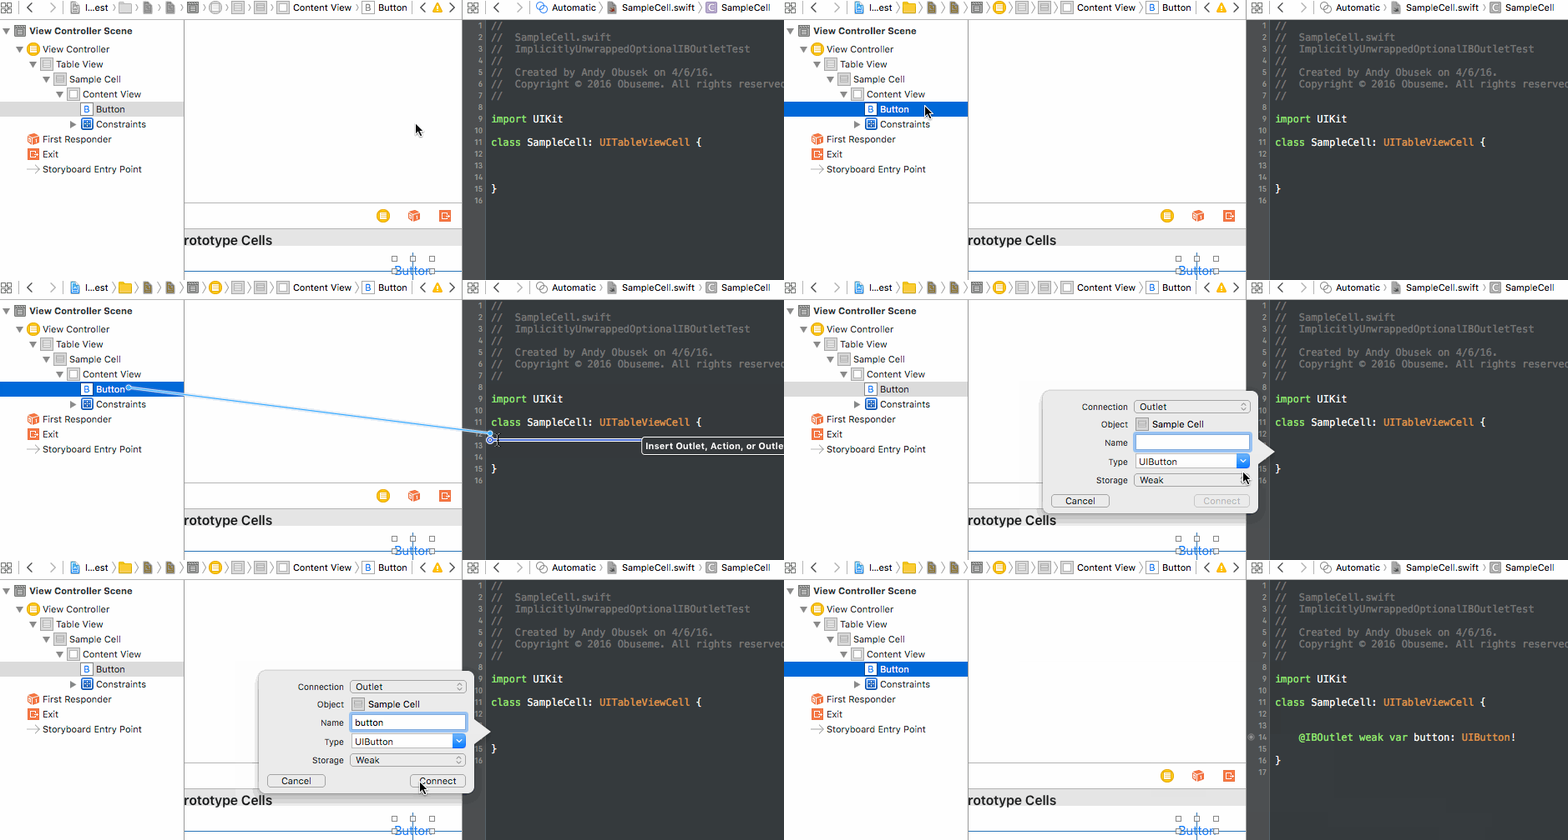
IBOutlet would never be nil. Turns out that isn’t a safe assumption. In my case, it was a slightly complicated UITableView where one cell was attempting an operation on another cell that was off the screen. While the UITableView was able to find the destination cell in question, that cell’s IBOutlets weren’t alive at that moment, aka they were nil. So why I tried to access them directly, without concern for their ability to be nil, an error results. Where Xcode steered me wrong, was in how it automatically created the IBOutlet for me. Take a look at this: implicitly unwrapped optionals When the Assistant Editor creates the corresponding variable, it’s defined as an implicitly unwrapped optional. In my opinion this is bad, and the root cause of this error. I would never think to write an automated test to verify flows in the code around those being nil – well I will going forward. And in my opinion, totally enables me the developer to go on thinking that I never need to worry about IBOutlets being nil. Since Apple built Xcode to do this, it’s like the a complicit in my crime of not worrying about whether my IBOutlet was nil or not.

The Fix

It’s a pretty easy fix, but one that’s easy to overlook. First, take a look at this risky code:

class SampleCell: UITableViewCell {

  @IBOutlet weak var button: UIButton!

  func styleCellWith(color: UIColor) {
    button.setTitleColor(color, forState: .Normal)
  }
}

It’s well within the rules of the Swift compiler to write that code. And in fact, Xcode even points you in the direction of writing this code. The bad part is that since

button is an implicitly unwrapped optional, that means any reference to it with a ? mark means that if it’s nil, your app will crash. If you don’t believe me, try setting it to nil right before the title color is set, and try to run an app. There’s a couple safer ways to do this. Any of these work:

@IBOutlet weak var button: UIButton?

Defining

button in this way will force you to explicitly treat the optional everywhere you use it. While it’s more verbose, I kind of like this technique because I think this is the essence of where Swift excels – it forces you to be a little more defensive or explicit with handling “anything that could go wrong.”

Writing a test for it My big gripe with this is that Xcode makes it so easy to write the faulty code based on how the Assistant Editor guides you to create the

IBOutlet in code. If I’m following my normal Test Driven Development flow, I’d never think to write a test first to verify that an IBOutlet was not nil. But of course, now that someone actually found the bug in my code, I need to add a test to ensure that this specific case doesn’t actually happen again. Luckily, it’s pretty easy:

class SampleCellTests: XCTestCase {

  func testStyleCellWith_DoesNotCrash_WhenButtonIsNil() {
    let toTest = SampleCell()
    toTest.styleCellWith(UIColor.blueColor())
    // No need to do an assert here , as long as the test doesn't crash, it will be marked passed
  }

}

Just setup the object with the

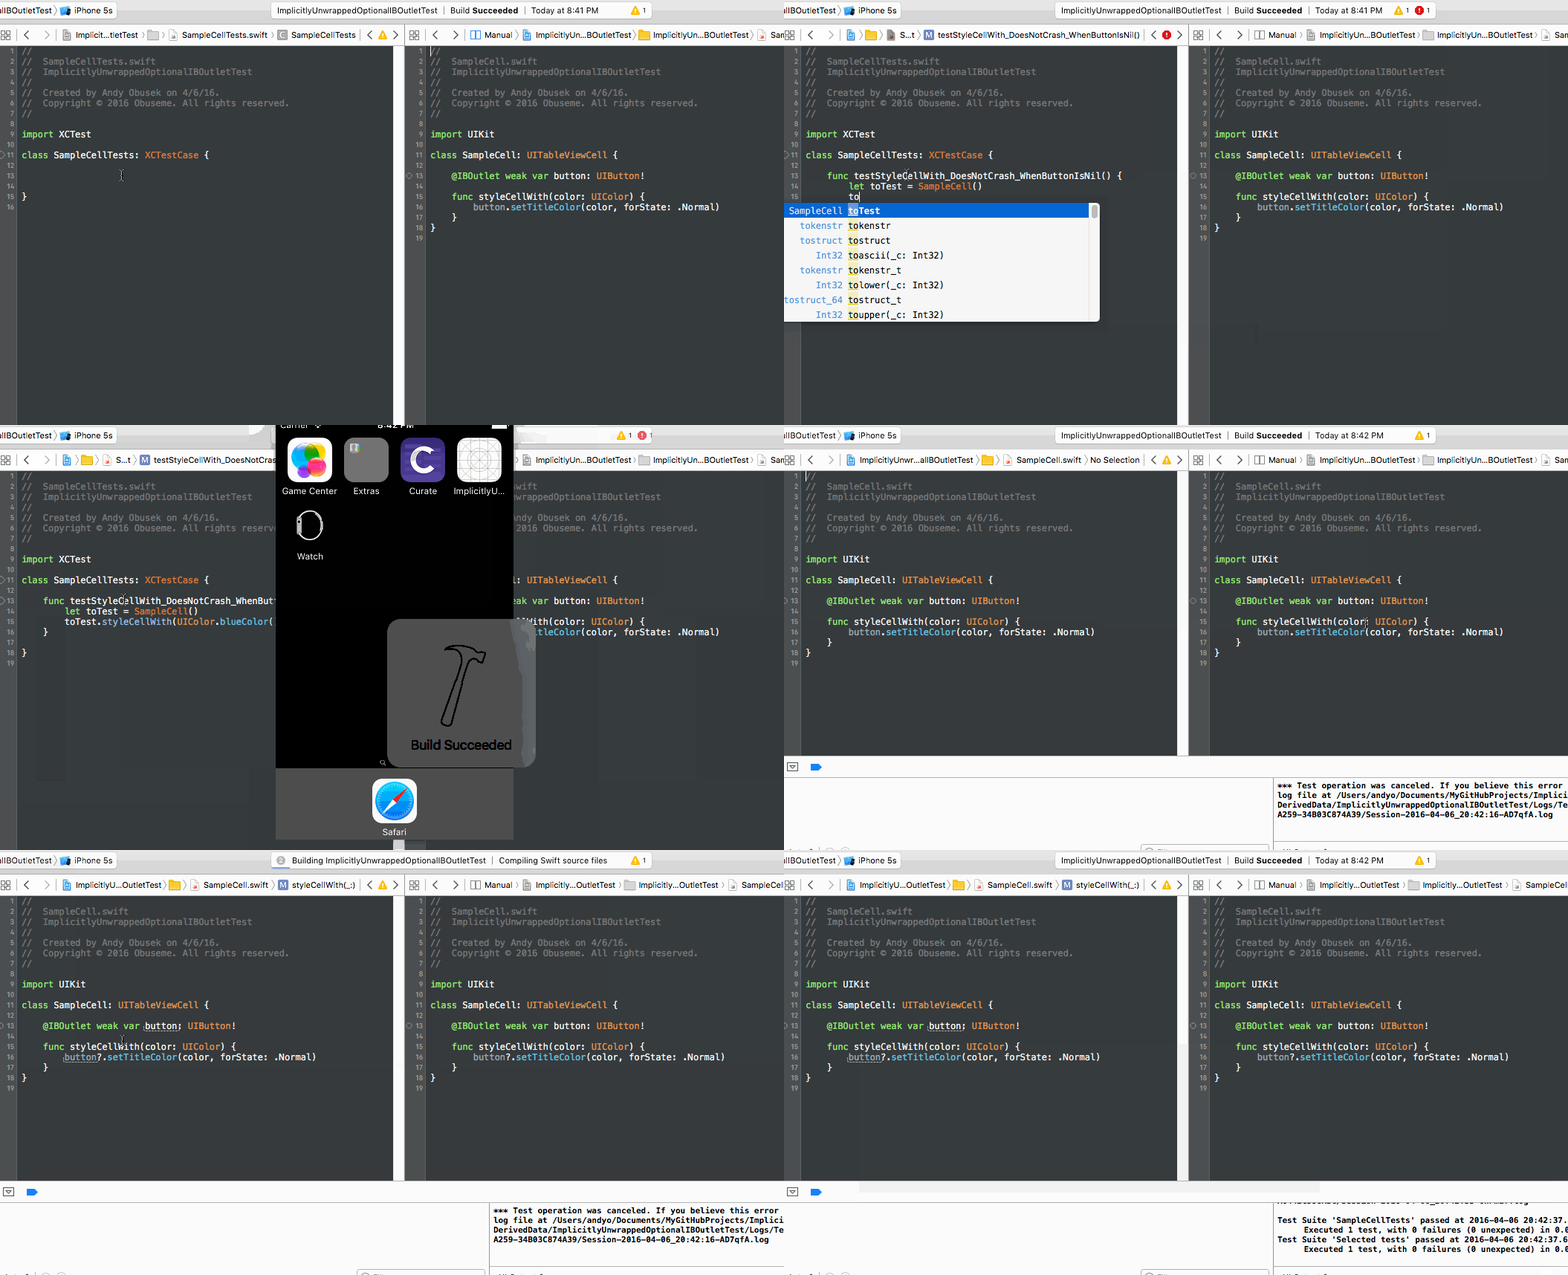
IBOutlet, call the method under test. No need for an assertion, as long as the test doesn’t crash, we can consider that a pass. Here’s a pseudo screencast of my test driven development flow for fixing this bug and adding a test: implicitly unwrapped optionals

Beat Xcode to Submission! Well not really, in fact, you should totally try to work

with Xcode. It’s important to be aware of it’s shortcomings though, and I totally got burned today! Luckily I had an awesome tester discover that there are cases when you can’t totally trust an IBOutlet to exist, despite connecting it right from the storyboard. In case you want to try out the sample code, I posted it on Github. Check it out here. You can read more about implicitly unwrapped optionals in Apple’s documentation here.

WWDC 2013 – Testing in Xcode 5

Ya’ll have it so easy with the tools that come with Xcode 7 to enable high quality code. Back in the day, Apple didn’t even recognize automated testing during WWDC (though tools were available in Xcode). It wasn’t until 2013 that a dedicated session to automated testing made the WWDC agenda. For posterity, go take a look:

WWDC 2013 – Testing in Xcode 5

or if you prefer, you can read it here.