“What’s New In Swift” WWDC Session Highlights

I just finished watching What’s New in Swift from WWDC 2016 and wanted to pass on the highlights for you. “What’s New in Swift” is great session that I highly recommend you also watch for yourself. There are a couple things that jump out at me that I feel are worth writing about.

Goals For Swift 3

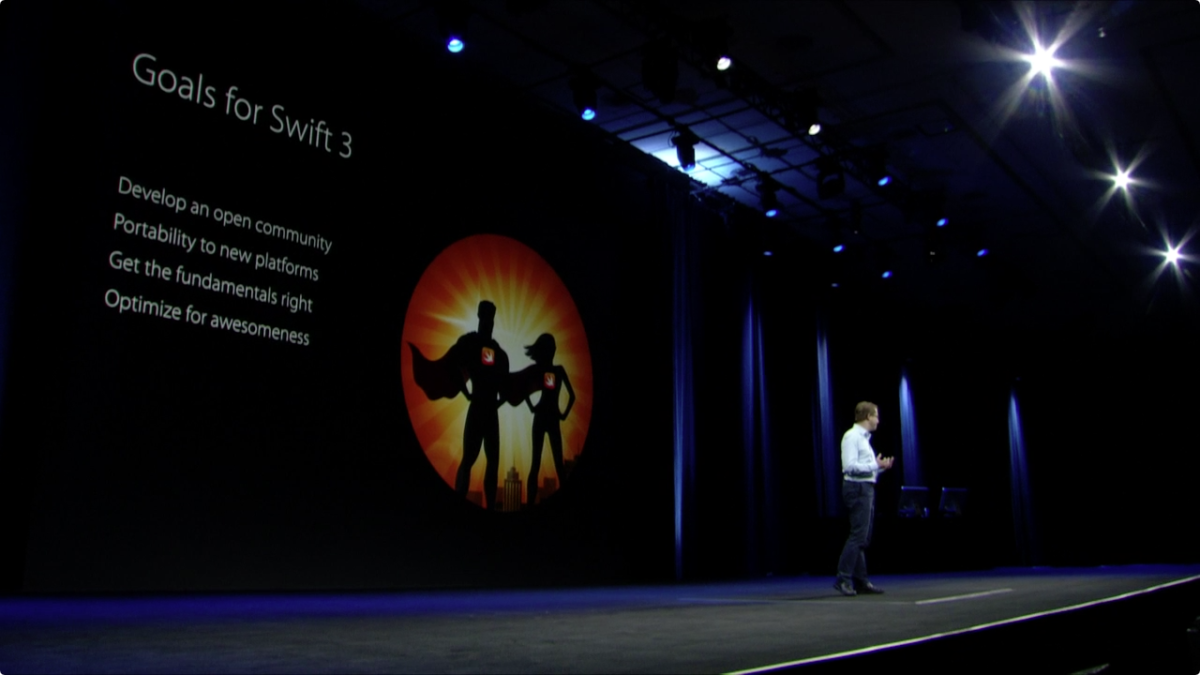
Unless you’re hiding under a rock, you’ll know that the big news in Swift is the upcoming release of Swift 3. This presentation kicks off immediately covering the goals for Swift 3:

  • Develop an open community
  • Portability to new platforms
  • Get core fundamentals into shape
  • Optimize Swift for awesomeness

Granted some of these are a little “soft” and not well defined, I really like the first goal. On stage, Apple did not hold back in describing that Swift 3 will be the result of total community involvement with the languages evolution – which is exactly the desired intention. This totally hits home for me. Even though I haven’t been an active participant in the language’s evolution, I’m a firm believer that the open source software model leads to better software, and for something as critical as the language that I could be using for the foreseeable future, I’m happy that it’s being evolved in such an open model.

Swift Adoption at Apple

This might be one of the first times that I’ve seen or heard Apple formally recognize and describe major uses of Swift internally in their own development. It was surprisingly extensive, and refreshing to hear them actually admit to it. Swift has been out almost two years now, and for me, one of the signs I’ve been looking for to represent Swift’s maturity is precisely this: Apple’s adoption of the language in their own products, and they finally hit the nail on the head for me. Here are some highlights:

Apple Products With Lots Of Swift

  • New Music app for iOS
  • Console app in Sierra
  • Dock app
  • Picture in Picture in Sierra (actually 100% Swift)
  • New documentation viewer in Xcode (actually 100% Swift)
  • Swift Playgrounds for iOS (actually 100% Swift)

The presenter then went on to talk further about the Dock with some really revealing information. Internally, there’s actually a lot of stuff I consider general “OS functionality” that Apple actually classifies as the Dock app. Can you believe all this is included in the Dock codebase?

  • Dock bar at the bottom
  • Mission Control
  • Command-Tab Application Switcher
  • Stacks
  • LaunchPad
  • Spaces
  • Dashboard
  • Some of Notification System

What’s interesting about the Dock app is that a significant amount of Swift code was written for it in the El Capitan release, 10s of thousand lines of Swift code out of a total of 200k lines of code total. This is interesting because it represents a case study of a non-trivial amount of code that will be migrated from Swift 2.2 to Swift 3.0, and Apple did just this. The migration resulted with about 15% less actual code! Not to mention that the engineers like the safety features of Swift as well as the more articulate code.

How To Contribute To Swift

Have you seen swift.org yet? It’s the home of Swift on the web, besides the actual repositories on GitHub. There is a ton of information on the site about everything from migrating to Swift 3, to information on how to get started with contributing to the language. It’s a lot to digest. During this WWDC session, What’s New in Swift, an extremely simple outline was provided what contributing to the Swift language looks like:

  1. Socialize your idea idea on the mailing list.
  2. Once critical mass is achieved, the idea becomes a formal proposal on GitHub.
  3. Formal review of the proposal happens once the pull request for the proposal merges into the repository. Formal review happens on the mailing list, out in the open.
  4. Core team arbitrates a decision. The rationale for the decision is always documented, regardless of whether the proposal was accepted or rejected.

All proposals, past and present, can be found in the swift-evolution repository.

Swift 3 Source Compatibility

The #1 goal for Swift 3, according to Chris Lattner, is API compatibility. This is no small task though, because decisions now will affect developers for years to come since the API will become stable. As a result, naming guidelines are carefully considered and many tweaks are made as a result. Swift 3 APIs should:

  • Strive for clarity, not terseness or verbosity
  • Capture essential information
  • Omit redundant info/boilerplate

A direct result of this is the libdispatch renaming that I wrote about a couple weeks ago. Additionally, one of the weirdest and hardest things to get used to in Objective-C for me (a prior Java developer) was it’s incredible verbosity for the sake of verbosity. Chris Latter provides a bunch of examples on stage of this new clarity, and I’m loving it.

Here’s two such examples:

array.insert(1, atIndex: 0)

becomes

array.insert(1, at: 0)

and

if url.fileURL {}

becomes

if url.isFileURL {}

I can’t wait.

There is a lot more information in this session, “What’s New in Swift”, especially some in-depth discussion of improvements and cleaning-up of Swift 3 syntax, as well as some information on tool improvements when using Swift.

One of the closing statements of “What’s New in Swift” recognized that Swift 2.3 will be a total interim step towards Swift 3, most notably, Apple recommends getting Swift 3 migration into your project plans. And certain tools like the Swift Playgrounds iOS app and the Thread Sanitizer already require Swift 3. Luckily Xcode 8 comes with a nifty converter.

Did you watch this session, “What’s new in Swift”? If so, what are your impressions?

Happy cleaning.

VIDEO: Building Tests

Chapter 4 of “Refactoring, Improving the Design of Existing Code by Martin Fowler, titled “Building Tests” provides an introduction to automated testing.

Here’s my perspective on the chapter:

Video Transcription:

Hey, what’s up everybody, it’s Andy from cleanswifter.com and I’m here to talk about the next chapter in Martin Fowler’s book, “Refactoring, Improving the Design of Existing Code.” You can buy that book in the Amazon Affiliate link in the description for this video. Last week we talked about chapter 3, Bad Smells in Code. In that chapter, Fowler presents some ideas of what to look for in your code to know it’s time to actually refactor it. This week, chapter 4, titled “Building Tests” Fowler actually talks about some techniques for introducing automated tests within your code. If you’ve been following any of my posts on cleanswifter.com, you’ll know I have a huge passion for automated testing of software. I was kind of excited for this chapter. When I finally got around to actually reading it, it fell short of what I was looking for. Fowler clarifies that this book is not about testing. And the reason I interpret he chose to include this chapter is to recognize the value of automated testing, especially in the time of refactoring. He doesn’t even mention test driven development in this chapter. Now, if you remember test driven development, one of the key steps to test driven development, is that final third step, to refactor everything you’ve done. Test driven development. You start off writing a failing test. Then you write the production code to make that test pass. And then you refactor. Now just bringing it back to Fowler’s book, he doesn’t actually talk about anything in detail with regard to test driven development. In fact I think he kind of just puts this chapter in here to recognize that when you go out to use this as a recipe book of refactoring, that you should keep in mind the value that can be adding tests throughout the process.

If you’re not familiar with automated testing, or haven’t been following any of my posts on <cleanswifter.com> is that remember, automated tests’ value is that it is code testing code. You can execute an entire test bed at the click of a button. Where your entire code base is tested in a matter of seconds. You do actually have to go through the effort of writing these tests, and that’s no small effort. Then you can make changes to the rest of your code base without risk of introducing new bugs. Additionally, when you find a bug, whether that’s reported through QA or an end user, you can first write a test to verify that bug, and then go fix the code to make sure the test passes, you can now have the confidence that that bug will never surface again in your code. For me, that’s really the value of adding tests, knowing that when I find a bug, I can write a test that verifies the bug does actually exist, then I can go fix that code, make the bug go away, make sure the test passes, then never again will that bug surface. This is especially relevant to the iOS development community because at a recent presentation I gave to the local CocoaHeads group here in Philly, there continues to be the majority of iOS development community that doesn’t write automated tests for their code. In that meeting we talked about some of the reasons this may be. For an independent or contract developer, that they don’t feel it is worth their time. Or hard to justify to their client, whether that is them for their own product, or someone else paying them for their time), that it is worth the time to write tests. It’s a 1:1 ratio, for every hour you spend writing production code, you’ll need to spend an hour writing test code. I think until you learn the lesson the hard way, and then see the value of automated tests correcting that, you’ll never be able to justify the cost. It’s like a catch-22, because if you never try it you’ll never be able to justify it to yourself. On the otherhand, if you’re going to wait to see the value before you try it, you’re never going to try it. I think one takeaway from this chapter, that even Fowler calls out, is that specifically, go try to write a couple tests. Don’t spend a lot of time writing an entire big test suite for your entire application, worrying about every edge case, and instead focus on just 1 or 2 tests that are going to add value, and I guarantee you that sometime down the road, you will have your butt saved by the fact that you had automated tests. You will write automated tests, and sometime down the road they will fail because some code change you made introduced an unexpected, but tested for bug. You’ll be happy since you caught the bug and not an end user.

Fowler clarifies the difference between unit and functional tests. Again, I have a ton of documentation on <cleanswifter.com> that helps differentiate and define each of these for iOS development. For unit testing, you’ll be using XCTest as provided by Apple. It’s code that tests other code at the smallest level. You’ll write a test method for each path of conditional code in another class. It requires intimate knowledge of the code you’re testing. Consider it white box testing. You can see the code, to know the conditional paths, and know how to test it. This is in contrast to functional testing. Functional testing is where you would call it black box testing. You don’t have intimate knowledge of the code. Instead, all you’re doing is testing the code from the outside in. This means that you are simulating an end user swiping, tapping, and navigating your app. There are a bunch of tools out there to do this. Apple’s provided tool is called Xcode UI Tests and I personally use a different tool, called KIF. It stands for Keep-It-Functional. It’s open source. Some of the benefits I like of KIF are that it is mature, been in the community for years, you can write your tests in either Objective-C or Swift. I haven’t spent enough time with Xcode UI Tests to know it’s pros and cons, but I did use its predecessor, UI Automation which was Javascript driven and a poorly documented API. It’s soured me on Apple’s provided functional testing tools, so that’s why I haven’t gone back yet. I’ll do that soon and write about it on <cleanswifter.com>.

Another important thing to keep in mind when you write your first test, regardless of whether you are doing TDD or not, and in fact if you are just starting out I don’t recommend jumping right into TDD. But one thing to keep in mind when writing your tests is that you want to see that test fail when you expect it to fail. For example, say you are writing a test for a method that adds numbers. You want to first verify that adding 1 and 2, never returns anything other than 3. Otherwise, you won’t have the confidence that when someting actually goes wrong, that test will actually fail. That gives you a baseline assurance that that test is actually providing that quality check you’re looking for. And trust me, I’ve seen plenty of cases where I’ve written a test and not done this, only to find out that it wasn’t actually verifying, what I thought it was verifying.

It was a pretty short chapter, chapter 4 in Martin Fowler’s book, “Refactoring” where he just introduces the concept of tests. If you’re watching this video and haven’t checked out anything I’ve posted on <cleanswifter.com> around automated tests. And if you’re not writing automated tests for your iOS apps, you should definitely go try that out.

Looking ahead, I’m really excited for the rest of this book. Chapter 4 is the end of the preamble before the actual list of refactoring recipes. Going forward, week by week, I’m going to make a screencast of that refactoring, showing it in action with Swift code, and post it on <cleanswifter.com>. It will demonstrate the transformation from smelly code to nice clean code. That will be done in a screencast where you can go back and watch. The first refactoring we’ll try in the book is Extract Method. It’s a really easy one, but also a really effective one. I’m looking forward to showing you that. Check back next week for that. In the meantime, be sure to checkout <cleanswifter.com>.

Happy cleaning.

Swift Algorithm Club

I caught an article today on raywenderlich.com that pointed me to the Swift Algorithm Club. I had heard of the Swift Algorithm Club a couple times in the past, but never got the chance to take a peak. Today, I got that chance, and what I saw was really cool. Algorithms classes during my education were some of the most challenging, yet fulfilling classes that I took. Being able to dissect or create a complicated algorithm is a unique feeling. Something that I don’t think I’ve flexed enough since being out of school.

Big Oh

I really like how the Swift Algorithm Club has frequent references to Big-Oh notation, eg O(n). In particular, it’s so easy to get caught up in the high level APIs that we are often using when building our iOS apps, that it’s easy to lose focus on the basics of algorithm effectiveness and efficiency. Being able to spot an optimization to move from quadratic (O(n^2)) to linear (O(n) to even constant (O(1)) efficiency can have vast performance improvements in everything from network usage, to battery usage, to simple responsiveness of your app. One drawback, is that with the ease of learning how to “code iPhone apps” from the vast amount of tutorials out there, often these course cover nothing about algorithmic efficiency. So if all this is new to you, go do some Googling. Here’s a recorded course from MIT.

Go Contribute

I also appreciate how the article also puts an offer out recruiting contributors. I think for newcomers to the field, finding a project to be able to contribute to, or even just know how to contribute, can be daunting. It was nice that the article made some pointers on how to get started.

Wrap Up

Open source, and algorithms, how can you get any better? The Swift Algorithm Club is awesome. Take a look, and I’d love to know, do you consider Big-Oh efficiency when building your apps?

Happy cleaning.

Swift OOP Patterns and Principles

I’m always fascinated how to best apply the intersection of object oriented programming (OOP) and functional programming that is made available in Swift. Having come from a Java background, I’m much more inclined to flex my object oriented skills when a problem arises. I came across two great GitHub repos today from the same author, Oktawian Chojnacki. These repos are actually more of a reference than an open source code base. Oktawian created one repo that shows Swift OOP Patterns, and another for Swift OOP Principles. I actually had my own failed attempt at documenting Swift OOP Patterns here. I’m just including that for laughs as I abandoned the project, but it’s good to know that the idea was relevant and it’s exciting to come across someone else who was able to successfully execute it. I’ll definitely be starring and bookmarking these projects from Oktawian for future reference. And what’s even cooler about these pages and playgrounds is that Oktawian actually links out to more formal definition and further reading about each principle and pattern. It’s great having all this documentation consolidated within one easy to reference resource.

The Swift Patterns and Principles

I know I need to develop those functional programming muscles, but it’s too exciting not to pass along cool resources for Swift OOP patterns and principles when I find them. How are you making out with your balance of OOP and functional paradigms in your Swift? Do you have any similar resources for getting up to speed or improving your functional programming toolset? If so, you absolutely must send them to me, because I’m looking for anything and everything available on that topic.

6 days until WWDC 2016… The countdown continues.

Until next time, happy cleaning.

Chris Eidhof on Table View Controllers

Are you following Chris Eidhof? If you’re not, you should be. He first came across my radar a couple years ago when was part of the founding team behind objc.io. I loved the monthly issues of objc.io, and I definitely recommend going to check out their back catalog if you haven’t already (despite some of it being written in Objective-C). I also really like Deckset, an app Chris made for easily creating beautiful presentations. And finally, I also read his book Functional Swift which honestly might have been my first formal introduction to real world functional programming outside of some academic exercises during my education.

Recently, Chris gave a talk at try! Swift in Japan titled Table View Controllers in Swift. I wanted to bring the talk to your attention because I think it’s a good example of refactorings and improvements you can make while implementing a table view controller in Swift. Go take a look.

My Highlights

Custom Initializers For View Controllers

It’s so easy to get sucked into the world of Interface Builder. Don’t forget that there is life outside it. Chris provides some solid examples of how you can leverage custom initializers for UITableViewControllers to provide the initial set of data, and even closures for populating table view cells. Nothing revolutionary here, but again, something easy to forget if you are always living in a world of Interface Builder.

Fix All In Scope

Do you know about this magical Xcode tool? I didn’t until I watched this talk. In a lot of ways, this is why watching talks are worth their time in gold. Even if the talk itself isn’t on a topic you’re totally into, just watching someone else code can yield so many little tips and tricks that will help you improve your own development. During this presentation, I learned from Chris of the option in Xcode to “Fix All In Scope.” I’ve only tried this in a couple cases, and it is magical. As you are coding, you’ll forget to force unwrap an optional, or something that was originally declared a constant with let now needs to be a variable with var. Xcode can automatically fix a lot of these issues for you, and there’s actually a menu option with an accompanying keyboard shortcut- Command-Option-Control-F. Give it a try.

Screen Shot 2016-05-26 at 8.58.48 PM

Refactoring View Controllers Crosses a Line

Watching this video with a co-worker, he said something that I agreed with. A lot of videos you watch, and blog posts you read, about refactoring view controllers, eventually cross a line from being useful to academic. I feel like this happened in the later part of this talk. Eventually the generalizing and refactoring led to a point where no two screens in an app are going to be so similar that you can use a single view controller implementation and be able to entirely reuse it. Despite that, there are plenty of things to be learned from “academic” implementations.

Refactor Out State

One pattern I really love in Swift that comes from functional programming is being able to use computed properties to help define the “truth.” Here’s an example:

var history:[String]? = nil
var canUndo: Bool {
  get {
    return (history == nil)
  }
}

This is similar to what Chris shows in his presentation for managing a history of changes to an editable table view. What I like about this, is that pre-functional programming, and back in Objective-C, I would create a instance boolean variable canUndo that gets set to true or false throughout the flow of code based on changes to the table view’s contents. That code is super prone to bugs, particularly because ensuring that canUndo is the correct value in all cases. By using a computed property like this to consolidate the truth in one place helps remove that uncertainty and proneness to bugs.

Refactoring A Complicated Initializer

As Chris moves through his refactoring of a table view controller, at one point he arrives at a custom initializer for the table view controller that has many parameters. Besides being hard to read, it also doesn’t really lend itself to testing that well. Chris’s refactoring creates a struct that represents each parameter in the custom initializer. Now, just one thing to pass as a value to the initializer whether from calling code, or the tests. Easy, and concise.

Try It Yourself

I’d love to hear what you think after watching the video, what were your takeaways?

Happy cleaning.

libdispatch in Swift 3, an evolutionary step

Are you following any of the lists.swift.org mailing lists? You can subscribe for emails to follow the open source development of Swift. I’m on the swift-evolution-announce list, and it ends up with a couple emails a day. To me, that’s a reasonable volume. The thing I like about that list is that it’s a broadcast of the approved or rejected changes, no discussion. While it would probably be interesting, I don’t have the bandwidth to be reading through in-depth discussions about how Swift should evolve. Simply catching the end result of the discussion and decision is good enough for me now. When the email arrives, I usually just do a quick glance at the subject to see if it’s something I’m interested in, and recently, oh boy, was there one that caught my eye, it’s related to libdispatch in Swift 3.

Modernize libdispatch for Swift 3 naming conventions

Proposal SE-0088 was accepted to modernize libdispatch in Swift 3 naming conventions. libdispatch, aka Grand Central Dispatch is a modern and easy way to add multithreading to your applications. If you want to learn about it, here’s a great tutorial on Ray Wenderlich’s site (the tutorial is in Objective-C).

libdispatch in Swift 3
Grand central….

For whatever reason, I have such a hard time memorizing any of the C APIs that we use when building our apps. For me, most commonly this is libdispatch. I must have written this code hundreds of times:

Old Way

dispatch_async(dispatch_get_main_queue(),{
    // do something UI-ish on the main thread, like dismiss a view controller
})

but for some reason, I’m never confident in being able to write it based on memory. I almost always have to either lean on code completion, or even go look up a different place I wrote it to copy and paste. And this just scratches the surface of Grand Central Dispatch.

Now, this will all change with Swift 3, as there will be a modernized API available for libdispatch in Swift 3. So that old C code I wrote above will be written as:

New Way

let queue = DispatchQueue.main
queue.asynchronously {
    // do something UI-ish on the main thread, like dismiss a view controller
}

That makes me so happy. Hopefully this modernization of libdispatch in Swift 3 gives you a gist of the cool developments that are happening on the Swift mailing lists and you might even go sign up for them yourself. Let me know, what cool things did you discover?

Happy cleaning.

Asynchronous iOS Unit Test Tutorial

By default, iOS unit tests in Xcode execute just like any other method, from top to bottom, in serial order. This is fine most of the time. Occasionally though, you’ll find the need to write a unit test for asynchronous code. And with the prevalence of closures in Swift, writing an asynchronous iOS unit test will become even more common place.

The Method To Test

Consider this method under test:

class Parser {

  func parse(toParse: String, success: () -> Void, failure: () -> Void) {
    // code omitted
  }

}

It requires some imagination, but envision that this is some kind of complicated parsing routine that takes a long amount of time to complete. Depending on the outcome of parsing the input, either a closure success() or ‘failure()` (that are provided to the method) are guaranteed to be called at some asynchronous, non-deterministic point in the future.

Why This Is Hard To Test

At the core of this method, an input string will be parsed, probably on a different thread. In some cases that will pass, and in some cases that will fail. We need to figure out how to write tests to verify that.

Initially, one might think to try a test like this:

func testParse_Succeeds() {
  let toTest = Parser()
  toTest.parse("Something that will parse", success: {
    // do nothing, test will pass
  }) { 
    // if failure parsing, fail test
    XCTFail()
  }
}

The problem with this approach, is that assuming the long running code in parse(_:success:failure) is executed on another thread, `testParse_Succeeds()’ will likely complete before the parsing actually completes, thus never giving the test the chance to perform the actual verification. This will result in false positives, with no way to actually see the test fail.

asynchronous iOS unit test

The Solution – Expectations

There’s a really cool API provided in an XCTestCase extension that makes testing asynchronous code possible.

public func expectationWithDescription(description: String) -> XCTestExpectation

and

public func waitForExpectationsWithTimeout(timeout: NSTimeInterval, handler: XCWaitCompletionHandler?)

Here’s how you can use this with the previous example to verify the asynchronous code:

func testParse_Succeeds() {
  // 1
  let expectation = expectationWithDescription("Parsing Succeeds")
  let toTest = Parser()
  toTest.parse("Something that will parse", success: {
      // 2
      expectation.fulfill()
    }) { 
      // 3
      XCTFail()
  }

  // 4
  waitForExpectationsWithTimeout(1.0) { (_) -> Void in
  }
}

Looking at this line by line:

  1. Create an expectation for parsing to succeed
  2. When parsing succeeds, mark the expectation as fulfilled (and optionally perform any other verification)
  3. Explicitly fail the test if parsing does not succeed
  4. Tell XCTest to wait 1.0 second for the expectation to be fulfilled, or otherwise fail the test. (Good thing the timeout is configurable).

That’s it, now you can write an asynchronous iOS unit test!

Getting Cleaner

Now you know how to write an asynchronous iOS unit test. Take a minute to try out these sweet extensions on XCTestCase. I think you’ll find a lot of creative uses for them. Keep in mind, it doesn’t necessarily need to be long running code that needs this solution, but rather any code that is going to execute in an asynchronous fashion. Do you unit test your web service API calls?

Happy cleaning.

Other References:

Swift Pattern Matching Is Powerful

In Natasha The Robot’s weekly Swift newsletter, I caught a pretty awesome series of articles written by Olivier Halligon on Swift pattern matching. After reading this four-post series, my mind is sufficiently blown in thinking about all these new ways to use Swift pattern matching.

swift pattern matching
]4 Pattern matching in the real world.

Here are the articles:

According to Apple’s documentation on Swift Patterns:

A pattern represents the structure of a single value or a composite value. For example, the structure of a tuple (1, 2) is a comma-separated list of two elements. Because patterns represent the structure of a value rather than any one particular value, you can match them with a variety of values. For instance, the pattern (x, y) matches the tuple (1, 2) and any other two-element tuple. In addition to matching a pattern with a value, you can extract part or all of a composite value and bind each part to a constant or variable name.

Basically, this means that if you have a value like a struct, the struct can be represented by any number of “patterns” that generally describe the type. You can then use patterns in conditional checks to selectively filter for values that match the pattern.

Switches, Not Just Integers

From Olivier’s articles:

In Swift, you’re not restricted to use switch on integer values or enums like in ObjC. You can actually switch on a lot of stuff, including (but not restricting to) tuples.

This was an incredible discovery for me. It’s little nuggets of discovery like this that so easily slip through the cracks when learning new languages.

This Is Scary

Switch case statements are evaluated in order. This feels scary to me.

Here’s Olivier’s example:

let point = CGPoint(x: 7, y: 0)
switch (point.x, point.y) {
  case (0,0): print("On the origin!")      // 1
  case (0,_): print("x=0: on Y-axis!")     // 2
  case (_,0): print("y=0: on X-axis!")     // 3
  case (let x, let y) where x == y: print("On y=x")
  default: print("Quite a random point here.")
}

This gets my nerves going big time. You could easily inadvertently swap the order of lines 1, 2, and 3, with no compiler warning, and have vastly different functionality of your code. You MUST pair code like this with tests, or just avoid relying on the order of the cases altogether.

Exhaustive, no defaulting

One of the things I like best about Swift is how the language easily enables you to be totally explicit about how you intend for things to behave. switch statements are another example in that the compiler simply won’t let you write a switch statement there may be a condition that doesn’t match. Furthermore, I also like this advice from Olivier:

I strongly recommend you to not use default when possible, and instead make your switch exhaustive, this way if you happen to add a new value to your enum you’ll be forced to think about what to do with it instead of it being ignored or eaten up by the default without you realizing.

In other words, Command-Shift-F for “default” and inspect any switch statement you find that uses it, and do everything possible to refactor it out.

Your Own Objects

If you want to use Swift pattern matching on your own objects, just override the ~= operator as:

func ~= (lhs: Affine, rhs: Int) -> Bool

When doing that though, keep in mind this advice from Olivier:

Don’t mix up the parameters order: the first parameter of the infix ~= operator (commonly named lhs, for left-hand side) is the object you’re gonna use in your case statements. The second parameter (commonly named rhs for right-hand side) is the object you’re switch-ing over.

A Real World Example

A lot of this blog series focused on theoretical uses of value types like Movies or Books. I really like when Olivier brought it back to the real world, or at least my real world with an example of using guard case let for checking the HTTP response code for a remote API call.

Looking Forward

I’m really excited to find uses for Swift pattern matching in my own code now that I know all about it. I recommend Olivier’s full article series and guarantee that you’ll learn something along the way. It’s a concise read and won’t take much of your time. Come back and let me know what you learned.

Happy cleaning.

Writing Your First FBSnapshotTestCase

I’m in the thick of preparing for my talk at Philly CocoaHeads this week, but I wanted to get a quick post out that shows you how easy writing your first FBSnapshotTestCase is. Yesterday, I showed you how to setup FBSnapshotTestCase with Carthage. I’m going to assume you’ve done that already. I’ve create a sample project for my talk on Thursday that I’m going to use for this walkthrough on writing your first FBSnapshotTestCase. You can download that on GitHub here.

What You’ll Test

Open the application, and Build and Run.

writing your first FBSnapshotTestCase

You’ll see it’s a simple app, one that I’ve even used before in other posts. There’s two flows forward from this first screen, either with the Save, and continue button or the Continue, without saving button. If the user chooses, they may enter their name and tap Save, and continue to access the Welcome view where their name is shown to them.

writing your first FBSnapshotTestCase

Simple enough. In writing your first FBSnapshotTestCase, you are going to verify that the name specified shows up correctly on the Welcome view.

Take The Baseline Snapshot

To create the test, right-click the SnapshotTest group, and select New File:

writing your first FBSnapshotTestCase

Select Unit Test Case Class and Next:

writing your first FBSnapshotTestCase

Name the test WelcomeSnapshotTests and specify it as a Subclass of FBSnapshotTestCase. Click Next:

writing your first FBSnapshotTestCase

Click Create on the subsequent screen.

If you are prompted to create a bridging header, select Don’t create.

Now, Xcode will create the source file for you and drop you in it. The first thing to do is correctly import FBSnapshotTestCase.

Replace this:

import XCTest

with this:

import FBSnapshotTestCase
@testable import CocoaHeadsTestingPresentation

Importing CocoaHeadsTestingPresentation is necessary to access classes from that module so we can create views specific to the app. Now, you should be able to build with Command-B.

Delete everything within the WelcomeSnapshotTests class, and add this:

override func setUp() {
  super.setUp()
  recordMode = true
}

This setUp() method tells FBSnapshotTestCase that when recordMode is true, new snapshots will be taken. This requires the application to be in a “known good state.” That means that the view that you are going to “snapshot” looks just as you want it to look, because all future test runs will compare against this view.

Next, add this test method:

func testWelcomeView_WithName() {
  let welcomeVC = UIStoryboard(name: "Main", bundle: nil).instantiateViewControllerWithIdentifier("WelcomeViewController") as! WelcomeViewController
  welcomeVC.name = "Andy Obusek"
  FBSnapshotVerifyView(welcomeVC.view)
  FBSnapshotVerifyLayer(welcomeVC.view.layer)
}

This test creates a WelcomeViewController from a storyboard, specifies the name to be shown, and then verifies the view and layer.

Run this test. Just as usual, I suggest the keyboard shortcut Command-U. You’ll actually see the test fail:

writing your first FBSnapshotTestCase

But looking closer at the message:

Test ran in record mode. Reference image is now saved. Disable record mode to perform an actual snapshot comparison!

Nothing is actually wrong. FBSnapshotTestCase is just telling you that since it’s in recordMode, it will take new snapshots, but not let the test pass.

To see the snapshot, open the directory /SnapshotTests/ReferenceImages_64/SnapshotTests.SnapshotTests/. Inside that directory, you should see a png file that is the snapshotted view! So cool!

writing your first FBSnapshotTestCase

Turn Off Record Mode

Now that the baseline snapshot has been taken, turn recordMode off.

override func setUp() {
  super.setUp()
  recordMode = false
}

Now, rerun the test with Command-U. And bingo bango, the test passes! Light is green, trap is clean!.

Make Sure It Fails When It Needs To

It’s hard, if not impossible, to practice test driven development when writing your first FBSnapshotTestCase, or really any snapshot test at all. Since it requires the known “good state” to be snapshotted, some amount of real development has to happen first. That being said, you should still make sure that the test fails when it should. To do that, we’ll hack a bug into WelcomeViewController. Open WelcomeViewController.swift and add a few “eeee” to how the welcome message is set:

override func viewDidLoad() {
  super.viewDidLoad()
  if let name = name {
    welcomeLabel.text = "Welcomeeeeeeeee \(name)"
  } else {
    welcomeLabel.text = "Welcome Player 1"
  }
}

Re-run the test. It will fail! Whew, now we know that it will actually fail when it should.

Wrap Up

See, wasn’t it easy writing your first FBSnapshotTestCase? I hope snapshot testing helps you out. I’d love to hear how it helps you, or what you think of this approach. Please leave a comment!

Happy cleaning.

FBSnapshotTestCase Installation with Carthage

FBSnapshotTestCase installation failed with CocoaPods 1.0.0.rc.2 while in preparation for an upcoming presentation to Philadelphia CocoaHeads. I gave Carthage a try, and it worked! I wanted to write it up and share it with you. Now I know that switching to Carthage may not work for everyone just to use a test framework, but maybe there’s a hybrid solution that you could come up with?

What is FBSnapshotTestCase

FBSnapshotTestCase is a testing framework that was originally written at Facebook by Jonathan Dann with significant contributions from Todd Krabach. As a testing framework, it allows you to test the user interface of your iOS app by diff’ing screenshots. Yep, you heard me write, you literally take a source screenshot, mark it as “correct” and then all future runs of the test suite use this as the basis for determining if the test passes or not.

As my preferred channel, and as the README suggested, I wanted to install FBSnapshotTestCase with CocoaPods, but this issue prevented me from doing so in a Swift project. Instead, I tried using Carthage and was successful.

FBSnapshotTestCase Installation with Carthage

Step 1: Download Carthage

Carthage is an alternate dependency management framework, one that is more lightweight than CocoaPods (and doesn’t require Ruby! YEY). If you don’t have Carthage installed, download the latest .pkg file from here. I used 0.16.2 for this tutorial. FBSnapshotTestCase Installation was really easy with Carthage.

Step 2: Create a Cartfile

In the root of your project, create a new file called Cartfile. Add this to it:

github "facebook/ios-snapshot-test-case"

The Cartfile contains your dependencies for the project. While you can specify versions of your dependencies, I was content just picking the latest release, and thus didn’t specify a version.

Step 3: Install the Dependencies

Now that you have a Cartfile, the next thing to do is install the dependencies with Carthage. To do this, from a shell, run:

carthage update --platform iOS

You’ll see output like:

*** Fetching ios-snapshot-test-case
*** Checking out ios-snapshot-test-case at "2.1.0"
*** xcodebuild output can be found in /var/folders/mp/k1jy2r2d3gg9bzkz0v9y5jxm00024f/T/carthage-xcodebuild.GOHIjS.log
*** Building scheme "FBSnapshotTestCase iOS" in FBSnapshotTestCase.xcworkspace

A new Carthage/ directory will be created with your dependencies. Carthage is different from CocoaPods, in that, you now need to manually configure the libraries within your Xcode project.

Step 4: Add Dependencies to Your Project

Open a Finder window for the root folder of your project, and then navigate down the hierarchy to Carthage/Build/iOS. You should see the framework for FBSnapshotTestCase.

FBSnapshotTestCase Installation

Now, in Xcode, open the target settings for your test target, in my case it’s called SnapshotExampleTests, and then select the Build Phases tab, and then expand Link Binary With Libraries. Drag the framework in there:

FBSnapshotTestCase Installation

It will then look like:

FBSnapshotTestCase Installation

Step 5: Add a FBSnapshotTestCase

Create a new unit test (File -> New -> File):

FBSnapshotTestCase Installation

And specify it as a subclass of FBSnapshotTestCase

FBSnapshotTestCase Installation

At the top of the file, replace:

import XCTest

with

import FBSnapshotTestCase

At this point, you can try running your new FBSnapshotTestCase (Command-U). Everything should compile, but the test will fail.

Step 6: Copy-Frameworks

I’ll be honest, I’m not really sure why this final step is necessary, but without it, the tests would not pass. Carthage’s README indicates it’s necessary for an “App Store submission bug” but I’m not even archiving here, just running tests.

Do this (copied right from Carthage’s [README]):

On your application targets’ “Build Phases” settings tab, click the “+” icon and choose “New Run Script Phase”. Create a Run Script in which you specify your shell (ex: bin/sh), add the following contents to the script area below the shell:

/usr/local/bin/carthage copy-frameworks

and add the paths to the frameworks you want to use under “Input Files”, e.g.:

$(SRCROOT)/Carthage/Build/iOS/FBSnapshotTestCase.framework

It should now look like this:

FBSnapshotTestCase Installation

Now, try to run your FBSnapshotTestCase again with Command-U. It should compile and pass your test!

Wrap Up

See, isn’t FBSnapshotTestCase installation easy? Now you’re free to go ahead and use FBSnapshotTestCase to your heart’s content. I plan to write another post that will help you through creating your first FBSnapshotTestCase. If you’re a long time CocoaPods user, I know this isn’t optimal, but hey, look at it this way, at least you have an opportunity to try out Carthage if you’ve never looked at it before.

I got a log of inspiration and ideas for installing FBSnapshotTestCase with Carthage from this article on <raywenderlich.com>.

Happy cleaning!