
I’m in the thick of preparing for my talk at Philly CocoaHeads this week, but I wanted to get a quick post out that shows you how easy writing your first FBSnapshotTestCase is. Yesterday, I showed you how to setup FBSnapshotTestCase with Carthage. I’m going to assume you’ve done that already. I’ve create a sample project for my talk on Thursday that I’m going to use for this walkthrough on writing your first FBSnapshotTestCase. You can download that on GitHub here.
What You’ll Test
Open the application, and Build and Run.

You’ll see it’s a simple app, one that I’ve even used before in other posts. There’s two flows forward from this first screen, either with the Save, and continue button or the Continue, without saving button. If the user chooses, they may enter their name and tap Save, and continue to access the Welcome view where their name is shown to them.
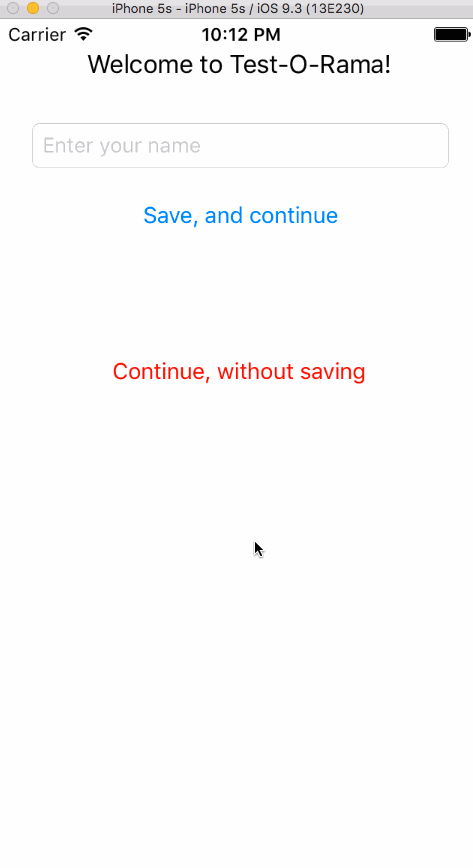
Simple enough. In writing your first FBSnapshotTestCase, you are going to verify that the name specified shows up correctly on the Welcome view.
Take The Baseline Snapshot
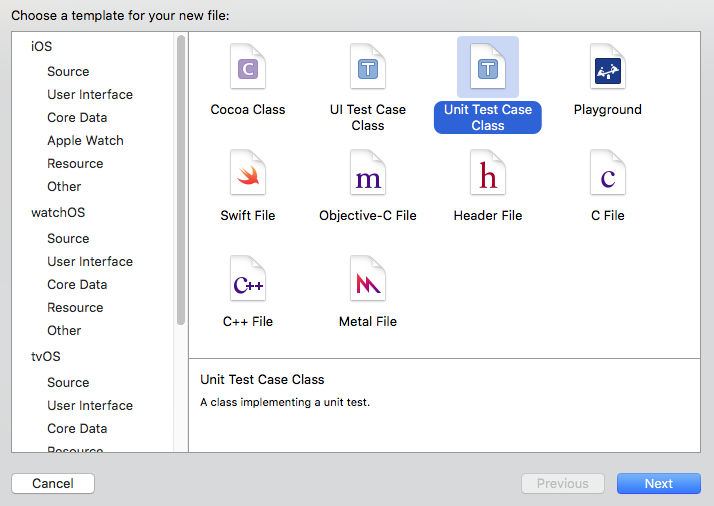
To create the test, right-click the SnapshotTest group, and select New File:

Select Unit Test Case Class and Next:
Name the test WelcomeSnapshotTests and specify it as a Subclass of FBSnapshotTestCase. Click Next:

Click Create on the subsequent screen.
If you are prompted to create a bridging header, select Don’t create.
Now, Xcode will create the source file for you and drop you in it. The first thing to do is correctly import FBSnapshotTestCase.
Replace this:
import XCTest
with this:
import FBSnapshotTestCase
@testable import CocoaHeadsTestingPresentation
Importing CocoaHeadsTestingPresentation is necessary to access classes from that module so we can create views specific to the app. Now, you should be able to build with Command-B.
Delete everything within the WelcomeSnapshotTests class, and add this:
override func setUp() {
  super.setUp()
  recordMode = true
}
This setUp() method tells FBSnapshotTestCase that when recordMode is true, new snapshots will be taken. This requires the application to be in a “known good state.” That means that the view that you are going to “snapshot” looks just as you want it to look, because all future test runs will compare against this view.
Next, add this test method:
func testWelcomeView_WithName() {
  let welcomeVC = UIStoryboard(name: "Main", bundle: nil).instantiateViewControllerWithIdentifier("WelcomeViewController") as! WelcomeViewController
  welcomeVC.name = "Andy Obusek"
  FBSnapshotVerifyView(welcomeVC.view)
  FBSnapshotVerifyLayer(welcomeVC.view.layer)
}
This test creates a WelcomeViewController from a storyboard, specifies the name to be shown, and then verifies the view and layer.
Run this test. Just as usual, I suggest the keyboard shortcut Command-U. You’ll actually see the test fail:

But looking closer at the message:
Test ran in record mode. Reference image is now saved. Disable record mode to perform an actual snapshot comparison!
Nothing is actually wrong. FBSnapshotTestCase is just telling you that since it’s in recordMode, it will take new snapshots, but not let the test pass.
To see the snapshot, open the directory

Turn Off Record Mode
Now that the baseline snapshot has been taken, turn recordMode off.
override func setUp() {
  super.setUp()
  recordMode = false
}
Now, rerun the test with Command-U. And bingo bango, the test passes! Light is green, trap is clean!.
Make Sure It Fails When It Needs To
It’s hard, if not impossible, to practice test driven development when writing your first FBSnapshotTestCase, or really any snapshot test at all. Since it requires the known “good state” to be snapshotted, some amount of real development has to happen first. That being said, you should still make sure that the test fails when it should. To do that, we’ll hack a bug into WelcomeViewController. Open WelcomeViewController.swift and add a few “eeee” to how the welcome message is set:
override func viewDidLoad() {
  super.viewDidLoad()
  if let name = name {
    welcomeLabel.text = "Welcomeeeeeeeee \(name)"
  } else {
    welcomeLabel.text = "Welcome Player 1"
  }
}
Re-run the test. It will fail! Whew, now we know that it will actually fail when it should.
Wrap Up
See, wasn’t it easy writing your first FBSnapshotTestCase? I hope snapshot testing helps you out. I’d love to hear how it helps you, or what you think of this approach. Please leave a comment!
Happy cleaning.