Weekend Reading for August 5, 2016

Weekend Reading for August 5, 2016, click here

Happy Weekend fellow Clean Swifters. Aside from checking out this year’s incredible Perseid meteor shower , I found some good reading.

Get “Weekend Reading” delivered in your email, as well as every other cleanswifter.com post, and receive a free screencast on iOS automated testing by signing up here. “Weekend Reading” is created through AWeber’s app, Curate, which I helped create and is entirely written in Swift.

Happy cleaning

VIDEO: Building Tests

Chapter 4 of “Refactoring, Improving the Design of Existing Code by Martin Fowler, titled “Building Tests” provides an introduction to automated testing.

Here’s my perspective on the chapter:

Video Transcription:

Hey, what’s up everybody, it’s Andy from cleanswifter.com and I’m here to talk about the next chapter in Martin Fowler’s book, “Refactoring, Improving the Design of Existing Code.” You can buy that book in the Amazon Affiliate link in the description for this video. Last week we talked about chapter 3, Bad Smells in Code. In that chapter, Fowler presents some ideas of what to look for in your code to know it’s time to actually refactor it. This week, chapter 4, titled “Building Tests” Fowler actually talks about some techniques for introducing automated tests within your code. If you’ve been following any of my posts on cleanswifter.com, you’ll know I have a huge passion for automated testing of software. I was kind of excited for this chapter. When I finally got around to actually reading it, it fell short of what I was looking for. Fowler clarifies that this book is not about testing. And the reason I interpret he chose to include this chapter is to recognize the value of automated testing, especially in the time of refactoring. He doesn’t even mention test driven development in this chapter. Now, if you remember test driven development, one of the key steps to test driven development, is that final third step, to refactor everything you’ve done. Test driven development. You start off writing a failing test. Then you write the production code to make that test pass. And then you refactor. Now just bringing it back to Fowler’s book, he doesn’t actually talk about anything in detail with regard to test driven development. In fact I think he kind of just puts this chapter in here to recognize that when you go out to use this as a recipe book of refactoring, that you should keep in mind the value that can be adding tests throughout the process.

If you’re not familiar with automated testing, or haven’t been following any of my posts on <cleanswifter.com> is that remember, automated tests’ value is that it is code testing code. You can execute an entire test bed at the click of a button. Where your entire code base is tested in a matter of seconds. You do actually have to go through the effort of writing these tests, and that’s no small effort. Then you can make changes to the rest of your code base without risk of introducing new bugs. Additionally, when you find a bug, whether that’s reported through QA or an end user, you can first write a test to verify that bug, and then go fix the code to make sure the test passes, you can now have the confidence that that bug will never surface again in your code. For me, that’s really the value of adding tests, knowing that when I find a bug, I can write a test that verifies the bug does actually exist, then I can go fix that code, make the bug go away, make sure the test passes, then never again will that bug surface. This is especially relevant to the iOS development community because at a recent presentation I gave to the local CocoaHeads group here in Philly, there continues to be the majority of iOS development community that doesn’t write automated tests for their code. In that meeting we talked about some of the reasons this may be. For an independent or contract developer, that they don’t feel it is worth their time. Or hard to justify to their client, whether that is them for their own product, or someone else paying them for their time), that it is worth the time to write tests. It’s a 1:1 ratio, for every hour you spend writing production code, you’ll need to spend an hour writing test code. I think until you learn the lesson the hard way, and then see the value of automated tests correcting that, you’ll never be able to justify the cost. It’s like a catch-22, because if you never try it you’ll never be able to justify it to yourself. On the otherhand, if you’re going to wait to see the value before you try it, you’re never going to try it. I think one takeaway from this chapter, that even Fowler calls out, is that specifically, go try to write a couple tests. Don’t spend a lot of time writing an entire big test suite for your entire application, worrying about every edge case, and instead focus on just 1 or 2 tests that are going to add value, and I guarantee you that sometime down the road, you will have your butt saved by the fact that you had automated tests. You will write automated tests, and sometime down the road they will fail because some code change you made introduced an unexpected, but tested for bug. You’ll be happy since you caught the bug and not an end user.

Fowler clarifies the difference between unit and functional tests. Again, I have a ton of documentation on <cleanswifter.com> that helps differentiate and define each of these for iOS development. For unit testing, you’ll be using XCTest as provided by Apple. It’s code that tests other code at the smallest level. You’ll write a test method for each path of conditional code in another class. It requires intimate knowledge of the code you’re testing. Consider it white box testing. You can see the code, to know the conditional paths, and know how to test it. This is in contrast to functional testing. Functional testing is where you would call it black box testing. You don’t have intimate knowledge of the code. Instead, all you’re doing is testing the code from the outside in. This means that you are simulating an end user swiping, tapping, and navigating your app. There are a bunch of tools out there to do this. Apple’s provided tool is called Xcode UI Tests and I personally use a different tool, called KIF. It stands for Keep-It-Functional. It’s open source. Some of the benefits I like of KIF are that it is mature, been in the community for years, you can write your tests in either Objective-C or Swift. I haven’t spent enough time with Xcode UI Tests to know it’s pros and cons, but I did use its predecessor, UI Automation which was Javascript driven and a poorly documented API. It’s soured me on Apple’s provided functional testing tools, so that’s why I haven’t gone back yet. I’ll do that soon and write about it on <cleanswifter.com>.

Another important thing to keep in mind when you write your first test, regardless of whether you are doing TDD or not, and in fact if you are just starting out I don’t recommend jumping right into TDD. But one thing to keep in mind when writing your tests is that you want to see that test fail when you expect it to fail. For example, say you are writing a test for a method that adds numbers. You want to first verify that adding 1 and 2, never returns anything other than 3. Otherwise, you won’t have the confidence that when someting actually goes wrong, that test will actually fail. That gives you a baseline assurance that that test is actually providing that quality check you’re looking for. And trust me, I’ve seen plenty of cases where I’ve written a test and not done this, only to find out that it wasn’t actually verifying, what I thought it was verifying.

It was a pretty short chapter, chapter 4 in Martin Fowler’s book, “Refactoring” where he just introduces the concept of tests. If you’re watching this video and haven’t checked out anything I’ve posted on <cleanswifter.com> around automated tests. And if you’re not writing automated tests for your iOS apps, you should definitely go try that out.

Looking ahead, I’m really excited for the rest of this book. Chapter 4 is the end of the preamble before the actual list of refactoring recipes. Going forward, week by week, I’m going to make a screencast of that refactoring, showing it in action with Swift code, and post it on <cleanswifter.com>. It will demonstrate the transformation from smelly code to nice clean code. That will be done in a screencast where you can go back and watch. The first refactoring we’ll try in the book is Extract Method. It’s a really easy one, but also a really effective one. I’m looking forward to showing you that. Check back next week for that. In the meantime, be sure to checkout <cleanswifter.com>.

Happy cleaning.

Philly CocoaHeads Testing Talk – Where to Go From Here

I want to thank Philly CocoaHeads for an awesome opportunity to spread the word on automated iOS testing. I’m happy with how the presentation turned out, it was a great audience, and there was some really insightful conversation throughout the night. It turns out, the presentation was recorded and will be hosted online for anyone to watch. As soon as it’s up, I’ll link to it here and share it with you all.

If you’re looking to get more information about automated testing outside of this site, here’s some useful resources:

Tools Mentioned

  • XCTest – Apple’s main test framework, that is the foundation of unit tests, and a lot of other test tools.
  • Xcode UI Tests – WWDC 2015 video introducing the revamped UI testing framework from Apple.
  • OCMock – If you’re testing Objective-C code and need to write mocks, THIS IS AWESOME. Unfortunately, doesn’t totally work with Swift.
  • KIF – What I’m currently using for UI tests.
  • FBSnapshotTestCase – Use it for your snapshot tests.
  • Your Fingers – Useful for manual testing.
  • Fabric – Useful for a lot of stuff, including beta distribution, crash reporting, and app analytics
  • OHHTTPStubsCorey Floyd’s suggestion for stubbing network requests
  • NocillaCorey Floyd’s other sugggestion for stubbing network requests
  • ChairsCurtis Herbert’s suggestion for setting up the simulator with preset data for testing
  • Martin Fowler’s Test Pyramid – Not a tool, but the original documentation.
  • AWeber – The company I work for.

Sample Project

The project I used tonight represents a bare bones project configured with 4 targets. The main target, a target for unit testing, a target for KIF testing (UI/Functional tests), and a target for FBSnapshotTestCase testing. I used Carthage to setup the dependencies.

If you’re looking for the project, you can find it on my GitHub at: https://github.com/obuseme/CocoaHeadsTestingPresentation.

Other Resources

PS – Did you know where the term “Where to Go From Here” comes from? Every tutorial on raywenderlich.com closes with a section of the same title. I found it fitting to use here (almost as a tribute). :]

Happy Cleaning.

Sam Soffes on Test Driven Development

It always feels good when your own perspective is validated by someone you respect. Listening to the Immutable podcast episode 36 today, Sam Soffes gave a great endorsement of test driven development that I agree with. Essentially the question was asking for Sam’s perspective on unit testing, specifically challenging whether they are worth the time or not. To summarize Sam’s response, he acknowledged that they might feel like a chore when you are first writing them, but it’s when you are going back to change the code later that the value really shines. This to me is one of the main reasons why I write unit tests. There have been many times when I’ve gone into an existing code base to make a change – either a bug fix or a feature enhancement, only to introduce another bug. It’s when you have an automated test catch this mistake that you’ll buy into the value as well.

Immutable Podcast

I also wanted to recognize this podcast as one that I’ve been enjoying lately. I think you’d like it too. Each episode focuses on five listener submitted questions to Sam Soffes, an iOS engineer, and Bryn Jackson, a designer. Bryan and Sam answer each question with a brief conversation, and the whole episode is 30 minutes or less.

Who is Sam Soffes

Sam Soffes first came onto my radar a couple years ago when I heard that he built and sold a todo app called Cheddar. Later on, I found some good use of his open source framework called SSKeychain. SSKeychain simplifies the storage and retrieval of data in the iOS keychain. It’s very popular on GitHub with over 3000 stars at the time of this writing.

A Role Model For Me

Sam is someone I recognize as a really good engineer in the industry, someone I aspire to be like. I feels really good when you have a role model reinforce one of your values. Take a listen to Sam Soffes on test driven development on Immutable, and let me know what you think.

Happy cleaning.

Swift Code Coverage: How to measure it

Yesterday, I talked about the merits of how code coverage can be used as a metric in your software development process. Measuring Swift code coverage in Xcode has never been easier. Apple provides a great overview in their WWDC 2015 session, “Continuous Integration and Code Coverage in Xcode”. Xcode 7 provides a integrated experience for tracking the coverage of your tests. You can literally start measuring the code coverage of your tests by clicking a single checkbox. And good news, the coverage also works for your KIF tests.

How To Turn On Code Coverage Measurement

Open your scheme editor by selecting Product -> Scheme -> Edit Scheme, or the keyboard shortcut Command-Shift-Comma.

Select Test in the left hand pane, and then check the box for Gather code coverage.

swift code coverage

That’s it! On your next test run, Xcode will measure the Swift code coverage of your tests.

Viewing Swift Code Coverage Results

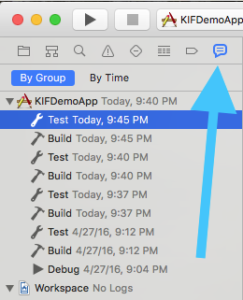
Viewing the results of how your tests fare with code coverage is just as easy. Run your tests, and then open the Report Navigator. You can open this by either selecting the thing that looks like a chat bubble in the left hand pane of Xcode, or select the menu Product->Scheme->Edit Scheme…, or use the keyboard shortcut Command-8. Then select your most recent Test run in the list.

swift code coverage

From there, in the center pane of Xcode, look for the Coverage tab.

swift code coverage

On the Coverage tab, you’ll see a list of your classes, and their methods, with bar charts indicating how much of their code is covered from your tests.

You can then even jump right to the corresponding code from the coverage viewer. Just double click either the class or method name. And what’s even cooler, is that Xcode will show you the number of times the line of code was executed in the right hand gutter of the editor.

Overlapping Test Types

Keep in mind, that depending on how your test targets are configured in the scheme, that the results you are looking at may be an aggregate of more than one type of test. For example, if you’ve created both unit and UI tests, and they each live in their own targets, but both targets are included in the Test action for the scheme, that the coverage numbers will be an aggregate of both types of tests. I’ll write a post later this week with a proposal on how you can separate these metrics (hint: it involves creating separate schemes for each type of tests).

Wrap Up

Measuring your Swift code coverage really is that easy. Normally code coverage is also tracked in actual numbers, and reviewed for trends over time. With Xcode alone, it doesn’t provide this. Xcode Server helps remediate the problem while providing specific measurement numbers and also allowing you to compare coverage numbers across different devices. Have fun with code coverage. When working in a team, it’s fun to watch code coverage change over time, hopefully for the better. I suggest that even as you code review your peers’ work, peak at how the code coverage for a given piece of code changes with their change. Does it go up? Does it go down? Remember, code coverage is just a metric that indicates whether a line of code was executed or not. It doesn’t speak at all to the quality of the test. Please be a professional, and professionals don’t write code without using test driven development.

Happy cleaning.

Code Coverage Is A Silver Bullet

Have you ever measured code coverage on any of your projects? How did it work out for you? What problems did it solve? Did it present any new problems? Code coverage is a silver bullet, a silver bullet for understanding how well your tests cover your code. Beyond that, it’s really what you make of it.

What Is Code Coverage

Code coverage is a metric that measures how much of your “production” codebase is being tested by your automated tests, usually unit tests. It’s usually measured at the granularity of a line of code, and sometimes measures methods and classes in aggregate. It’s nothing more than a black and white measurement, how much production code was executed when a given test suite was run. There’s no judgements made to the quality of the tests, simply, how much code did they execute.

Where Code Coverage Gets Tricky

Just to reiterate, code coverage as a metric makes no claims about the quality of tests. If you write a “test” (intentionally in quotes), that simply calls a method and does nothing with the result, the method it calls will have a high level of coverage. That being said, the “test” has done nothing to actually verify an outcome, or craftily provide edge case inducing input. It simply calls the method and discards the result. Voilah, high coverage, crappy test. For example:

class Adder {
  func add(x: Int, y: Int) -> Int {
    return x + y
  }
}

Here’s a corresponding test:

func testAdd() {
  let toTest = Adder()
  toTest.add(2, y: 3)   
}

Adder right now has 100% unit test code coverage! Yay!

Wait a minute, slow down hoss. There’s not a single assertion made in that test. While the test generates a high code coverage metric, it doesn’t validate squat.

code coverage is a silver bullet

TDD FTW

This is where following your test driven development cycle of “Red, Green, Refactor” you’ll never get into this state of test crappiness, and it can truly ensure that your code coverage is a silver bullet. The “red” step of that cycle is critically important, as it ensures that your test actually verifies something. Without knowing that your test can actually fail, you never know that your test actually does anything. And likewise, that your code coverage even means anything.

Be a Professional

The biggest counter argument you will hear about measuring code coverage, is that it can be cheated. Of course it can be cheated! Software “professionals” don’t cheat though. Craftsmen don’t take shortcuts. My life was changed when I read “The Clean Coder” by Bob Martin. He talks about what it takes to be a “professional software engineer.” (He also advocates for 100% code coverage despite all other costs, but I have other opinions on that). It’s a sense of taking pride in your work. With this post, I just want to put this call to action out there, be a professional. Code coverage measurement is just another tool in your toolbox. Code coverage is a silver bullet, but only one that returns to you what you put into it. Crap in, crap out. Use it appropriately, know it’s shortcomings, and know where it shines. When properly used in conjunction with TDD it can powerfully help you continually improve over time. I’d love for you to try it out, and let me know how it works for you.

I was inspired to write this article from listening to episode 67 of “This Agile Life” podcast, where they reference this article, “Is Code Coverage a Silver Bullet?

Happy cleaning.

iOS Functional Testing Overview

What is Functional Testing

iOS functional testing is the process in which an app is tested as a “black box” and in an end to end fashion. Unlike unit testing, functional tests are written with no awareness of the inner working of the code of an app. Honestly, you could even hand your project to someone, and forbid them from looking at the main source, and they would still be able to write thorough functional tests just my observing how the app behaves on a device or in a simulator. As a result, in iOS functional testing, you’ll write a lot of code that simulates gestures (taps, swipes, shakes, rotations, etc.), and perform validation based what appears on the screen in response to varied input. Of course, knowing the ins and outs of how the code for the app is written helps a lot when writing iOS functional tests. You’ll be more able to know where the edge cases are, and be able to ensure there’s coverage for each nook and cranny.

iOS functional testing

I’m someone cloudy on how iOS functional testing might differ from “acceptance” testing or “integration” testing or “UI testing”, and a lot of the time I interchangeably use the terms. In more complex systems than iOS apps, there may be more nuances to where boundaries are drawn between these processes.

How to do Functional Testing on iOS

Unlike manual tests, iOS functional testing is performed via written tests that enable this outside-in approach in an automated and repeatable way. I’m currently using and loving KIF for my iOS functional testing. As a result, I’m going to make a couple other posts this week dedicated to writing great tests with KIF.

KIF isn’t without its limitations. There’s also a bunch of other tools available for iOS functional testing, including:

Down the road, I plan to cover each of these in-depth as well as KIF.

Can you do TDD with iOS Functional Testing?

Hell yes, you can do TDD with iOS Functional Testing. In fact, I believe in it, and advocate it, though there are caveats you should be aware of. Often, it will end up redundant with unit tests. And, if you are purely following the red, green, refactor cycle, you won’t often end up with compilation errors as a result of your iOS functional tests, and instead you’ll have to run your tests more frequently. And iOS functional testing is slow, so as a result, I end up usually spending my TDD cycles with unit testing, and then after the fact, perform my iOS functional testing with KIF.

Often, as bugs are found in the app, I might start with iOS functional testing in order to ensure that I have a functional test that actually leverages the broken code. That way, I have the confidence to know that the bug will never surface again.

Don’t Rely on iOS Functional Testing Alone

As much as I love iOS functional testing, I believe it should be used side by side with unit tests. There’s simply large pieces of code that will go untested if you only rely on iOS functional testing. Additionally, because these test are slow, the more you write, the more slow they get. And finally, depending on how many other “things” like persistence layers or backend services that your app uses, your iOS functional testing will rely on these to be “working” and reliable as well – a dependency that just isn’t there with unit tests, and thus they are more reliable. I liked this article on the Google Testing blog that goes into this in more detail.

Wrapping Up

iOS functional testing sit at the top of the testing pyramid. They are a powerful way to test your app in an end to end, blackbox fashion, simulating a user testing your app. Check back throughout the week for more detailed posts on my favorite functional testing tool, KIF.

Happy cleaning.

Your First iOS Unit Test

I recently had the question posed to me, “how do I get started with unit testing on iOS?” I have a suggestion for your first iOS unit test, look for a piece of code that performs an operation on a String. Write your first iOS unit test for that method. Strings and their related manipulations are easy to unit test. They don’t have deep integration with other frameworks like UIKit or CoreData, and the behavior is usually easily understandable just by reading the code, thus making it easy to reverse engineer what “should” happen, in order to translate it into a unit test. Let’s work through an example.

A “Unit” Defined

The first thing to understand about “unit testing” is what a “unit” even is.

Your First iOS Unit Test

No, not a storage “unit.”

It’s a vague term for sure. I’d describe it as, “the smallest piece of code that actually does something useful.” It’s kind of like art, you know it when you see it. I’ve written dedicated unit tests for single lines of code before. I’ve written unit tests for entire methods before. Bigger than that, and you start to take on too much scope for the test. You want the test to be straightforward. You want the test to be easily troubleshootable when it fails. And you want to minimize the reasons it could fail, to only a few reasons. This keeps your tests well factored, and easily maintainable.

My suggestion for your first test is to look for a standalone method, aka a “unit” that performs an operation on a string. Here’s an example for your first iOS unit test:

The Code To Test

I wanted to come up with a straight forward example to help you visualize a piece of code that is easily verified with a unit test. Consider the following struct that represents a person with a name:

struct Person {

  let firstName:String
  let lastName:String
  let suffix:String?

  init(firstName: String, lastName: String) {
    self.firstName = firstName
    self.lastName = lastName
    self.suffix = nil
  }

  init(firstName: String, lastName: String, suffix: String) {
    self.firstName = firstName
    self.lastName = lastName
    self.suffix = suffix
  }

  func formattedName() -> String {
    if let suffix = suffix {
      return "\(firstName) \(lastName), \(suffix)"
    } else {
      return "\(firstName) \(lastName)"
    }
  }
}

The struct sets up a Person as a thing that is represented by three Strings, a firstName, a lastName, and an optional suffix.

formattedName jumps out as a prime candidate for a unit test. A standalone method that does some isolated logic based on some inputs, and returns a a new value based on those inputs.

Add An XCTestCase Your Project

Now that you know what you want to test, in order to test it, you need to leverage the XCTest framework to test it. Xcode makes this easy.

From your project, select File -> New -> File… and pick Unit Test Case Class.
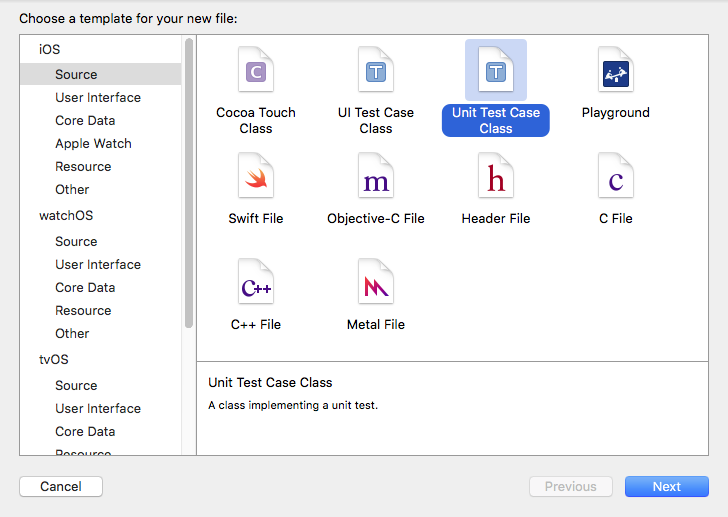
Your First iOS Unit Test

Give it an appropriate name, usually ending in the convention of: Tests, so in my case, PersonTests.

That’s it, a new file will be created containing a class that is a subclass of XCTestCase. Add your tests here. Anything function whose name begins with “test” will be executed when you run unit tests.

Writing The Unit Tests

Reviewing formattedName() in Person there are two flows through the code, when the Person has a suffix and when they don’t. Two flows through the “unit” means two tests – keep your tests small. Test one thing at a time.

Consider this test to verify that a Person‘s formattedName() is correct when they don’t have a suffix:

func testFormattedName_ProperlyFormats_WhenNoSuffix() {
  let theCleanSwifter = Person(firstName: "Andy", lastName: "Obusek")
  let expectedFormattedName = "Andy Obusek"
  XCTAssertEqual(expectedFormattedName, theCleanSwifter.formattedName())
}

First, a Person is setup without a suffix, then the expected output is defined, and finally XCTest is used to verify that the output matches the expectation.

Here’s a test for the opposite condition, when a Person does have a suffix:

func testFormattedName_ProperlyFormats_WhenSuffixPresent() {
  let theCleanSwifter = Person(firstName: "Andy", lastName: "Obusek", suffix: "Jr.")
  let expectedFormattedName = "Andy Obusek, Jr."
  XCTAssertEqual(expectedFormattedName, theCleanSwifter.formattedName())
}

This test is very similar to the prior test. The only differences are that a suffix is provided for the Person and the expectedFormattedName is different.

Running The Tests

IMPORTANT: For your tests to compile, any files that you reference in the main target (eg. the code under test) need to be included in the test target. You specify this in the File Inspector:
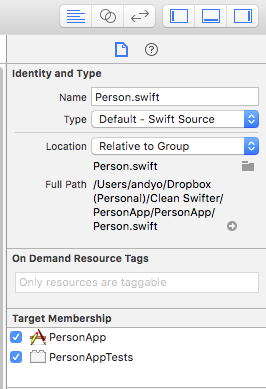
Your First iOS Unit Test

To run the tests, use the keyboard shortcut Command-U (or if you want to be slow, select the menu item Product -> Test. The iOS Simulator will launch, the tests will run, and you’ll see the results in the Console. They look like this:

22:11:52.771 PersonApp[12486:9452629] _XCT_testBundleReadyWithProtocolVersion:minimumVersion: reply received
22:11:52.777 PersonApp[12486:9452629] _IDE_startExecutingTestPlanWithProtocolVersion:16
Test Suite 'Selected tests' started at 2016-04-19 22:11:52.785
Test Suite 'PersonTests' started at 2016-04-19 22:11:52.787
Test Case '-[PersonAppTests.PersonTests testFormattedName_ProperlyFormats_WhenNoSuffix]' started.
Test Case '-[PersonAppTests.PersonTests testFormattedName_ProperlyFormats_WhenNoSuffix]' passed (0.021 seconds).
Test Case '-[PersonAppTests.PersonTests testFormattedName_ProperlyFormats_WhenSuffixPresent]' started.
Test Case '-[PersonAppTests.PersonTests testFormattedName_ProperlyFormats_WhenSuffixPresent]' passed (0.000 seconds).


Test session log:
    /Users/andyo/Dropbox (Personal)/Clean Swifter/PersonApp/DerivedData/PersonApp/Logs/Test/78B021DC-E467-4F0E-8D95-EE44156AB2DE/Session-2016-04-19_22:11:43-ZVrKpY.log

Test Suite 'PersonTests' passed at 2016-04-19 22:11:52.810.
     Executed 2 tests, with 0 failures (0 unexpected) in 0.021 (0.023) seconds
Test Suite 'Selected tests' passed at 2016-04-19 22:11:52.811.
     Executed 2 tests, with 0 failures (0 unexpected) in 0.021 (0.025) seconds

Congratulations, You Did It!

BOOM! That’s it, you just wrote your first iOS unit test! Well, two of them. How does it feel? Trivial? Powerful? I can relate to both of those feelings. Starting out, you might be thinking, “That’s so simple, how does it even provide value?” Well, ya, if you write the test and never execute it again, chances are you’ll never get any value out of it. The power of tests comes with repeated execution of those tests. Anytime you make a change to your project, run the tests! (and add new tests too!) I guarantee you that at some point, your tests will eventually catch a bug that you didn’t otherwise notice. Then you’ll be sold on automated testing. You’ll never get there if you don’t start somewhere.

Thanks for reading, happy cleaning.

PS – Continuous integration tools like Xcode Server or Jenkins further magnify the power of your first iOS unit test by enabling automatic execution of builds and tests in response to events like source code repository commits. I’ll tackle this topic in a future post.

TDD in Xcode – Critical Keyboard Shortcuts

Iterations though the test driven development workflow must happen fast. In fact, fast is better than perfect. TDD in Xcode isn’t painful. In fact, there are a couple tips and tricks I’ve adopted when going through my red-green-refactor workflow in Xcode that makes it easy. I wanted to share them with you.

Assistant Editor FTW

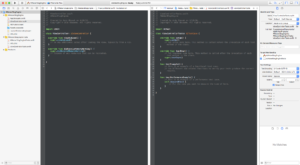
When entering the TDD zone, the first thing you want to do is get both the “production” file and the corresponding test file open. Use the Assistant Editor for this. The bigger the monitor the better. Open both of these files at the same time, in windows next to each other.

It should look like this:

TDD in Xcode

I don’t really have a concrete preference as to which file, the test or the production class, should go on the left or the right. Just remember that if you set breakpoints, the debugger will bring the file with the breakpoint to focus in the lefthand pane.

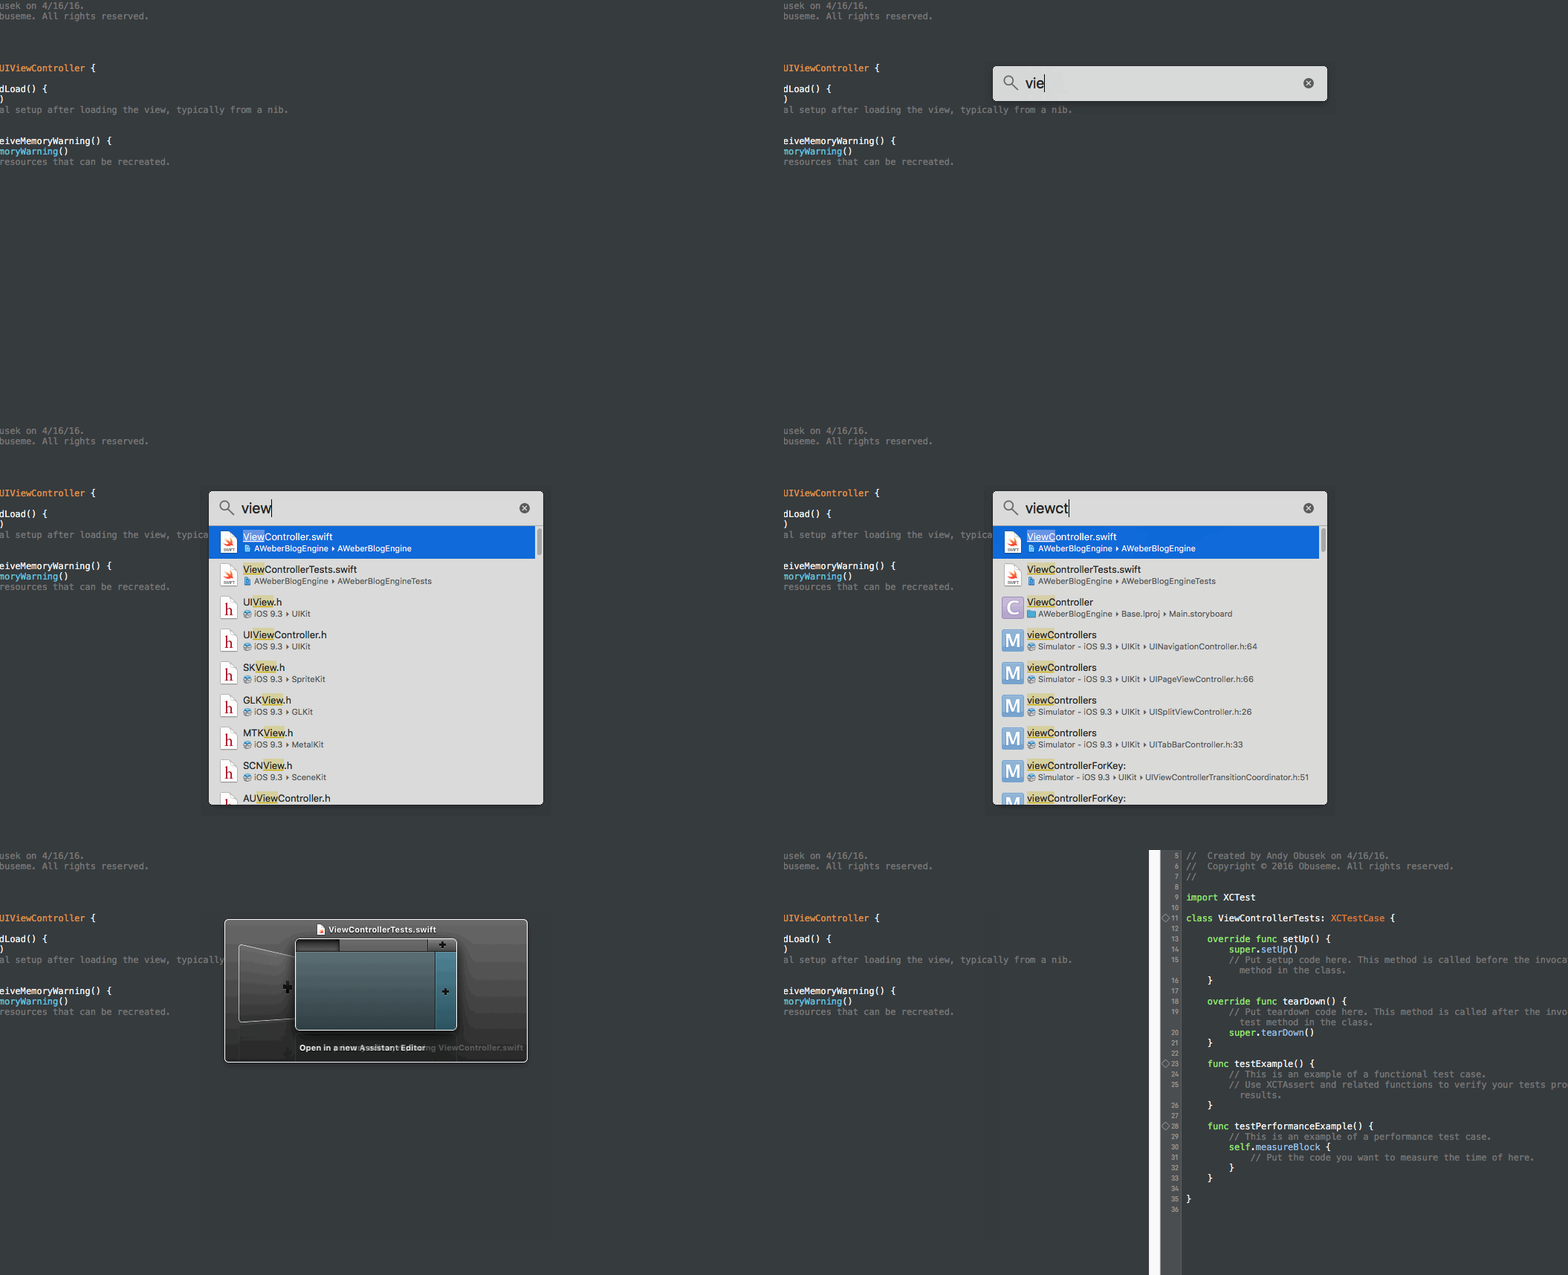
It’s kind of cumbersome to click around in Xcode to get the Assistant Editor to do what you want, and in fact I’m not even sure that I know how! I’ve become so accustomed to using keyboard shortcuts to bend Xcode to my will!!! Here’s a shortcut that I couldn’t live without, it will open any file of your choosing in the Assistant Editor, side by side with whatever file is currently open.

  1. Command-Shift-o
  2. Option-Shift-Enter
  3. Right Arrow, Enter

Okay, so it’s really a sequence of commands. Stop complaining, it’s not that hard to learn, and TRUST ME, once you commit these to finger memory, you’ll find use for them beyond just your TDD flow.

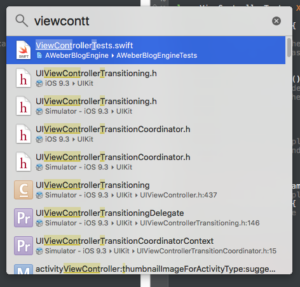
The first command brings up the “Open Quickly” dialog where you can then type a filename (or a method or variable) to open. It looks like this:

TDD in Xcode

The second command selects the file to open, while at the same time allowing you to specify where it should be opened in Xcode. It looks like this:

TDD in Xcode

The third command is just the key combination to specify that the file should be opened side by side with the current window.

Here’s a clip showing the whole sequence together:

TDD in Xcode

Running Tests

There are two specific other keyboard shortcuts that are absolutely essential to when I’m working with TDD in Xcode:

  1. Command-Option-Control-U
  2. Command-Option-Control-G

There’s not even a succinct name for the first command, and maybe that speaks to it’s absolutely magical nature. First off, the command only works when the cursor is within focus of a test class. When you execute that command from a test case, it will run whatever tests that are in the same scope as the cursor. For example:

If the cursor is within a single test method, only that test method will be run. If the cursor is within a single test class, all tests in that class will be run, but only that class.

Speed it the key to successful TDD in Xcode. The less tests you execute at once, the faster execution will be (and the more you sacrifice in what’s actually validated). I absolutely love this keyboard shortcut, it totally enables me to make small changes to the test and the class under test throughout my TDD workflow, and quickly run the associated tests.

The second keyboard shortcut is a nice complement. It reruns the last test that was run. So if you cursor is bouncing around and it’s not focused in the appropriate context (like the cursor is within the class under test) to execute the first command, this is a nice alternative to rerun whatever the last test run was.

Command-U

Don’t forget to periodically run the entire test suite. This shortcut runs all tests associated with the Test configuration in the current Scheme. In the early stages of projects, this may be fast enough for you, and you may not even need to use the more specific test running shortcuts. Enough TDD though, and you’ll get to a point where executing all tests becomes frustratingly slow for getting that immediate feedback you need for successful TDD.

The Mouse, Available But Slow

TDD in Xcode

You can always use the mouse for executing tests as well, but don’t. I just want to point it out for thoroughness sake, as well as make the point that any point you need to take your fingers off your keyboard, you are slowing down. Resist the urge to move your hands over to the mouse. Learn the keyboard shortcuts! It will pay so many dividends in your quest towards TDD in Xcode enlightenment.

Anything Else?

What do you use in your TDD workflow that enables successful, high quality code?

Happy cleaning.