Proposed iOS Testing Pyramid

The Original Testing Pyramid

Before I go into my proposed iOS testing pyramid, I know you’ve heard me mention Martin Fowler’s test pyramid before. In case you weren’t reading, or don’t remember, here it is:

iOS Testing Pyramid

Fowler advocates for three levels of testing: unit, service, and UI. If you’d like the full description, you can read about it here.

Proposed Revision

I disagree with this pyramid for iOS apps. I think we can do better. Here’s my **proposed revised iOS testing pyramid **:

iOS Testing Pyramid

The changes include:

  • Unit Tests Remain – If you don’t write any other automated tests, please write unit tests. In the least, unit tests open the door for things like test driven development and refactoring.
  • UI Tests Remain – With the vast variety of device sizes and OS versions, UI tests’ value can multiply with the more devices and OS’s you run them on.
  • No Service Layer – I think with most iOS apps, there’s no need for the Service layer. I think a comprehensive suite of unit tests will take care of anything that the service layer would have otherwise taken care of.
  • Add Snapshot Testing – Snapshot testing can really help “lock in” your user interface to ensure it looks pixel perfect and preventing any future code changes from introducing slop.
  • Add Manual Testing – There are simply bugs that no amount of automated testing will find. There was one bug we came across where a hidden `UIView` was covering a button in a very specific edge case such that the button was not tappable. This was found by a human during manual QA. It never would have been found by automated tests alone. TestFlight makes this so easy these days, don’t skimp on it.

Suggested Tools

Writing Your First FBSnapshotTestCase

I’m in the thick of preparing for my talk at Philly CocoaHeads this week, but I wanted to get a quick post out that shows you how easy writing your first FBSnapshotTestCase is. Yesterday, I showed you how to setup FBSnapshotTestCase with Carthage. I’m going to assume you’ve done that already. I’ve create a sample project for my talk on Thursday that I’m going to use for this walkthrough on writing your first FBSnapshotTestCase. You can download that on GitHub here.

What You’ll Test

Open the application, and Build and Run.

writing your first FBSnapshotTestCase

You’ll see it’s a simple app, one that I’ve even used before in other posts. There’s two flows forward from this first screen, either with the Save, and continue button or the Continue, without saving button. If the user chooses, they may enter their name and tap Save, and continue to access the Welcome view where their name is shown to them.

writing your first FBSnapshotTestCase

Simple enough. In writing your first FBSnapshotTestCase, you are going to verify that the name specified shows up correctly on the Welcome view.

Take The Baseline Snapshot

To create the test, right-click the SnapshotTest group, and select New File:

writing your first FBSnapshotTestCase

Select Unit Test Case Class and Next:

writing your first FBSnapshotTestCase

Name the test WelcomeSnapshotTests and specify it as a Subclass of FBSnapshotTestCase. Click Next:

writing your first FBSnapshotTestCase

Click Create on the subsequent screen.

If you are prompted to create a bridging header, select Don’t create.

Now, Xcode will create the source file for you and drop you in it. The first thing to do is correctly import FBSnapshotTestCase.

Replace this:

import XCTest

with this:

import FBSnapshotTestCase
@testable import CocoaHeadsTestingPresentation

Importing CocoaHeadsTestingPresentation is necessary to access classes from that module so we can create views specific to the app. Now, you should be able to build with Command-B.

Delete everything within the WelcomeSnapshotTests class, and add this:

override func setUp() {
  super.setUp()
  recordMode = true
}

This setUp() method tells FBSnapshotTestCase that when recordMode is true, new snapshots will be taken. This requires the application to be in a “known good state.” That means that the view that you are going to “snapshot” looks just as you want it to look, because all future test runs will compare against this view.

Next, add this test method:

func testWelcomeView_WithName() {
  let welcomeVC = UIStoryboard(name: "Main", bundle: nil).instantiateViewControllerWithIdentifier("WelcomeViewController") as! WelcomeViewController
  welcomeVC.name = "Andy Obusek"
  FBSnapshotVerifyView(welcomeVC.view)
  FBSnapshotVerifyLayer(welcomeVC.view.layer)
}

This test creates a WelcomeViewController from a storyboard, specifies the name to be shown, and then verifies the view and layer.

Run this test. Just as usual, I suggest the keyboard shortcut Command-U. You’ll actually see the test fail:

writing your first FBSnapshotTestCase

But looking closer at the message:

Test ran in record mode. Reference image is now saved. Disable record mode to perform an actual snapshot comparison!

Nothing is actually wrong. FBSnapshotTestCase is just telling you that since it’s in recordMode, it will take new snapshots, but not let the test pass.

To see the snapshot, open the directory /SnapshotTests/ReferenceImages_64/SnapshotTests.SnapshotTests/. Inside that directory, you should see a png file that is the snapshotted view! So cool!

writing your first FBSnapshotTestCase

Turn Off Record Mode

Now that the baseline snapshot has been taken, turn recordMode off.

override func setUp() {
  super.setUp()
  recordMode = false
}

Now, rerun the test with Command-U. And bingo bango, the test passes! Light is green, trap is clean!.

Make Sure It Fails When It Needs To

It’s hard, if not impossible, to practice test driven development when writing your first FBSnapshotTestCase, or really any snapshot test at all. Since it requires the known “good state” to be snapshotted, some amount of real development has to happen first. That being said, you should still make sure that the test fails when it should. To do that, we’ll hack a bug into WelcomeViewController. Open WelcomeViewController.swift and add a few “eeee” to how the welcome message is set:

override func viewDidLoad() {
  super.viewDidLoad()
  if let name = name {
    welcomeLabel.text = "Welcomeeeeeeeee \(name)"
  } else {
    welcomeLabel.text = "Welcome Player 1"
  }
}

Re-run the test. It will fail! Whew, now we know that it will actually fail when it should.

Wrap Up

See, wasn’t it easy writing your first FBSnapshotTestCase? I hope snapshot testing helps you out. I’d love to hear how it helps you, or what you think of this approach. Please leave a comment!

Happy cleaning.

FBSnapshotTestCase Installation with Carthage

FBSnapshotTestCase installation failed with CocoaPods 1.0.0.rc.2 while in preparation for an upcoming presentation to Philadelphia CocoaHeads. I gave Carthage a try, and it worked! I wanted to write it up and share it with you. Now I know that switching to Carthage may not work for everyone just to use a test framework, but maybe there’s a hybrid solution that you could come up with?

What is FBSnapshotTestCase

FBSnapshotTestCase is a testing framework that was originally written at Facebook by Jonathan Dann with significant contributions from Todd Krabach. As a testing framework, it allows you to test the user interface of your iOS app by diff’ing screenshots. Yep, you heard me write, you literally take a source screenshot, mark it as “correct” and then all future runs of the test suite use this as the basis for determining if the test passes or not.

As my preferred channel, and as the README suggested, I wanted to install FBSnapshotTestCase with CocoaPods, but this issue prevented me from doing so in a Swift project. Instead, I tried using Carthage and was successful.

FBSnapshotTestCase Installation with Carthage

Step 1: Download Carthage

Carthage is an alternate dependency management framework, one that is more lightweight than CocoaPods (and doesn’t require Ruby! YEY). If you don’t have Carthage installed, download the latest .pkg file from here. I used 0.16.2 for this tutorial. FBSnapshotTestCase Installation was really easy with Carthage.

Step 2: Create a Cartfile

In the root of your project, create a new file called Cartfile. Add this to it:

github "facebook/ios-snapshot-test-case"

The Cartfile contains your dependencies for the project. While you can specify versions of your dependencies, I was content just picking the latest release, and thus didn’t specify a version.

Step 3: Install the Dependencies

Now that you have a Cartfile, the next thing to do is install the dependencies with Carthage. To do this, from a shell, run:

carthage update --platform iOS

You’ll see output like:

*** Fetching ios-snapshot-test-case
*** Checking out ios-snapshot-test-case at "2.1.0"
*** xcodebuild output can be found in /var/folders/mp/k1jy2r2d3gg9bzkz0v9y5jxm00024f/T/carthage-xcodebuild.GOHIjS.log
*** Building scheme "FBSnapshotTestCase iOS" in FBSnapshotTestCase.xcworkspace

A new Carthage/ directory will be created with your dependencies. Carthage is different from CocoaPods, in that, you now need to manually configure the libraries within your Xcode project.

Step 4: Add Dependencies to Your Project

Open a Finder window for the root folder of your project, and then navigate down the hierarchy to Carthage/Build/iOS. You should see the framework for FBSnapshotTestCase.

FBSnapshotTestCase Installation

Now, in Xcode, open the target settings for your test target, in my case it’s called SnapshotExampleTests, and then select the Build Phases tab, and then expand Link Binary With Libraries. Drag the framework in there:

FBSnapshotTestCase Installation

It will then look like:

FBSnapshotTestCase Installation

Step 5: Add a FBSnapshotTestCase

Create a new unit test (File -> New -> File):

FBSnapshotTestCase Installation

And specify it as a subclass of FBSnapshotTestCase

FBSnapshotTestCase Installation

At the top of the file, replace:

import XCTest

with

import FBSnapshotTestCase

At this point, you can try running your new FBSnapshotTestCase (Command-U). Everything should compile, but the test will fail.

Step 6: Copy-Frameworks

I’ll be honest, I’m not really sure why this final step is necessary, but without it, the tests would not pass. Carthage’s README indicates it’s necessary for an “App Store submission bug” but I’m not even archiving here, just running tests.

Do this (copied right from Carthage’s [README]):

On your application targets’ “Build Phases” settings tab, click the “+” icon and choose “New Run Script Phase”. Create a Run Script in which you specify your shell (ex: bin/sh), add the following contents to the script area below the shell:

/usr/local/bin/carthage copy-frameworks

and add the paths to the frameworks you want to use under “Input Files”, e.g.:

$(SRCROOT)/Carthage/Build/iOS/FBSnapshotTestCase.framework

It should now look like this:

FBSnapshotTestCase Installation

Now, try to run your FBSnapshotTestCase again with Command-U. It should compile and pass your test!

Wrap Up

See, isn’t FBSnapshotTestCase installation easy? Now you’re free to go ahead and use FBSnapshotTestCase to your heart’s content. I plan to write another post that will help you through creating your first FBSnapshotTestCase. If you’re a long time CocoaPods user, I know this isn’t optimal, but hey, look at it this way, at least you have an opportunity to try out Carthage if you’ve never looked at it before.

I got a log of inspiration and ideas for installing FBSnapshotTestCase with Carthage from this article on <raywenderlich.com>.

Happy cleaning!

Marco Arment Does Not Unit Test

If you aren’t listening to the Accidental Tech Podcast, you should be. It’s by far my favorite podcast. On this week’s episode, episode 168, Marco Arment reaffirmed his stance that he does not unit test his code. The context of the conversation was that Marco was discussing how he had to put in an emergency fix for an upgrade to his sync algorithm for his iOS podcasting app, Overcast. The co-hosts on the show, John Siracusa, and Casey Liss immediately jumped all over him to point out that this was exactly the sort of problem that automated tests are intended to fix.

This isn’t new news that Marco doesn’t unit test his code, he’s talked about this in the past. I’ll be giving a talk at Philly CocoaHeads this week on automated testing, and one of the things that I’ve been wrestling with is: where do I begin the talk? How much background should I assume? Are we still at the point as a community where we need to debate whether automated testing is a good/worthwhile thing? If you’ve read other posts on this blog, my stance should be obvious- half the posts I’ve written so far have been in favor of automated testing! It’s been a while since I’ve worked in other platforms than iOS, but I hear communities like Ruby on Rails and .Net have incredibly deep adoption of automated testing and test driven development principles. And on iOS, there really are plenty of both open source options, and even Apple-endorsed options for adding automated tests to your code.

So why are we still debating whether automated testing is even a thing? To me, it’s not about critiquing Marco about his development practices. It’s about recognizing that 1 out 3 senior engineers on a popular podcast don’t write automated tests. Is that representative of our community?

For my talk this week, I want to address this, and I’m thinking this is where I’ll open it up for conversation at the end of the talk. The majority of the 30 minutes will be focused on some how-to techniques for adding automated tests into your apps.

I like this trend that I’ve started now of capturing “testing in the wild” – how last week I dropped the reference to Sam Soffes’ perspective on automated testing. In a lot of ways, these popular people in our industry have a lot of power. I can imagine if I were an aspiring iOS engineer hearing that Marco doesn’t unit test his software – it would certainly make me think twice about whether it’s a worthwhile endeavor.

Separate Schemes For Better iOS Code Coverage

As you continue to construct the test pyramid for your iOS apps to Martin Fowler’s specification, you’ll find the desire to separately measure your code coverage for both unit tests and functional tests. And if you don’t have that desire, then you should know that measuring a combined code coverage for both unit and functional tests is not an accurate representation of how your production code is truly covered. For one, functional tests will generally have a higher coverage, while also including less assertions. This is because of how much code gets executed while broadly navigating through your app as functional testing does. This data will then be glom’d on to the code coverage metrics for your unit tests, making it really hard to identify where you can refine the coverage of your unit tests. And the opposite can also be true, where you have unit test coverage and no functional test coverage, but since you are only evaluating a single number, you can’t figure out where one ends and one begins. To fix this, use separate schemes for better iOS code coverage. By moving each group of tests into their own scheme, you’ll be able to measure code coverage independently.

The Fix – Separate Schemes

To fix this, you are going to create separate schemes for better iOS code coverage. To start, you are going to duplicate the main scheme for your app, and then specify a different set of tests for each scheme. I’ll walk you through creating a separate scheme for your unit and functional tests. For this example, we’ll be using KIF as the tool for the functional tests (Yes, soon enough I’m going to take a deep dive into Xcode’s new UI tests). For this walkthrough, you’re going to continue with the project from Wednesday where you setup code coverage for unit tests. You can find the project on GitHub if you just want to start there. https://github.com/obuseme/CodeCoverage.

To start, open the Scheme Editor and duplicate the one and only scheme.

Separate Schemes For Better IOS Code Coverage

The new, duplicate, scheme that you created will be used for executing your functional tests, while the initial scheme will be used for your unit tests. The benefit of this is that you’ll be able to separately calculate code coverage for each set of tests. The drawback is that you’ll need to manually switch the scheme to execute each set of tests.

After you’ve duplicated the scheme, rename the new scheme to CodeCoverageFunctionalTests.

Next, create a new “iOS Unit Testing Bundle” target named CodeCoverageFunctionalTests. This target will contain your KIF tests.

Next, install KIF, preferably with CocoaPods. For detailed instructions on doing this, follow my previous post here. Ensure that the target you specify for where KIF should be installed is CodeCoverageFunctionalTests. And of course, after first configuring CocoaPods with a project, after you install pods for the first time, close CodeCoverage.xcodeproj and open CodeCoverage.xcworkspace instead.

And for the final step, edit each scheme to selectively use one of the two test targets for its Test step. First, edit the scheme for CodeCoverage and set the test suite for the Test step to be CodeCoverage. Make sure Gather code coverage is selected as well in each scheme.

Separate Schemes For Better IOS Code Coverage

Then, edit the scheme for CodeCoverageFunctionalTests and set the test suite for the Test step to be CodeCoverageFunctionalTests.

Separate Schemes For Better IOS Code Coverage

BOOM! That’s it. Now you can explicitly change schemes, and use Command-u to run tests for each scheme. Depending on the scheme selected, a different set of tests will be run – either the unit tests or the functional tests, and as a result, different code coverage metrics will be generated.

Wrap Up

This post concludes a week of code coverage information. I hope you enjoyed it, and I hope your tests are better covered as a result separate schemes for better iOS code coverage. I’d love to hear how you’re using code coverage. Please post a comment and let me know!

Happy cleaning!

Sam Soffes on Test Driven Development

It always feels good when your own perspective is validated by someone you respect. Listening to the Immutable podcast episode 36 today, Sam Soffes gave a great endorsement of test driven development that I agree with. Essentially the question was asking for Sam’s perspective on unit testing, specifically challenging whether they are worth the time or not. To summarize Sam’s response, he acknowledged that they might feel like a chore when you are first writing them, but it’s when you are going back to change the code later that the value really shines. This to me is one of the main reasons why I write unit tests. There have been many times when I’ve gone into an existing code base to make a change – either a bug fix or a feature enhancement, only to introduce another bug. It’s when you have an automated test catch this mistake that you’ll buy into the value as well.

Immutable Podcast

I also wanted to recognize this podcast as one that I’ve been enjoying lately. I think you’d like it too. Each episode focuses on five listener submitted questions to Sam Soffes, an iOS engineer, and Bryn Jackson, a designer. Bryan and Sam answer each question with a brief conversation, and the whole episode is 30 minutes or less.

Who is Sam Soffes

Sam Soffes first came onto my radar a couple years ago when I heard that he built and sold a todo app called Cheddar. Later on, I found some good use of his open source framework called SSKeychain. SSKeychain simplifies the storage and retrieval of data in the iOS keychain. It’s very popular on GitHub with over 3000 stars at the time of this writing.

A Role Model For Me

Sam is someone I recognize as a really good engineer in the industry, someone I aspire to be like. I feels really good when you have a role model reinforce one of your values. Take a listen to Sam Soffes on test driven development on Immutable, and let me know what you think.

Happy cleaning.

Broken Code Coverage in Xcode: How To Fix It

When using metrics to make decisions about your code, it’s fundamentally important that those metrics are 100% correct. You need to have absolute faith in the reported numbers. If this is not the case, you risk making decisions and taking action through inaccurate data, and risk making incorrect decisions. By default, there’s a critical flaw in how code coverage is measured by Xcode for iOS apps. From the moment you setup unit tests for a project, Xcode will automatically identify code as “covered” for anything that is triggered through the normal application launch sequence, such as your application delegate. This means that your code coverage numbers will be artificially inflated! And broken code coverage in Xcode means you won’t fully understand how well your app is tested.

Let me say this one more time to it sinks in, your iOS code coverage numbers are not correct unless you take specific action to fix them.

An Example Of Broken Code Coverage in Xcode

First, I’m going to demonstrate to you the broken-ness of code coverage in Xcode. Then, I’m going to show you how to fix it.

To observe the broken code coverage, you are going to perform these steps:

1) Create a new empty project, including unit tests 2) Leave the unit tests empty 3) Turn on code coverage 4) Run the tests, and review coverage

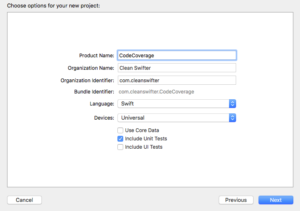
Let’s do it. First, create a new Swift iOS project called CodeCoverage. Be sure to check Include Unit Tests.

broken code coverage in xcode

Open CodeCoverageTests.swift. You aren’t going to make any changes to this file, but notice how there are two empty test implementations testExample() and testPerformanceExample(). These tests will run and pass, but should generate 0% coverage of the application.

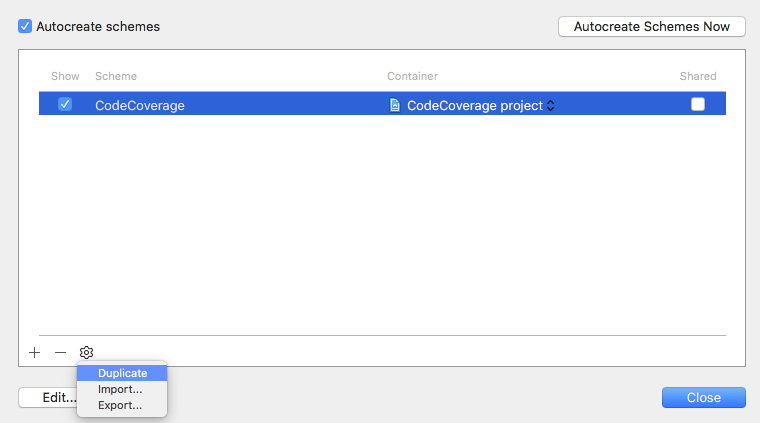
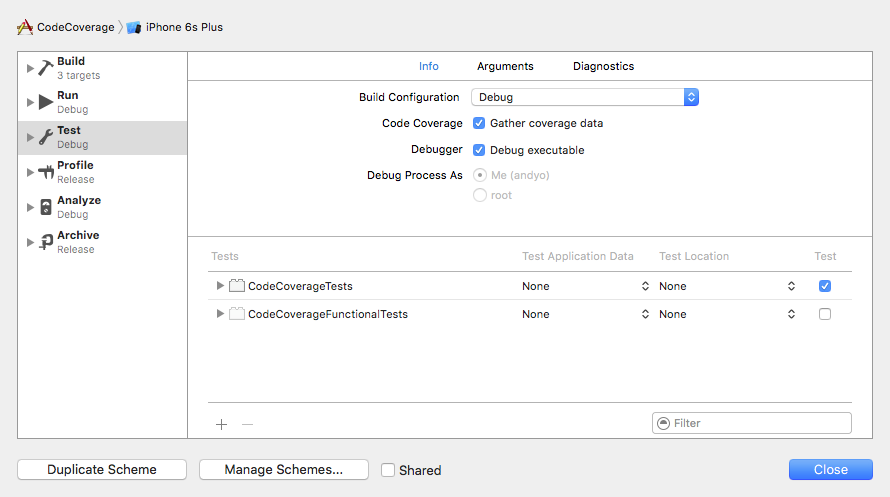
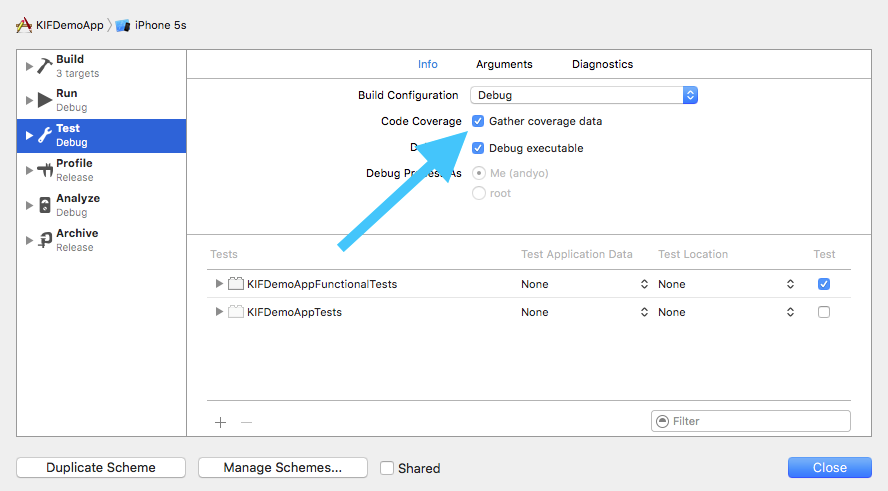
Now, turn on Code Coverage. Open the Scheme Editor and check Gather coverage data.

broken code coverage in xcode

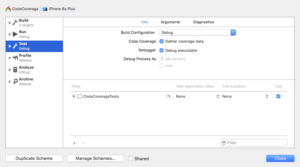
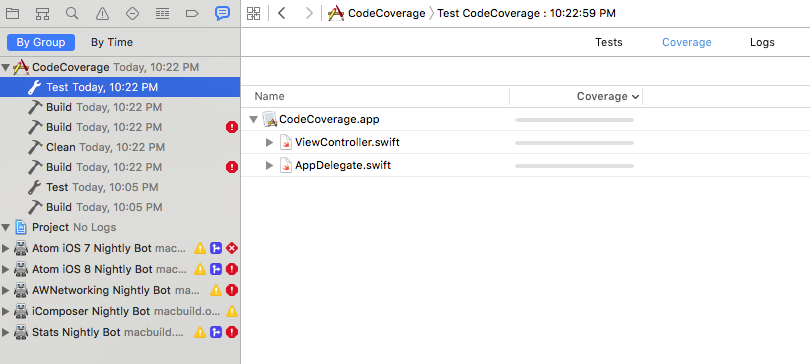
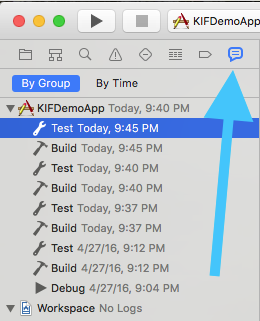
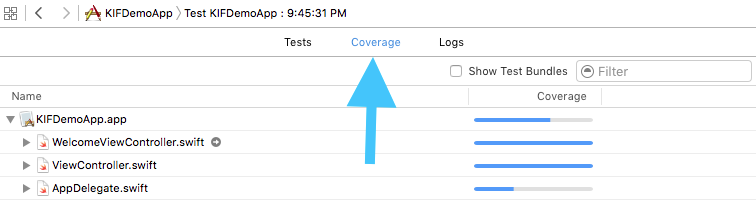
Finally, run the tests. Command-U (you only get a keyboard shortcut today :). Open the Code Coverage results from the Report Navigator.

broken code coverage in xcode

Uhhh, what’s wrong with that picture? It should be obvious, code coverage is being shown for ViewController and AppDelegate despite there being absolutely no legitimate tests in the project.

Why There Is Broken Code Coverage in Xcode

Well, I wouldn’t blame it all on Xcode. Xcode is measuring the code that is executing when your tests execute. And technically, since you app is starting up and showing the first view controller, that code has executed, so it’s reported as covered. The thing is, by the definition of how you want to measure code coverage, that code isn’t actually “covered.” There’s a really easy way to correct this.

How To Fix Broken Code Coverage in Xcode

Jon Reid’s article on How to Switch Your App Delegate for Fast Tests inspired me to figure out how to fix this. You are going to create a separate app delegate that is used by your tests. This app delegate will be entirely empty, so it totally intercepts the app launch sequence. This way, no code in your real app delegate will be executed unless explicitly done so from a test, and ditto for any view controller that it would have otherwise instantiated.

Note: I want to give full attribution to Jon Reid on this code. I just figured out that it also fixes broken code coverage in Xcode.

To fix this, first open AppDelegate.swift and delete this line:

@UIApplicationMain

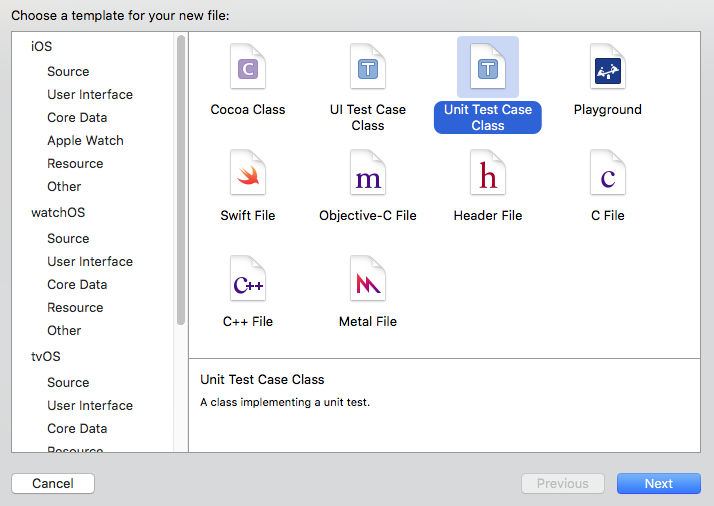
Create a new Swift file named TestingAppDelegate.swift, and replace it’s contents with:

import UIKit

class TestingAppDelegate: UIResponder {
}

This is the meat of the fix. It’s an empty implementation of an app delegate that will be used rather than your “real” app delegate.

Create a new Swift file named main.swift, and replace its contents with:

import UIKit

let isRunningTests = NSClassFromString("XCTestCase") != nil
let appDelegateClass : AnyClass = isRunningTests ? TestingAppDelegate.self : AppDelegate.self
UIApplicationMain(Process.argc, Process.unsafeArgv, nil, NSStringFromClass(appDelegateClass))

This is the first code that executes on app launch. It first checks whether XCTestCase is an available class to determine whether the app is being launched from tests or not. Depending on the result, a decision is made as to which app delegate should be used – the real one, or the empty one.

That’s it. Now re-run your tests and open your coverage report.

Note: You may need to Clean for a successful build.

broken code coverage in xcode

Woohoo! 0% coverage. Ya, that’s the only time you’ll ever be happy about 0% coverage, but in our case, we have no legitimate tests, so it’s what we want! Yay, we fixed our code coverage.

Side Benefit: Faster Tests

A side benefit of this fix for correcting broken code coverage in Xcode is that your tests will run faster. By alleviating the simulator of bootstrapping a significant portion of app startup, you’ll save that time each test run. I just compared the before state and after state of this fix on one of my current projects where we have about 500 unit tests. Before the fix, the tests ran in 21 seconds. After the fix the tests ran in 19 seconds. That’s about a 5% speed increase. Multiple 2 seconds over the large number of times that the tests will be run, and that’s a lot of time.

Looking forward

I added the final project to GitHub at https://github.com/obuseme/CodeCoverage. I hope that you find use in this approach. Just remember, you want 100% confidence in your code metrics. For me, if I notice something wrong with one of my code metrics, I stop using it until I get to the bottom of the false data.

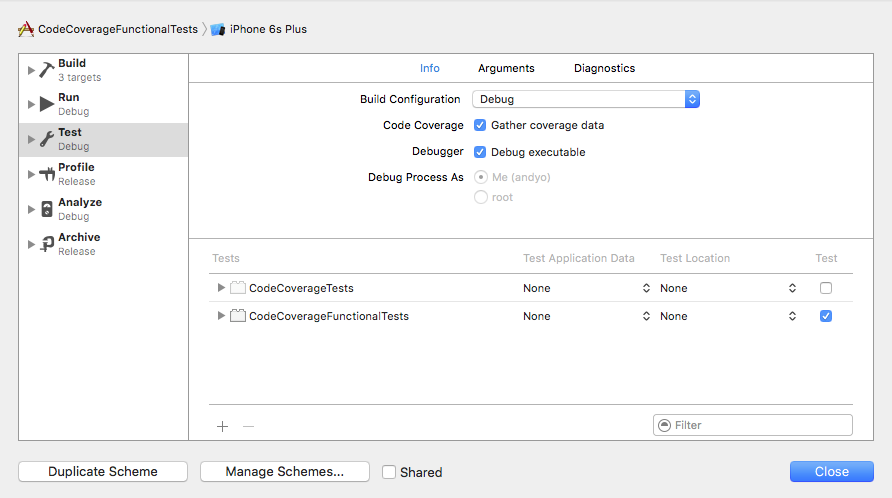
Tomorrow, I want to show you how you can gather separate code coverage metrics for your different types of tests. Hint, it involves some crafty Scheme creation.

Happy cleaning.

Swift Code Coverage: How to measure it

Yesterday, I talked about the merits of how code coverage can be used as a metric in your software development process. Measuring Swift code coverage in Xcode has never been easier. Apple provides a great overview in their WWDC 2015 session, “Continuous Integration and Code Coverage in Xcode”. Xcode 7 provides a integrated experience for tracking the coverage of your tests. You can literally start measuring the code coverage of your tests by clicking a single checkbox. And good news, the coverage also works for your KIF tests.

How To Turn On Code Coverage Measurement

Open your scheme editor by selecting Product -> Scheme -> Edit Scheme, or the keyboard shortcut Command-Shift-Comma.

Select Test in the left hand pane, and then check the box for Gather code coverage.

swift code coverage

That’s it! On your next test run, Xcode will measure the Swift code coverage of your tests.

Viewing Swift Code Coverage Results

Viewing the results of how your tests fare with code coverage is just as easy. Run your tests, and then open the Report Navigator. You can open this by either selecting the thing that looks like a chat bubble in the left hand pane of Xcode, or select the menu Product->Scheme->Edit Scheme…, or use the keyboard shortcut Command-8. Then select your most recent Test run in the list.

swift code coverage

From there, in the center pane of Xcode, look for the Coverage tab.

swift code coverage

On the Coverage tab, you’ll see a list of your classes, and their methods, with bar charts indicating how much of their code is covered from your tests.

You can then even jump right to the corresponding code from the coverage viewer. Just double click either the class or method name. And what’s even cooler, is that Xcode will show you the number of times the line of code was executed in the right hand gutter of the editor.

Overlapping Test Types

Keep in mind, that depending on how your test targets are configured in the scheme, that the results you are looking at may be an aggregate of more than one type of test. For example, if you’ve created both unit and UI tests, and they each live in their own targets, but both targets are included in the Test action for the scheme, that the coverage numbers will be an aggregate of both types of tests. I’ll write a post later this week with a proposal on how you can separate these metrics (hint: it involves creating separate schemes for each type of tests).

Wrap Up

Measuring your Swift code coverage really is that easy. Normally code coverage is also tracked in actual numbers, and reviewed for trends over time. With Xcode alone, it doesn’t provide this. Xcode Server helps remediate the problem while providing specific measurement numbers and also allowing you to compare coverage numbers across different devices. Have fun with code coverage. When working in a team, it’s fun to watch code coverage change over time, hopefully for the better. I suggest that even as you code review your peers’ work, peak at how the code coverage for a given piece of code changes with their change. Does it go up? Does it go down? Remember, code coverage is just a metric that indicates whether a line of code was executed or not. It doesn’t speak at all to the quality of the test. Please be a professional, and professionals don’t write code without using test driven development.

Happy cleaning.

Code Coverage Is A Silver Bullet

Have you ever measured code coverage on any of your projects? How did it work out for you? What problems did it solve? Did it present any new problems? Code coverage is a silver bullet, a silver bullet for understanding how well your tests cover your code. Beyond that, it’s really what you make of it.

What Is Code Coverage

Code coverage is a metric that measures how much of your “production” codebase is being tested by your automated tests, usually unit tests. It’s usually measured at the granularity of a line of code, and sometimes measures methods and classes in aggregate. It’s nothing more than a black and white measurement, how much production code was executed when a given test suite was run. There’s no judgements made to the quality of the tests, simply, how much code did they execute.

Where Code Coverage Gets Tricky

Just to reiterate, code coverage as a metric makes no claims about the quality of tests. If you write a “test” (intentionally in quotes), that simply calls a method and does nothing with the result, the method it calls will have a high level of coverage. That being said, the “test” has done nothing to actually verify an outcome, or craftily provide edge case inducing input. It simply calls the method and discards the result. Voilah, high coverage, crappy test. For example:

class Adder {
  func add(x: Int, y: Int) -> Int {
    return x + y
  }
}

Here’s a corresponding test:

func testAdd() {
  let toTest = Adder()
  toTest.add(2, y: 3)   
}

Adder right now has 100% unit test code coverage! Yay!

Wait a minute, slow down hoss. There’s not a single assertion made in that test. While the test generates a high code coverage metric, it doesn’t validate squat.

code coverage is a silver bullet

TDD FTW

This is where following your test driven development cycle of “Red, Green, Refactor” you’ll never get into this state of test crappiness, and it can truly ensure that your code coverage is a silver bullet. The “red” step of that cycle is critically important, as it ensures that your test actually verifies something. Without knowing that your test can actually fail, you never know that your test actually does anything. And likewise, that your code coverage even means anything.

Be a Professional

The biggest counter argument you will hear about measuring code coverage, is that it can be cheated. Of course it can be cheated! Software “professionals” don’t cheat though. Craftsmen don’t take shortcuts. My life was changed when I read “The Clean Coder” by Bob Martin. He talks about what it takes to be a “professional software engineer.” (He also advocates for 100% code coverage despite all other costs, but I have other opinions on that). It’s a sense of taking pride in your work. With this post, I just want to put this call to action out there, be a professional. Code coverage measurement is just another tool in your toolbox. Code coverage is a silver bullet, but only one that returns to you what you put into it. Crap in, crap out. Use it appropriately, know it’s shortcomings, and know where it shines. When properly used in conjunction with TDD it can powerfully help you continually improve over time. I’d love for you to try it out, and let me know how it works for you.

I was inspired to write this article from listening to episode 67 of “This Agile Life” podcast, where they reference this article, “Is Code Coverage a Silver Bullet?

Happy cleaning.

KIF Tips and Tricks

Now that you’ve written your first KIF test or two, there’s a couple more KIF tips and tricks I wanted to share with you. Nothing too fancy, just a couple nice touches I’ve developed while writing KIF tests.

Don’t Forget About XCTestCase

KIFTestCase is a subclass of XCTestCase. This means that all the goodness of the XCTest framework is available to you in KIF tests. This makes for some really nice KIF tips and tricks.

XCTAssertEqual, XCTAssertTrue and related methods

These are all methods that would be familiar to anyone writing unit tests. These are the meat of how you make assertions about outcomes and expectations when writing unit tests. You can do the same thing in KIF tests. It’s especially powerful when combined with tester().waitForViewWithAccessibilityLabel(String) since that method returns a UIView. You can cast that view to a UIView subclass, and then access any custom properties on it, and then make assertions.

For example, suppose you have a view that should change colors in response to a button being pressed. You could write this KIF test:

func testViewChangesColor_WhenButtonPressed() {
  tester().tapViewWithAccessibilityLabel("Some View")
  let redView = tester().waitForViewWithAccessibilityLabel("the supposed red view")
  XCTAssertEqual(redView.backgroundColor, UIColor.redColor())
}

In this test, you programmatically tap a view with a given accessibility label, presumably the button. Then, you get a reference to the view that should have changed colors, and make an assertion on its background color.

setUp(), tearDown(), beforeAll(), and afterAll()

setUp(), beforeAll(), and tearDown() are powerful methods that help you do common legwork before or after tests run. They help to stabilize state between tests, and remove redundant code by providing a single place for it to be executed. setUp() and tearDown() run before and after each test method in the test class. These are really useful if each test needs to assume some sort of initial state. Imagine you are testing a view that represents a form. Before each test, you want that form to be in a clean state. These methods can enable you to clean up, or set some intial state before each test runs.

beforeAll() and afterAll() run before or after all tests in a given test class. These are useful when a given test class contains tests for a certain view in the app, that isn’t the initial view of the app. Say you are trying to test the third view controller deep in a navigation stack. It would be appropriate in beforeAll() to navigate down the stack to the view to test, and then in afterAll() to pop back up to the root view for other tests to run.

This leads me to the next item in my KIF tips and tricks, some suggestions on how to break up your test classes.

Segmenting Your Tests

The key to maintainable KIF tests is good segmentation of what you’re testing, across different tests and test suites. A “test” refers to a single function in a KIFTestCase subclass. A “test suite” refers to an entire KIFTestCase subclass, and all the tests within it. I don’t have any hard and fast rules on how I break up my KIF tests. Thinking through my KIF tips and tricks, I would phrase my suggested best practice as, group tests of related functionality into a single test suite, while keeping your tests themselves standalone and cohesive. As much as you can avoid it, avoid any interdependcies between tests. If later you go back and delete tests, or add tests, you don’t want failures to crop up just because the order of execution changes based on assumptions of state you made from test to test. I might have a test class/suite called “EditModeTests” that goes through all the verification necessary for “Edit Mode” of the thing I’m building. Remember, at the end of the day, KIF tests are slow, so you don’t want a lot of redundancy between tests in terms of execution steps. So if you have the opportunity to perform verification and assertions on related items in a test, do it, as long as you aren’t totally sacrificing decoupling of that test from other tests. I know what you’re thinking, I’m proposing contradictory best practices. It’s all balance. You’ll feel it out as you go, I just wanted to bring up a couple things to be aware of. Remember, when a test fails, the best thing you can do to help yourself is to do everything possible to reduce the amount of time it takes to figure out why it failed. I see two easy ways to do this: ensure your tests don’t fail, and ensure that when your tests fail the context of why the test failed is clear.

KIFUITestActor Extension

KIF Tips and Tricks

KIFUITestActor is the class of the tester() available in KIFTestCases. It’s what you use to perform the navigation through your app. Don’t forget about extensions, they are a great way to add behavior to KIFUITestActor, especially common pieces of code for repetitive navigatoin tasks. For example, one of my apps conditionally shows an onboarding flow depending if the user is launching the app for the first time or not. I added two methods to a KIFUITestActor extension – one to check if the onboarding view was showing, and one method to close the onboarding flow if it was showing. This way, in all my KIF tests, I can reuse this code and have the confidence in the repeatability of the test. It’s KIF tips and tricks like this that make me really enjoy iOS functional testing.

Verify Something Is NOT On The Screen

KIF makes it really easy to verify that something IS on the screen, but there’s no obvious API for verifying something isn’t on the screen. You can use Swift’s do/try/catch to achieve this.

Consider this test:

func testPreviewIsNotAvailable() {
  do {
    try tester().tryFindingViewWithAccessibilityLabel("Preview")
    XCTFail("Preview should not be found.")
  } catch {
    // Nothing to do here - a throw here is a success.
  }
}

This test verifies that “Preview” is not available on the screen. KIF will throw an exception when it can’t find a view with the matching accessibility label after a 10 second timeout. That exception will be caught by the catch handler, at which point nothing is done, and the test will pass. In the case that a view with a matching accessibility label IS found, the test is explicitly told to fail. If you use this pattern, I suggest a good comment in the empty catch block so you help your future self and others understand what’s happening.

Wrap Up

I hope you find use of these KIF tips and tricks, and I hope that you are setup well to have success with your journey into iOS functional testing with KIF. This wraps up the week of KIF. I’d love to hear how you it works for you.

Happy cleaning.