Separate Schemes For Better iOS Code Coverage

As you continue to construct the test pyramid for your iOS apps to Martin Fowler’s specification, you’ll find the desire to separately measure your code coverage for both unit tests and functional tests. And if you don’t have that desire, then you should know that measuring a combined code coverage for both unit and functional tests is not an accurate representation of how your production code is truly covered. For one, functional tests will generally have a higher coverage, while also including less assertions. This is because of how much code gets executed while broadly navigating through your app as functional testing does. This data will then be glom’d on to the code coverage metrics for your unit tests, making it really hard to identify where you can refine the coverage of your unit tests. And the opposite can also be true, where you have unit test coverage and no functional test coverage, but since you are only evaluating a single number, you can’t figure out where one ends and one begins. To fix this, use separate schemes for better iOS code coverage. By moving each group of tests into their own scheme, you’ll be able to measure code coverage independently.

The Fix – Separate Schemes

To fix this, you are going to create separate schemes for better iOS code coverage. To start, you are going to duplicate the main scheme for your app, and then specify a different set of tests for each scheme. I’ll walk you through creating a separate scheme for your unit and functional tests. For this example, we’ll be using KIF as the tool for the functional tests (Yes, soon enough I’m going to take a deep dive into Xcode’s new UI tests). For this walkthrough, you’re going to continue with the project from Wednesday where you setup code coverage for unit tests. You can find the project on GitHub if you just want to start there. https://github.com/obuseme/CodeCoverage.

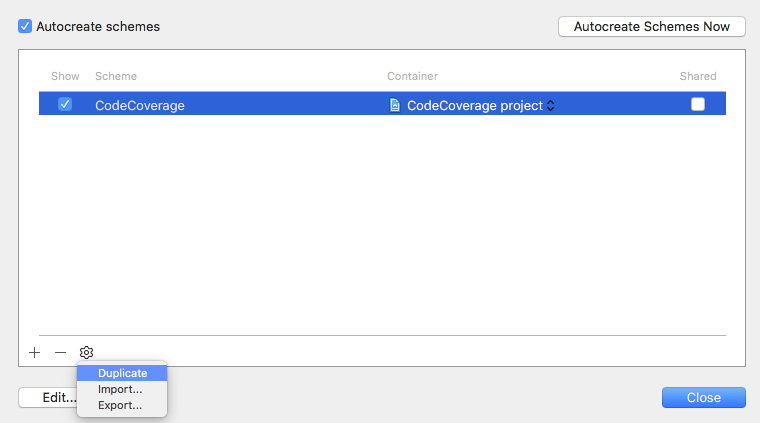
To start, open the Scheme Editor and duplicate the one and only scheme.

Separate Schemes For Better IOS Code Coverage

The new, duplicate, scheme that you created will be used for executing your functional tests, while the initial scheme will be used for your unit tests. The benefit of this is that you’ll be able to separately calculate code coverage for each set of tests. The drawback is that you’ll need to manually switch the scheme to execute each set of tests.

After you’ve duplicated the scheme, rename the new scheme to CodeCoverageFunctionalTests.

Next, create a new “iOS Unit Testing Bundle” target named CodeCoverageFunctionalTests. This target will contain your KIF tests.

Next, install KIF, preferably with CocoaPods. For detailed instructions on doing this, follow my previous post here. Ensure that the target you specify for where KIF should be installed is CodeCoverageFunctionalTests. And of course, after first configuring CocoaPods with a project, after you install pods for the first time, close CodeCoverage.xcodeproj and open CodeCoverage.xcworkspace instead.

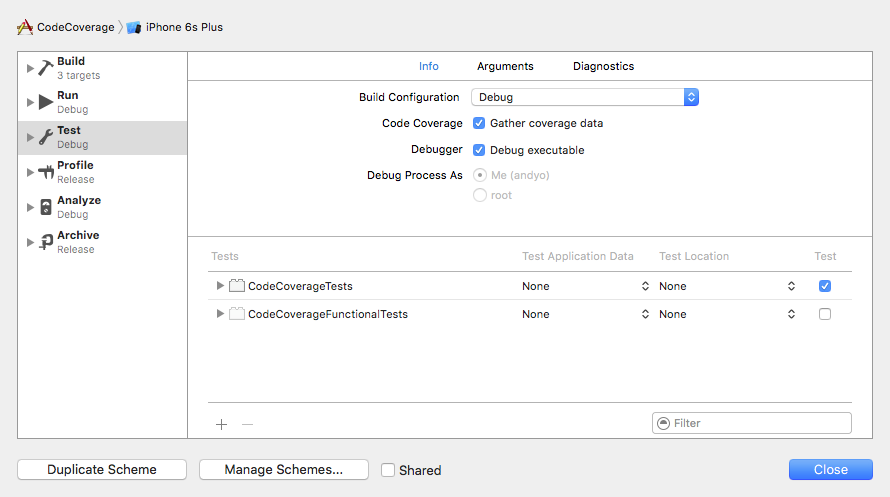
And for the final step, edit each scheme to selectively use one of the two test targets for its Test step. First, edit the scheme for CodeCoverage and set the test suite for the Test step to be CodeCoverage. Make sure Gather code coverage is selected as well in each scheme.

Separate Schemes For Better IOS Code Coverage

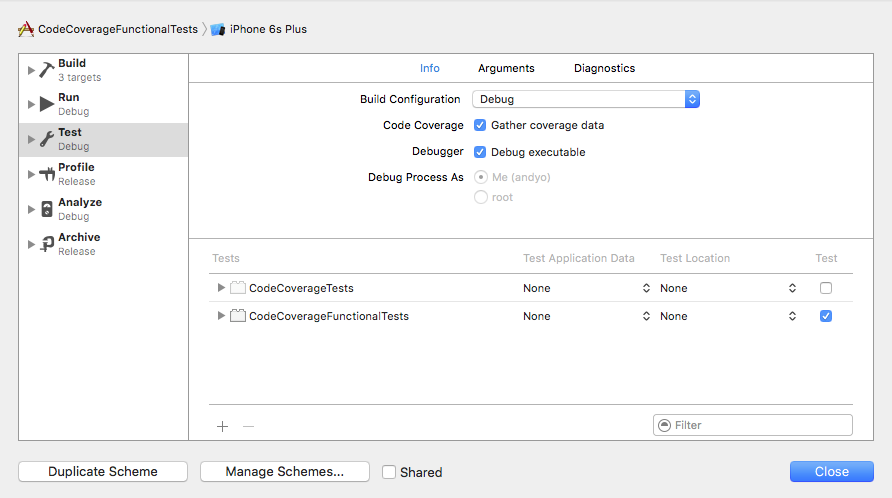
Then, edit the scheme for CodeCoverageFunctionalTests and set the test suite for the Test step to be CodeCoverageFunctionalTests.

Separate Schemes For Better IOS Code Coverage

BOOM! That’s it. Now you can explicitly change schemes, and use Command-u to run tests for each scheme. Depending on the scheme selected, a different set of tests will be run – either the unit tests or the functional tests, and as a result, different code coverage metrics will be generated.

Wrap Up

This post concludes a week of code coverage information. I hope you enjoyed it, and I hope your tests are better covered as a result separate schemes for better iOS code coverage. I’d love to hear how you’re using code coverage. Please post a comment and let me know!

Happy cleaning!

Broken Code Coverage in Xcode: How To Fix It

When using metrics to make decisions about your code, it’s fundamentally important that those metrics are 100% correct. You need to have absolute faith in the reported numbers. If this is not the case, you risk making decisions and taking action through inaccurate data, and risk making incorrect decisions. By default, there’s a critical flaw in how code coverage is measured by Xcode for iOS apps. From the moment you setup unit tests for a project, Xcode will automatically identify code as “covered” for anything that is triggered through the normal application launch sequence, such as your application delegate. This means that your code coverage numbers will be artificially inflated! And broken code coverage in Xcode means you won’t fully understand how well your app is tested.

Let me say this one more time to it sinks in, your iOS code coverage numbers are not correct unless you take specific action to fix them.

An Example Of Broken Code Coverage in Xcode

First, I’m going to demonstrate to you the broken-ness of code coverage in Xcode. Then, I’m going to show you how to fix it.

To observe the broken code coverage, you are going to perform these steps:

1) Create a new empty project, including unit tests 2) Leave the unit tests empty 3) Turn on code coverage 4) Run the tests, and review coverage

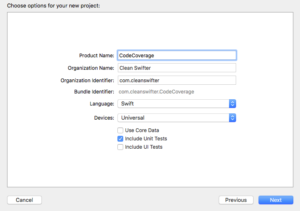
Let’s do it. First, create a new Swift iOS project called CodeCoverage. Be sure to check Include Unit Tests.

broken code coverage in xcode

Open CodeCoverageTests.swift. You aren’t going to make any changes to this file, but notice how there are two empty test implementations testExample() and testPerformanceExample(). These tests will run and pass, but should generate 0% coverage of the application.

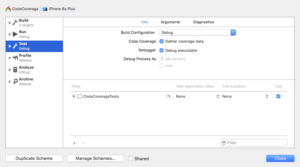
Now, turn on Code Coverage. Open the Scheme Editor and check Gather coverage data.

broken code coverage in xcode

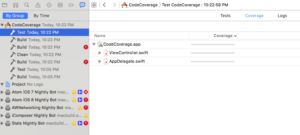
Finally, run the tests. Command-U (you only get a keyboard shortcut today :). Open the Code Coverage results from the Report Navigator.

broken code coverage in xcode

Uhhh, what’s wrong with that picture? It should be obvious, code coverage is being shown for ViewController and AppDelegate despite there being absolutely no legitimate tests in the project.

Why There Is Broken Code Coverage in Xcode

Well, I wouldn’t blame it all on Xcode. Xcode is measuring the code that is executing when your tests execute. And technically, since you app is starting up and showing the first view controller, that code has executed, so it’s reported as covered. The thing is, by the definition of how you want to measure code coverage, that code isn’t actually “covered.” There’s a really easy way to correct this.

How To Fix Broken Code Coverage in Xcode

Jon Reid’s article on How to Switch Your App Delegate for Fast Tests inspired me to figure out how to fix this. You are going to create a separate app delegate that is used by your tests. This app delegate will be entirely empty, so it totally intercepts the app launch sequence. This way, no code in your real app delegate will be executed unless explicitly done so from a test, and ditto for any view controller that it would have otherwise instantiated.

Note: I want to give full attribution to Jon Reid on this code. I just figured out that it also fixes broken code coverage in Xcode.

To fix this, first open AppDelegate.swift and delete this line:

@UIApplicationMain

Create a new Swift file named TestingAppDelegate.swift, and replace it’s contents with:

import UIKit

class TestingAppDelegate: UIResponder {
}

This is the meat of the fix. It’s an empty implementation of an app delegate that will be used rather than your “real” app delegate.

Create a new Swift file named main.swift, and replace its contents with:

import UIKit

let isRunningTests = NSClassFromString("XCTestCase") != nil
let appDelegateClass : AnyClass = isRunningTests ? TestingAppDelegate.self : AppDelegate.self
UIApplicationMain(Process.argc, Process.unsafeArgv, nil, NSStringFromClass(appDelegateClass))

This is the first code that executes on app launch. It first checks whether XCTestCase is an available class to determine whether the app is being launched from tests or not. Depending on the result, a decision is made as to which app delegate should be used – the real one, or the empty one.

That’s it. Now re-run your tests and open your coverage report.

Note: You may need to Clean for a successful build.

broken code coverage in xcode

Woohoo! 0% coverage. Ya, that’s the only time you’ll ever be happy about 0% coverage, but in our case, we have no legitimate tests, so it’s what we want! Yay, we fixed our code coverage.

Side Benefit: Faster Tests

A side benefit of this fix for correcting broken code coverage in Xcode is that your tests will run faster. By alleviating the simulator of bootstrapping a significant portion of app startup, you’ll save that time each test run. I just compared the before state and after state of this fix on one of my current projects where we have about 500 unit tests. Before the fix, the tests ran in 21 seconds. After the fix the tests ran in 19 seconds. That’s about a 5% speed increase. Multiple 2 seconds over the large number of times that the tests will be run, and that’s a lot of time.

Looking forward

I added the final project to GitHub at https://github.com/obuseme/CodeCoverage. I hope that you find use in this approach. Just remember, you want 100% confidence in your code metrics. For me, if I notice something wrong with one of my code metrics, I stop using it until I get to the bottom of the false data.

Tomorrow, I want to show you how you can gather separate code coverage metrics for your different types of tests. Hint, it involves some crafty Scheme creation.

Happy cleaning.

Your First iOS Unit Test

I recently had the question posed to me, “how do I get started with unit testing on iOS?” I have a suggestion for your first iOS unit test, look for a piece of code that performs an operation on a String. Write your first iOS unit test for that method. Strings and their related manipulations are easy to unit test. They don’t have deep integration with other frameworks like UIKit or CoreData, and the behavior is usually easily understandable just by reading the code, thus making it easy to reverse engineer what “should” happen, in order to translate it into a unit test. Let’s work through an example.

A “Unit” Defined

The first thing to understand about “unit testing” is what a “unit” even is.

Your First iOS Unit Test

No, not a storage “unit.”

It’s a vague term for sure. I’d describe it as, “the smallest piece of code that actually does something useful.” It’s kind of like art, you know it when you see it. I’ve written dedicated unit tests for single lines of code before. I’ve written unit tests for entire methods before. Bigger than that, and you start to take on too much scope for the test. You want the test to be straightforward. You want the test to be easily troubleshootable when it fails. And you want to minimize the reasons it could fail, to only a few reasons. This keeps your tests well factored, and easily maintainable.

My suggestion for your first test is to look for a standalone method, aka a “unit” that performs an operation on a string. Here’s an example for your first iOS unit test:

The Code To Test

I wanted to come up with a straight forward example to help you visualize a piece of code that is easily verified with a unit test. Consider the following struct that represents a person with a name:

struct Person {

  let firstName:String
  let lastName:String
  let suffix:String?

  init(firstName: String, lastName: String) {
    self.firstName = firstName
    self.lastName = lastName
    self.suffix = nil
  }

  init(firstName: String, lastName: String, suffix: String) {
    self.firstName = firstName
    self.lastName = lastName
    self.suffix = suffix
  }

  func formattedName() -> String {
    if let suffix = suffix {
      return "\(firstName) \(lastName), \(suffix)"
    } else {
      return "\(firstName) \(lastName)"
    }
  }
}

The struct sets up a Person as a thing that is represented by three Strings, a firstName, a lastName, and an optional suffix.

formattedName jumps out as a prime candidate for a unit test. A standalone method that does some isolated logic based on some inputs, and returns a a new value based on those inputs.

Add An XCTestCase Your Project

Now that you know what you want to test, in order to test it, you need to leverage the XCTest framework to test it. Xcode makes this easy.

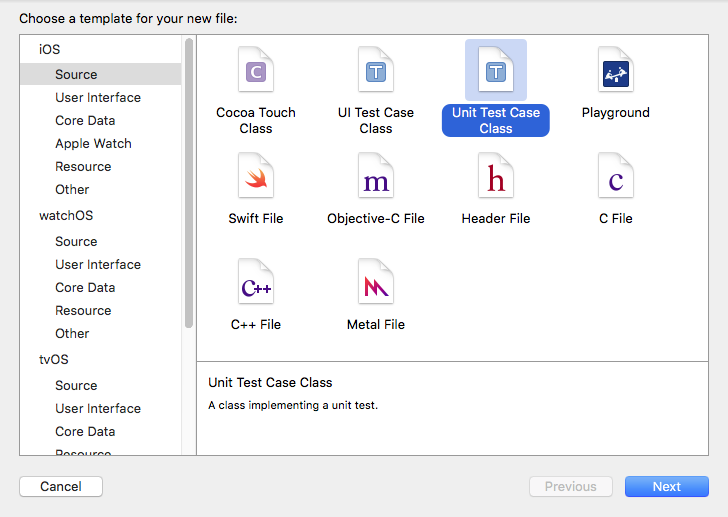
From your project, select File -> New -> File… and pick Unit Test Case Class.

Your First iOS Unit Test

Give it an appropriate name, usually ending in the convention of: Tests, so in my case, PersonTests.

That’s it, a new file will be created containing a class that is a subclass of XCTestCase. Add your tests here. Anything function whose name begins with “test” will be executed when you run unit tests.

Writing The Unit Tests

Reviewing formattedName() in Person there are two flows through the code, when the Person has a suffix and when they don’t. Two flows through the “unit” means two tests – keep your tests small. Test one thing at a time.

Consider this test to verify that a Person‘s formattedName() is correct when they don’t have a suffix:

func testFormattedName_ProperlyFormats_WhenNoSuffix() {
  let theCleanSwifter = Person(firstName: "Andy", lastName: "Obusek")
  let expectedFormattedName = "Andy Obusek"
  XCTAssertEqual(expectedFormattedName, theCleanSwifter.formattedName())
}

First, a Person is setup without a suffix, then the expected output is defined, and finally XCTest is used to verify that the output matches the expectation.

Here’s a test for the opposite condition, when a Person does have a suffix:

func testFormattedName_ProperlyFormats_WhenSuffixPresent() {
  let theCleanSwifter = Person(firstName: "Andy", lastName: "Obusek", suffix: "Jr.")
  let expectedFormattedName = "Andy Obusek, Jr."
  XCTAssertEqual(expectedFormattedName, theCleanSwifter.formattedName())
}

This test is very similar to the prior test. The only differences are that a suffix is provided for the Person and the expectedFormattedName is different.

Running The Tests

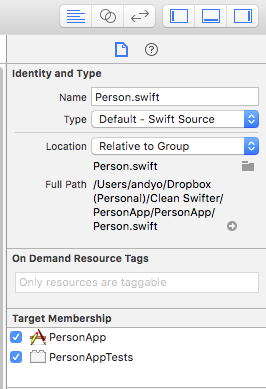
IMPORTANT: For your tests to compile, any files that you reference in the main target (eg. the code under test) need to be included in the test target. You specify this in the File Inspector:

Your First iOS Unit Test

To run the tests, use the keyboard shortcut Command-U (or if you want to be slow, select the menu item Product -> Test. The iOS Simulator will launch, the tests will run, and you’ll see the results in the Console. They look like this:

22:11:52.771 PersonApp[12486:9452629] _XCT_testBundleReadyWithProtocolVersion:minimumVersion: reply received
22:11:52.777 PersonApp[12486:9452629] _IDE_startExecutingTestPlanWithProtocolVersion:16
Test Suite 'Selected tests' started at 2016-04-19 22:11:52.785
Test Suite 'PersonTests' started at 2016-04-19 22:11:52.787
Test Case '-[PersonAppTests.PersonTests testFormattedName_ProperlyFormats_WhenNoSuffix]' started.
Test Case '-[PersonAppTests.PersonTests testFormattedName_ProperlyFormats_WhenNoSuffix]' passed (0.021 seconds).
Test Case '-[PersonAppTests.PersonTests testFormattedName_ProperlyFormats_WhenSuffixPresent]' started.
Test Case '-[PersonAppTests.PersonTests testFormattedName_ProperlyFormats_WhenSuffixPresent]' passed (0.000 seconds).


Test session log:
    /Users/andyo/Dropbox (Personal)/Clean Swifter/PersonApp/DerivedData/PersonApp/Logs/Test/78B021DC-E467-4F0E-8D95-EE44156AB2DE/Session-2016-04-19_22:11:43-ZVrKpY.log

Test Suite 'PersonTests' passed at 2016-04-19 22:11:52.810.
     Executed 2 tests, with 0 failures (0 unexpected) in 0.021 (0.023) seconds
Test Suite 'Selected tests' passed at 2016-04-19 22:11:52.811.
     Executed 2 tests, with 0 failures (0 unexpected) in 0.021 (0.025) seconds

Congratulations, You Did It!

BOOM! That’s it, you just wrote your first iOS unit test! Well, two of them. How does it feel? Trivial? Powerful? I can relate to both of those feelings. Starting out, you might be thinking, “That’s so simple, how does it even provide value?” Well, ya, if you write the test and never execute it again, chances are you’ll never get any value out of it. The power of tests comes with repeated execution of those tests. Anytime you make a change to your project, run the tests! (and add new tests too!) I guarantee you that at some point, your tests will eventually catch a bug that you didn’t otherwise notice. Then you’ll be sold on automated testing. You’ll never get there if you don’t start somewhere.

Thanks for reading, happy cleaning.

PS – Continuous integration tools like Xcode Server or Jenkins further magnify the power of your first iOS unit test by enabling automatic execution of builds and tests in response to events like source code repository commits. I’ll tackle this topic in a future post.

TDD in Xcode – Critical Keyboard Shortcuts

Iterations though the test driven development workflow must happen fast. In fact, fast is better than perfect. TDD in Xcode isn’t painful. In fact, there are a couple tips and tricks I’ve adopted when going through my red-green-refactor workflow in Xcode that makes it easy. I wanted to share them with you.

Assistant Editor FTW

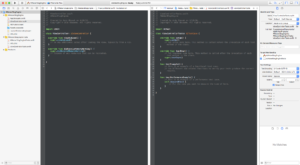
When entering the TDD zone, the first thing you want to do is get both the “production” file and the corresponding test file open. Use the Assistant Editor for this. The bigger the monitor the better. Open both of these files at the same time, in windows next to each other.

It should look like this:

TDD in Xcode

I don’t really have a concrete preference as to which file, the test or the production class, should go on the left or the right. Just remember that if you set breakpoints, the debugger will bring the file with the breakpoint to focus in the lefthand pane.

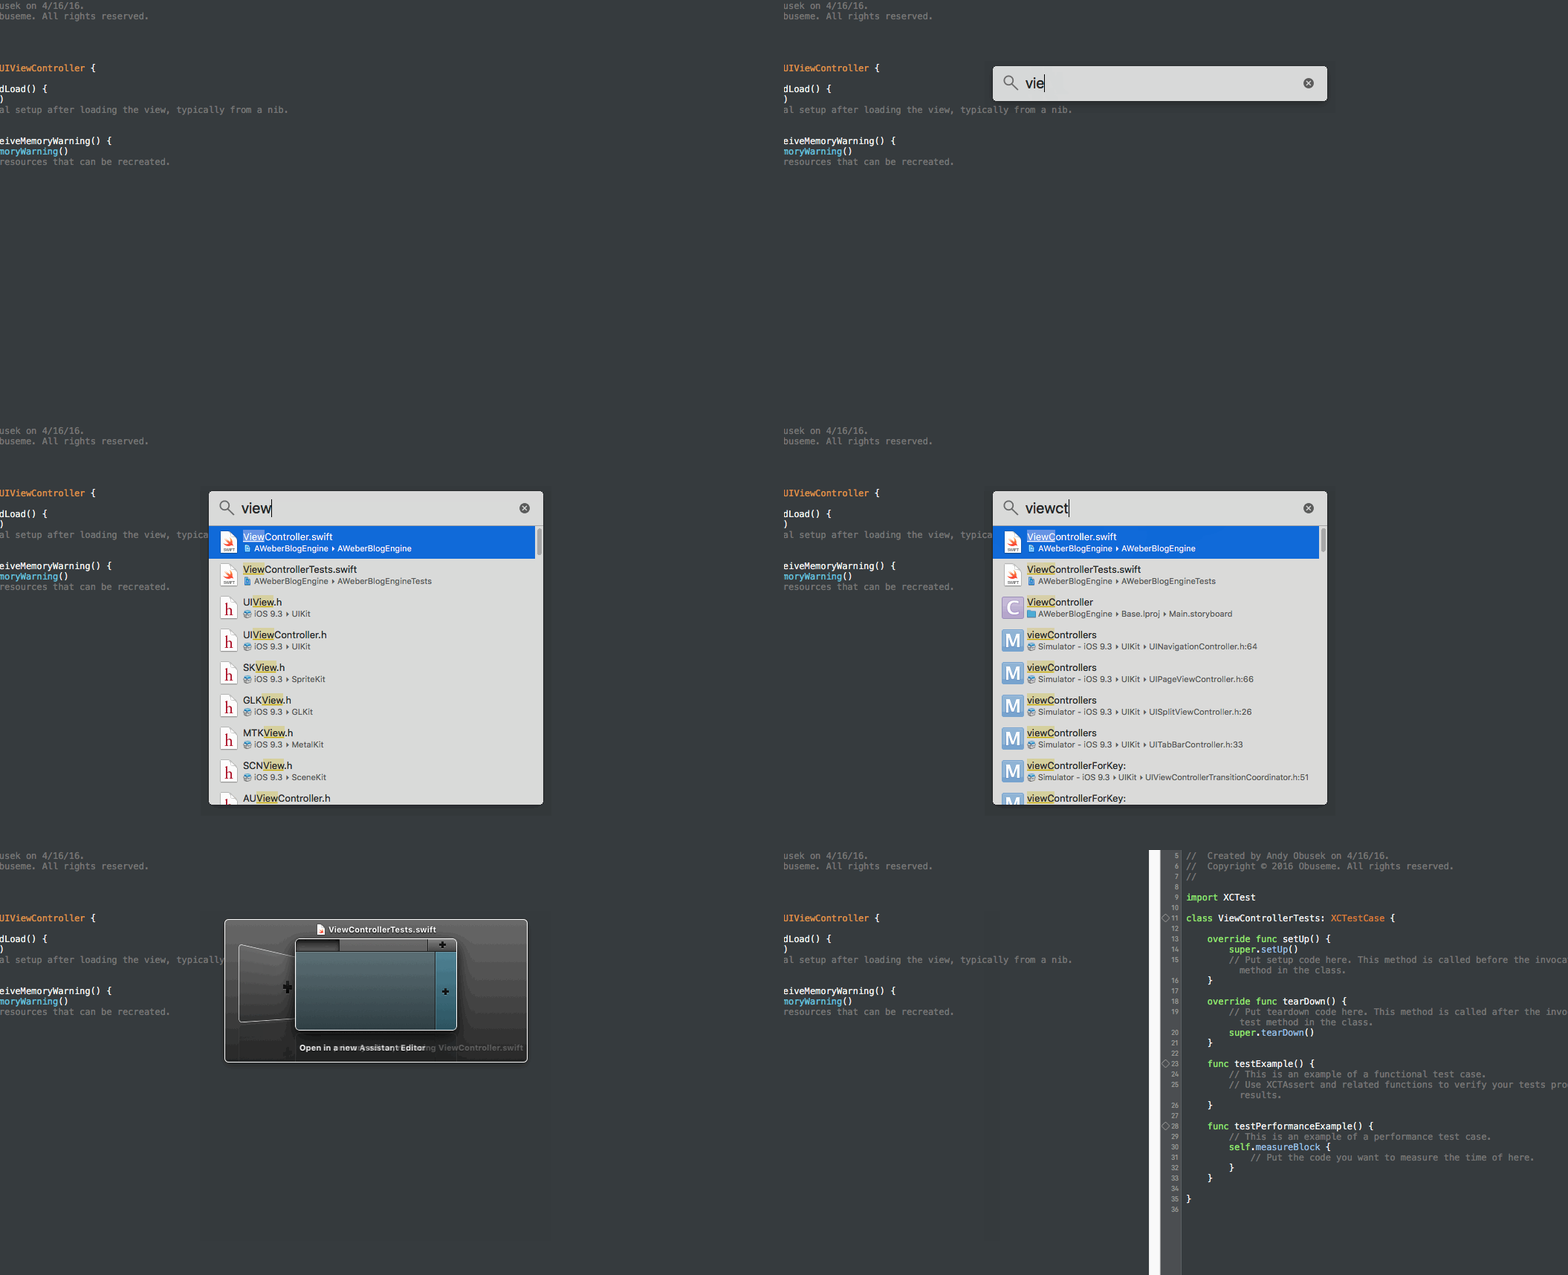
It’s kind of cumbersome to click around in Xcode to get the Assistant Editor to do what you want, and in fact I’m not even sure that I know how! I’ve become so accustomed to using keyboard shortcuts to bend Xcode to my will!!! Here’s a shortcut that I couldn’t live without, it will open any file of your choosing in the Assistant Editor, side by side with whatever file is currently open.

  1. Command-Shift-o
  2. Option-Shift-Enter
  3. Right Arrow, Enter

Okay, so it’s really a sequence of commands. Stop complaining, it’s not that hard to learn, and TRUST ME, once you commit these to finger memory, you’ll find use for them beyond just your TDD flow.

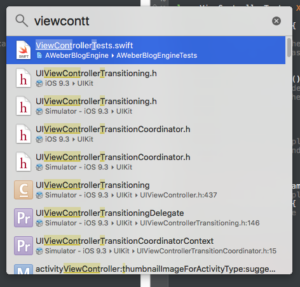
The first command brings up the “Open Quickly” dialog where you can then type a filename (or a method or variable) to open. It looks like this:

TDD in Xcode

The second command selects the file to open, while at the same time allowing you to specify where it should be opened in Xcode. It looks like this:

TDD in Xcode

The third command is just the key combination to specify that the file should be opened side by side with the current window.

Here’s a clip showing the whole sequence together:

TDD in Xcode

Running Tests

There are two specific other keyboard shortcuts that are absolutely essential to when I’m working with TDD in Xcode:

  1. Command-Option-Control-U
  2. Command-Option-Control-G

There’s not even a succinct name for the first command, and maybe that speaks to it’s absolutely magical nature. First off, the command only works when the cursor is within focus of a test class. When you execute that command from a test case, it will run whatever tests that are in the same scope as the cursor. For example:

If the cursor is within a single test method, only that test method will be run. If the cursor is within a single test class, all tests in that class will be run, but only that class.

Speed it the key to successful TDD in Xcode. The less tests you execute at once, the faster execution will be (and the more you sacrifice in what’s actually validated). I absolutely love this keyboard shortcut, it totally enables me to make small changes to the test and the class under test throughout my TDD workflow, and quickly run the associated tests.

The second keyboard shortcut is a nice complement. It reruns the last test that was run. So if you cursor is bouncing around and it’s not focused in the appropriate context (like the cursor is within the class under test) to execute the first command, this is a nice alternative to rerun whatever the last test run was.

Command-U

Don’t forget to periodically run the entire test suite. This shortcut runs all tests associated with the Test configuration in the current Scheme. In the early stages of projects, this may be fast enough for you, and you may not even need to use the more specific test running shortcuts. Enough TDD though, and you’ll get to a point where executing all tests becomes frustratingly slow for getting that immediate feedback you need for successful TDD.

The Mouse, Available But Slow

TDD in Xcode

You can always use the mouse for executing tests as well, but don’t. I just want to point it out for thoroughness sake, as well as make the point that any point you need to take your fingers off your keyboard, you are slowing down. Resist the urge to move your hands over to the mouse. Learn the keyboard shortcuts! It will pay so many dividends in your quest towards TDD in Xcode enlightenment.

Anything Else?

What do you use in your TDD workflow that enables successful, high quality code?

Happy cleaning.

TDD in Xcode – Can’t Refactor Swift Code

Red. Green. Refactor. That’s how I’ve memorized the steps for test driven development. Uncle Bob breaks them into a little more detail if you’re interested in something a little more long form. TDD in Xcode is pretty seamless, until you get to the refactor step. Xcode can’t automatically can’t refactor Swift code.

Refactoring Is Broken For Swift Code

Xcode does not currently support any refactoring of Swift code. If you attempt to use Xcode’s builtin refactoring tools, you see this:

Can't Refactor Swift Code

. From my earliest days of writing Swift, this has gotten under my skin. This is friction to my flow. I want my IDE to make it feel like I’m coasting downhill, rather than going up an incline.

Can't Refactor Swift Code

Additionally, I also take this as a sign at Swift’s maturity. I’ve since come to see the light, and no longer question Swift’s long term viability, but either way an error message like this should be embarrassing for Apple. And then the fact that it hasn’t changed in almost 2 years…

For more context, if you right click in Swift code to bring up the context menu, any of the options in the Refactor menu show that error message.

Can't Refactor Swift Code

Consider An Alternative – AppCode

This weekend I downloaded App Code by JetBrains. I’ve never tried it. Recently it specifically caught my eye that two people I respect, Orta Therox and Jon Reid, evangelize it and use it. JetBrain’s IDEs are renown for the abilities to support test driven development and refactoring. I’m looking forward to giving it a go. I’m in the 30-day trial right now, and I’m committed to learning all it has to offer to make my own impression. So far, I’ve been able to open a non-trivial project and run it in the iOS simulator, no issues. Next, I’m going to do some research about how to best use it, what it offers, and immerse myself in it. I’ll report back here along the way with my findings. I’m just hoping that while Xcode can’t refactor Swift code, I have better luck with AppCode.

Happy cleaning.