XCTest Target Membership Rule #1

I just had to learn a lesson the hard way, and wanted to pass on to you what I’m going to call the XCTest Target Membership Rule. It took some head banging of mine to discover this rule, and I don’t want you to go through the same pain.

The XCTest Target Membership Rule

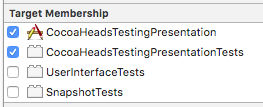
The actual implementation files for your app should not be included with the Target Membership for your XCTest target.

xctest target membership

If you were to check the box next to TestStaticTests you would start to see this error in the Console when running your tests:

objc[14049]: Class ViewController is implemented in both <path cut>/TestStatic.app/TestStatic and <path cut>/TestStaticTests.xctest/TestStaticTests. One of the two will be used. Which one is undefined. 

The runtime for XCTest is telling you that it has found the same class defined in two places, the two targets for which you specified the file should be included. And furthermore, you’re also being told that the behavior with regard to which implementation is used will be “undefined.” The funny thing was, I actually found this error message to be misleading. I found that in practice, both copies of the implementation are actually used if you can believe that!

Here’s an in-depth question I posted on StackOverflow documenting the odd behavior I noticed, and included a sample project demonstrating it as well.

Background

These past few weeks I’ve been working on an older project, specifically AWeber Stats. If you notice, that app hasn’t been updated since April 2015, that’s a while. As a result a lot of the dependencies were out of date, so one thing the team set out to do was update the dependencies, and CocoaPods seemed like a good place to start. We were previously on version 0.34.1 and planned to update to 1.0.1 (which at the time of this writing is the latest version). We use Ruby Gems to manage the dependency versions for CocoaPods specifically. This allows us to have per-project control of which version of CocoaPods end up being used. This gives us the reassurance that we must explicitly designate the desire to update a given project’s CocoaPod’s version, and thus accordingly test and verify the update.

I move forward with the update, bumping the version of CocoaPods to 1.0.1 as defined in our Gemfile. CocoaPods 1.0 actually defines a new schema for Podfiles so I subsequently migrated the Podfile to the new format, and successfully ran pod install. Everything has gone smoothly up to this point. Then I opened my Xcode workspace and attempt to run our test suite.

100s of failures.

In addition to the failures, I saw many instances of that Console warning from earlier:

...One of the two will be used. Which one is undefined.

Now the thing is, remember, at this point I hadn’t yet discovered the XCTest Target Membership Rule. And as it turns out, nearly every implementation file in the project for the app target, also existed in membership for the test target. And in fact, as I dusted the cobwebs off of my mind, and thought back to the original work on the project, I specifically remember needing to designate those implementation files as having membership in the test target. Specifically, it was errors like this that would appear of the class under test was not part of the test target:

Undefined symbols for architecture x86_64:
  "_OBJC_CLASS_$_MyArrayController", referenced from:
      objc-class-ref in MyArrayControllerTests.o

So where did the need to include that file with the test target go? Why was Xcode now telling me that I shouldn’t include these files with both targets?

Well I never got to the bottom of it. I have two guesses at this point: something either in Xcode, or in CocoaPods changed to modify the behavior how XCTest integrates with the classes under test.

Closing Thoughts

I’m still digging to get to the bottom of this. In the meantime, I will not forget the XCTest Target Membership Rule. A couple other lessons surfaced:

  1. Don’t wait to keep your project up to date – It’s easy to launch an app on the store, or hand it off to a client, and semi-forget about it. The app is live, attracting customers, and functioning well. Just remember, at some point it will either need to be updated or die. And the longer you wait, the harder it will be to bring it up to contemporary standards. It’s much easier to make more frequent small changes, than wait 15 months, return to an unfamiliar code base, and try to bring it up to speed.
  2. Know your tool chain – I’m still not fully aware of what changed between the last app update and today such that such a fundamental piece of project functionality changed. I’m taking this as a kick in the butt to get my head wrapped around third party dependencies being used. And if you can’t do that (for whatever reason – time, complexity, interest, etc.), don’t use them. There are plenty of ways to manually install third party code, or even write it from scratch. Of course other people have already invented the wheel, just don’t blindly use the tools without a foundational understanding of how to troubleshoot them when they go wrong.

Happy cleaning.

How to Disable Tests in Xcode

It’s easy to disable tests in Xcode, but not entirely obvious. A lot of people give Xcode flack in terms of how far behind other IDEs it is with regard to its support for automated testing. I don’t entirely disagree with this. On the other hand, it’s come so far from just five years ago and I’m thankful for that.

Why Disable Tests

You might be wondering, if I’ve spent all this time writing tests, why would I ever want to disable tests in Xcode? I’m not advocating permanently disabling them, instead, I’m advocating disabling them temporarily to speed up your development or to unblock progress. Just this week, I returned to an old project of mine, one that hasn’t had an app store update in over a year. It still uses CocoaPods version 0.33.0, and Swift 1. Needless to say, it needed some work getting it up to speed. (Side note: I have a lot of ammunition for future blog posts on how to NOT let a project get this stale, but we’ll save those for a future camp fire). First, I needed to get the project to actually compile. Second, I needed to get the tests passing. And finally, I needed to update our continuous integration machines and jobs to also compile and successfully run the tests. I had my work cut out for me.

When working with a project this old, sometimes advanced techniques like TDD aren’t immediately useful if you can’t even get the project to simply compile. When working through compilation errors and test failures at a large scale, it’s useful to selectively turn off a subset of the errors or test failures so you can eliminate noise, focus on a piece of the problem, and make progress. You can easily disable tests in Xcode in two ways: disable compilation, and disable test execution. Both of these are scheme changes. Here’s how:

How To Disable Tests

Disable Tests From Building

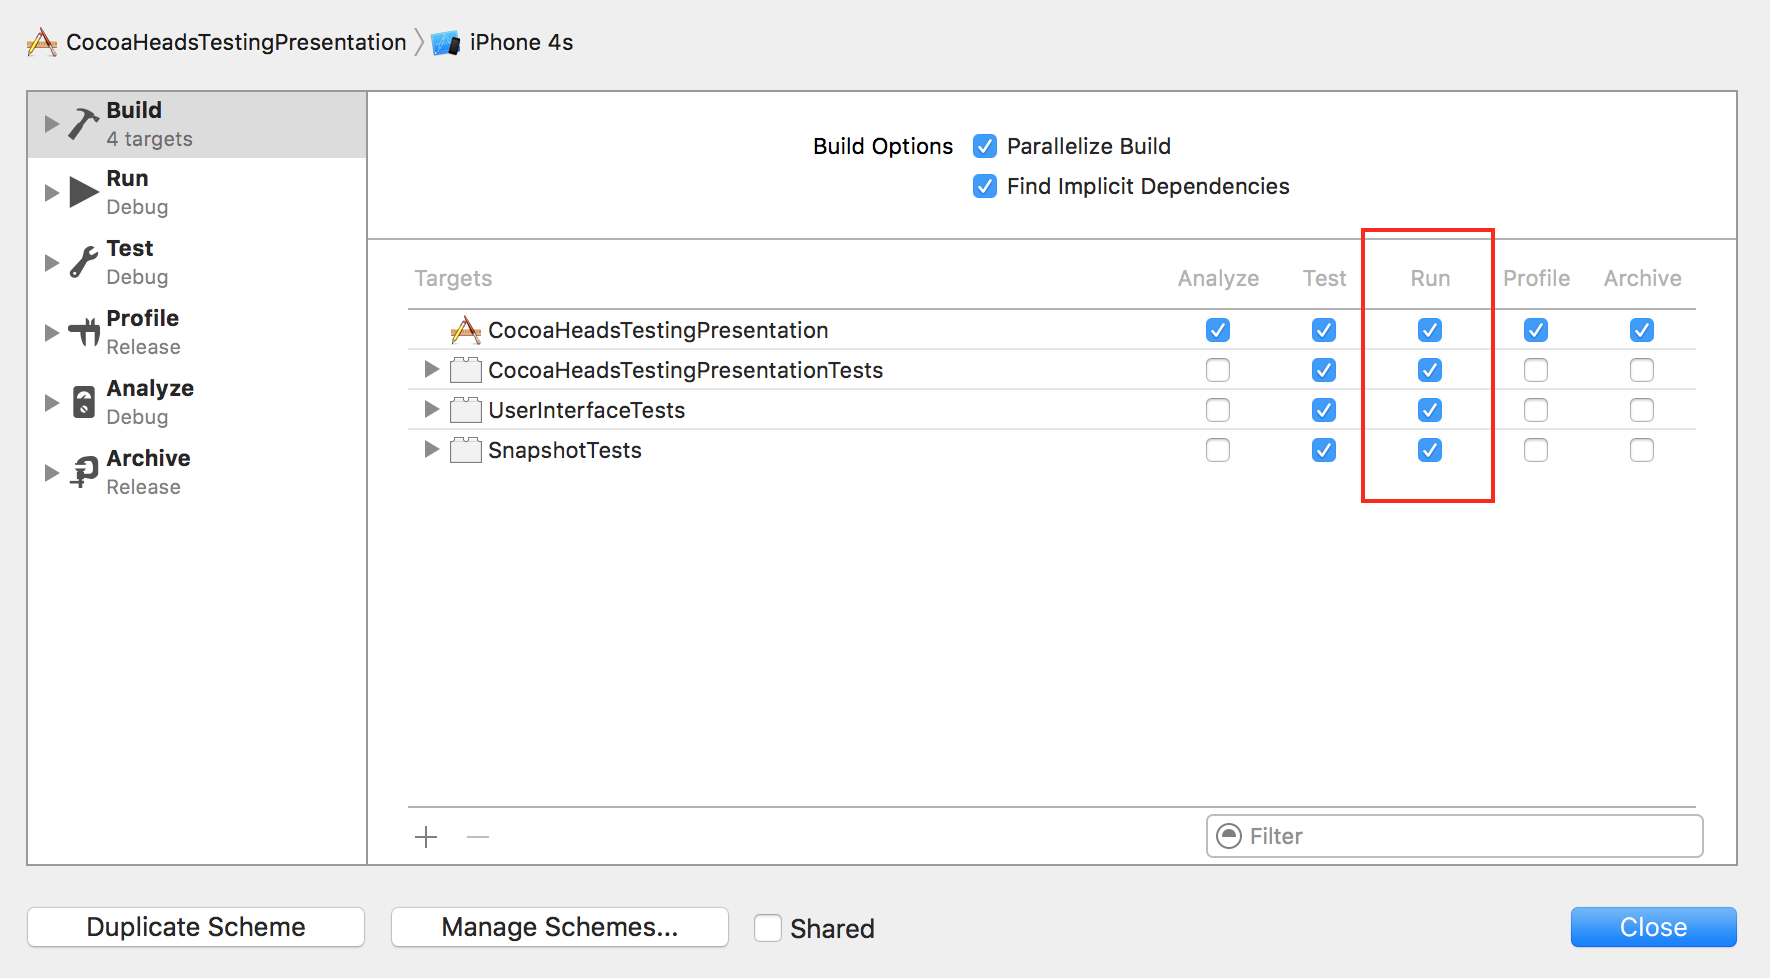
To simply disable all your tests from building, you can do this in the Scheme editor. From the menu bar, select Product -> Scheme -> Edit Scheme.

In the left hand bar, select Build.

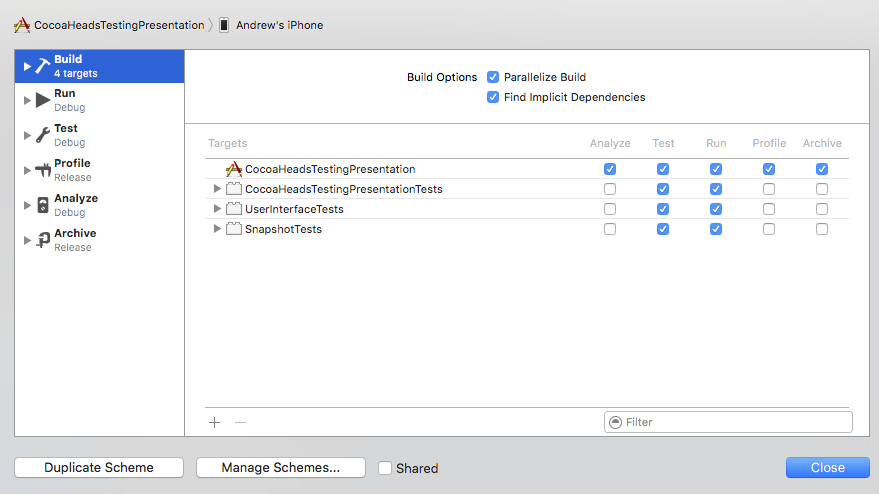
Then in the main pane, you can disable tests from compiling for any action in your project. If you’re project is in a really bad state, you can disable tests from compiling when running your application.

disable tests in Xcode

By disabling any of those checkboxes, when you run your application, anything in the associated targets will not be compiled.

Disable Tests From Running

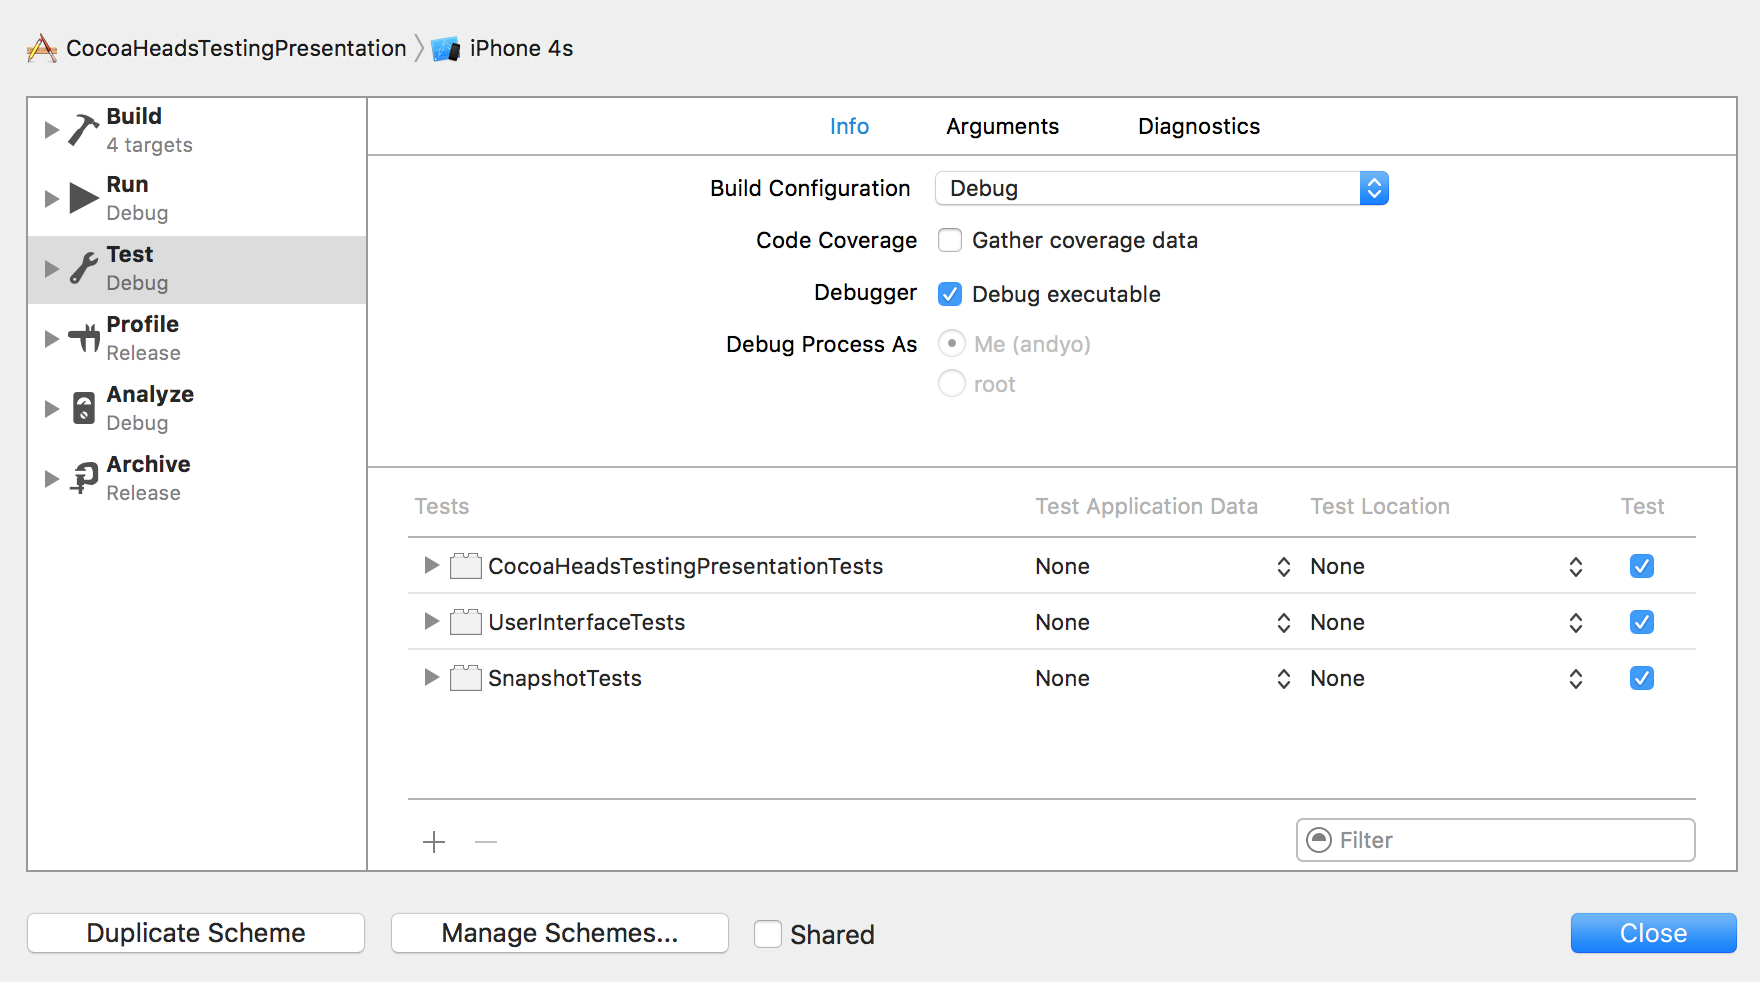
Similarly, you can use the Scheme Editor for selectively turning tests and off. Still in the Scheme Editor, select Test in the left hand bar. Then, in the main pane, you’ll see each target associated with tests. The checkbox will let you enable or disable the tests from being run when you run tests for your project (Command-U, or Product -> Test).

disable tests in Xcode

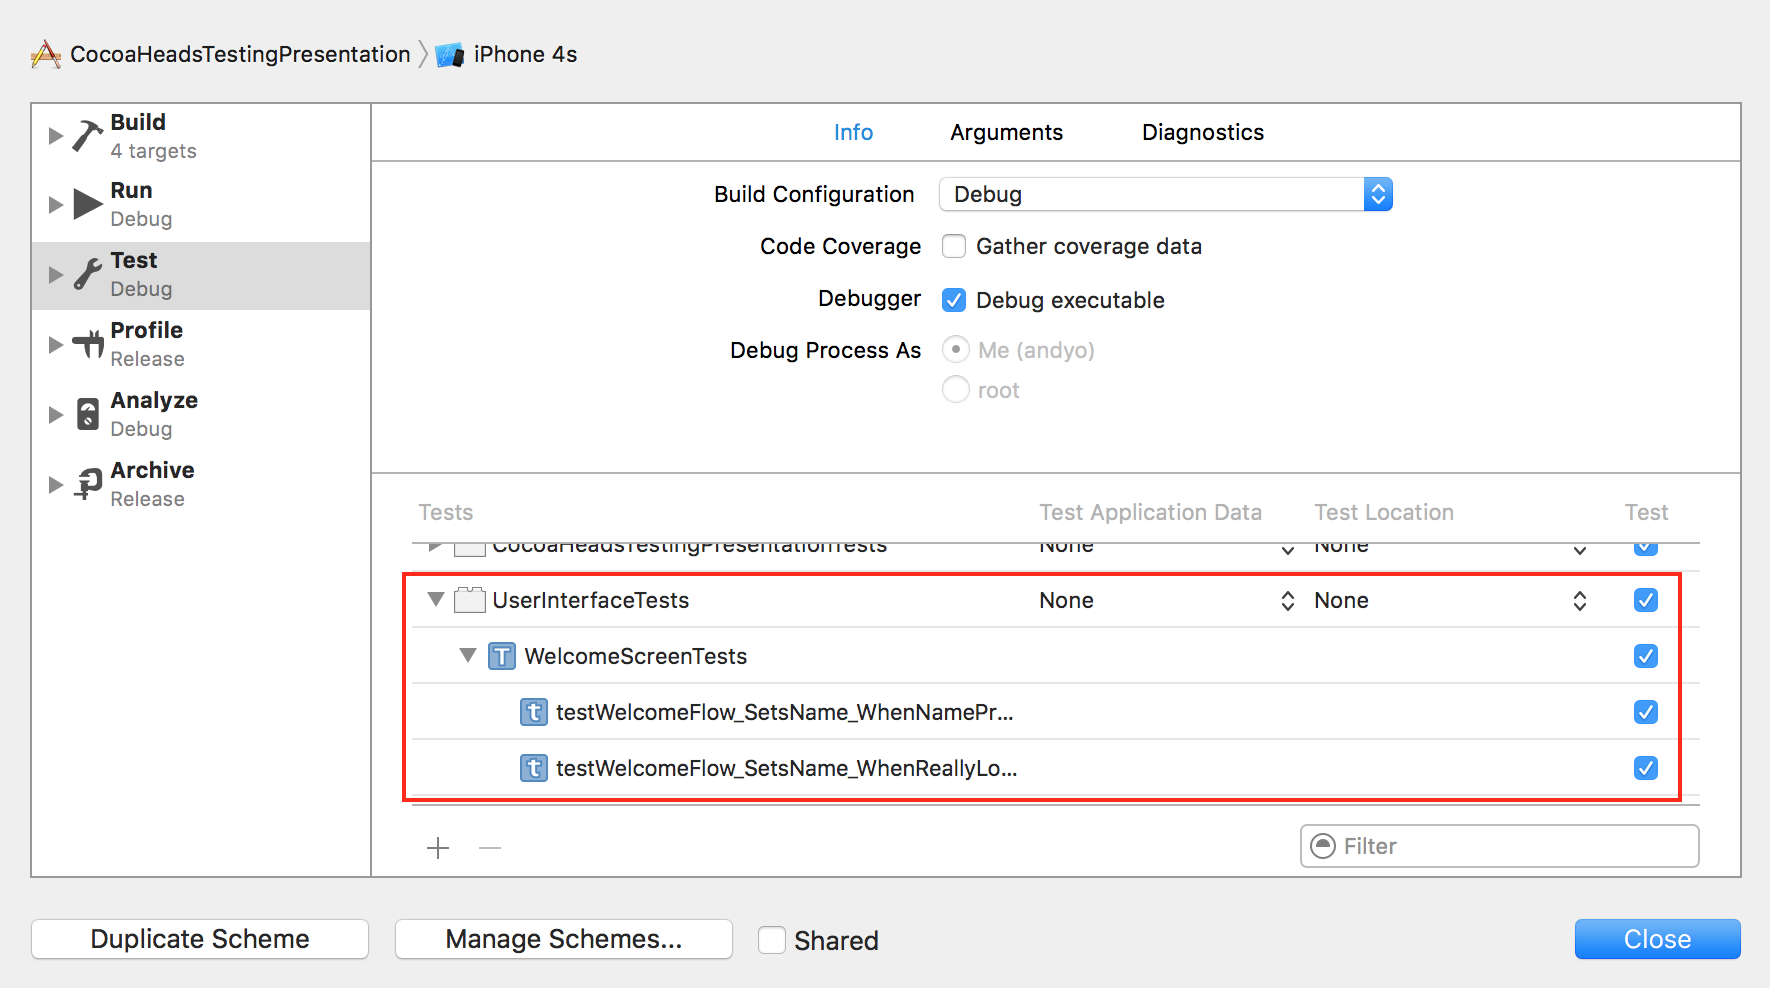
Disabling an entire target may not be as granular as you’d like. In fact, it’s pretty coarse. You can expand any of the targets in that list and see specific test classes, and then selectively enable or disable tests by test class. And if that isn’t granular enough, you can drill one level deeper and then selectively turn tests on or off by test method!

disable tests in Xcode

Give it a try.

xcodebuild in Xcode 8

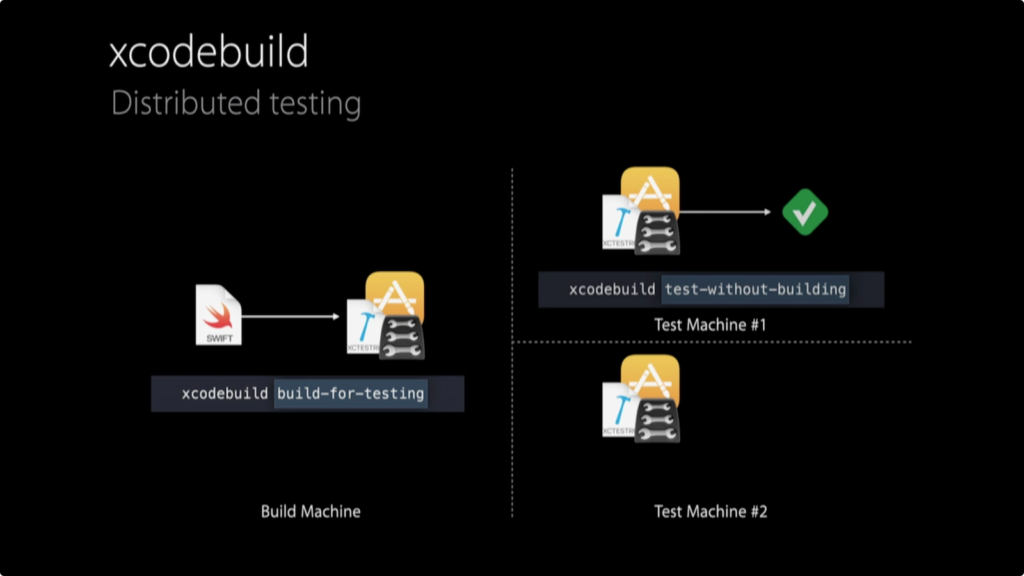
One thing I’m really excited for in Xcode 8 is that xcodebuild, the command line interface for building Xcode projects, was updated with similar functionality. With xcodebuild in Xcode 8 you can selectively pick which tests are built and executed. The use case is a little different for this tool. xcodebuild is often used as part of a continuous integration setup. With the new changes, you no longer need to compile tests to run them. xcodebuild will be able to run tests previously compiled. This means that you can compile your app and tests on one machine, and then distribute the load of testing it across other machines!

disable tests in Xcode

To build you app for testing, but not actually run the tests:

xcodebuild build-for-testing -workspace <path>
                             -scheme <name>
                             -destination <specifier>

Then you can use the produced bundle on different machines to run the tests without compiling! Combine that with the following steps for selectively running tests, and you’ll be able to distribute the execution of your test suite across different machines, in parallel!

To selectively specify which tests to run for xcodebuild:

xcodebuild test -workspace <path>
                -scheme <name>
                -destination <specifier>
                -only-testing:TestBundleA/TestSuiteA/TestCaseA
                -only-testing:TestBundleB/TestSuiteB
                -only-testing:TestBundleC

You can also specify tests to be skipped:

xcodebuild test -workspace <path>
                -scheme <name>
                -destination <specifier>
                -skip-testing:TestBundleA/TestSuiteA/TestCaseA

Don’t Abuse It

With great power comes great responsibility. Please don’t disable tests in Xcode, either from running or compiling, and leave it that way. That’s like driving without a seatbelt. Only do it if you are working in effort to improve your project. I know that working with a dusty and stale project isn’t the only time that it may be useful to disable tests in Xcode. I’m sure you’ll find your own reasons. I’d love to hear what they are.

Happy cleaning.

Three New Xcode 8 Testing Features

I’m in the middle of watching the Platforms State of the Union from WWDC 2016, and there were three new Xcode 8 testing features announced for Xcode 8 that are so exciting for me. They are all related to automated testing. Did you catch them? They were:

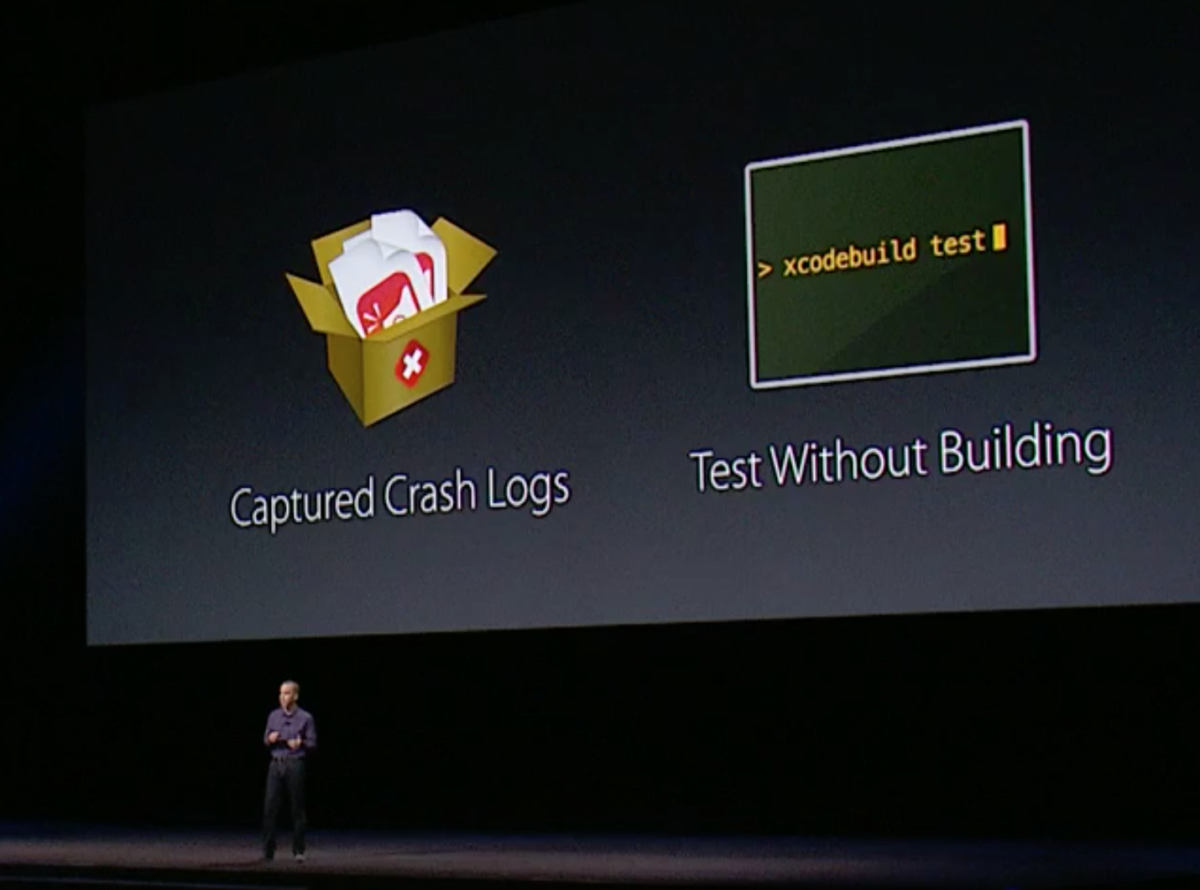
  1. Test crash logs are captured.
  2. xcodebuild can now run with pre-built tests.
  3. Indexing tests is now 50x faster.

Capturing Crash Logs

Have you ever ran a test, unit or UI, that triggered an app crash? It just happened to me today. I bug when animating a UIPresentationController surfaced on iOS8. Unfortunately, Xcode 7 doesn’t capture crash logs when a test triggers a crash. Instead, you have to go back, re-run the test several times, set some breakpoints, and hone in on the code that caused the crash. Luckily, this is changing in Xcode 8 as crash logs will automatically be captured when a test crashes. This means you’ll instantly know the offending line of code that caused the crash, and will be able to fix it that much faster, and move on to building other pieces of your app.

Running with Pre-Built Tests

There’s no way in Xcode 7 to provide a pre-built bundle of compiled tests to be executed against a new instance of your app. This is changing in Xcode 8 with the new xcodebuild. You’ll be able to specify a pre-compiled bundle of tests to be run against a freshly-compiled instance of your app. This has the potential to vastly reduce your compile times. By default (at least in Xcode 7), all of your tests will go into the same target. Each time you need to run your tests, your entire app and all the tests will be recompiled. This isn’t always efficient, especially if there are pieces of your app that haven’t changed. With this new feature of Xcode 8, you’ll be able segregate these tests on their own, so that they can still be run, but they don’t have to be compiled. Awesome.

Faster Test Indexing

Xcode 8 testing features

In Xcode 7, it’s really frustrating when I open a project in Xcode, and I have to wait several minutes for Xcode to finish “Indexing” my tests before I can run them. Have you experienced this? Seeing that I’m only working with a couple projects at a time, and the number of my tests creeps up slowly as I work on the projects, there really isn’t a huge cliff where performance all of a sudden drops off. Instead, one day, it will catch my eye that I noticed the indexing took longer than usual, or got in my way from actually performing a build. Then I wait. And eventually I can resume what I intended to do.

I was happy to hear that in Xcode 8, Apple has vastly improved the performance of this indexing process. In the Platforms State of the Union, it was stated that there is a 50x speed increase when tests are indexed. I can’t wait to experience this in my real projects during my day to day development.

It’s been great to watch how Apple’s support of automated testing has evolved over the years, and these three new Xcode 8 testing features continue that trend. You can measure tangible jumps in automated testing support with each WWDC since the iPhone’s original introduction. I can’t wait to see what else the rest of the week holds with regards to further enhancements to testing in Xcode 8.

Happy cleaning.

Amazon Device Farm XCTest Tutorial

Amazon Device Farm has been on my radar for some time now. It offers the ability to remotely test your iOS apps on physical devices that are located somewhere else. Remember my post about cattle vs pets, and how your continuous integration box should not be a pet? I wanted to test out how well Amazon Device Farm XCTest actually worked, and report back here on my experience so you know how to do it as well.

Extensive List of Supported Devices

Not only does moving your automated testing to the cloud move you away from owning a “pet” build box, but it is also a cost effective way of testing your application across a large number of devices and OS versions. You won’t need to go buying old iOS devices on eBay. Amazon Device Farm supports all the way back to iOS 7. Ever accidentally upgrade your old iOS8 test device, only to realize that you can’t downgrade? With cloud based testing, you no longer need to worry about that. Amazon Device Farm supports many devices and OS versions, across iOS AND Android. You can take a look at the actual list of supported devices here.

The Goal

The goal is to evaluate and document getting a project executing Amazon Device Farm XCTest runs. I’m going to reuse my sample project from my CocoaHeads presentation, you can find it here. The project actually has three test targets setup: unit tests with XCTest, KIF tests, and FBSnapshotTestCase tests. My primary goal here get Amazon Device Farm XCTest running for unit tests. Getting the other two test targets running would be icing on the cake.

Running Amazon Device Farm XCTest Cases

TLDR

If you’ve gone through Amazon’s documentation, and are still stuck, there are two key things that I discovered that made this work for me:

  1. Properly create the .ipa file – I achieved this by Archive -> Save for Adhoc Deployment, etc.
  2. Properly create and find the .xctest folder – I had a hard time finding the .xctest folder to zip up. It’s buried in your Derived Data folder. I used the command line find command to locate it. Also, Amazon Device Farm requires you to include any class under test in the test bundle as well.

More details on those two steps later, so read on!

Overview of Amazon Device Farm

Amazon Device Farm breaks down your work into Projects and Runs. Amazon describes a Project as:

A project in Device Farm represents a logical workspace in Device Farm that contains runs, one run for each test of a single app against one or more devices. Projects enable you to organize workspaces in whatever way you choose. For example, there can be one project per app title, or there can be one project per platform. You can create as many projects as you need.

You basically have the freedom to use Projects as wide or as narrow as you want. I’m imagine a Project to be analogous to a Jenkins job. Just like a Jenkins job, a Project will consist of any number of Runs, which are basically just an execution of a given test script.

Access Your Account

To use Amazon Device Farm, you’ll need a Amazon Web Services account. Follow the instructions here for creating an account and setting it up. It’s a little more involved than just registering. You can actually create additional users within your AWS account to help segregate identities and access management, and it’s recommended that you do this to be used with Amazon Device Farm.

Once you have your account setup, sign in to the Amazon Device Farm at https://console.aws.amazon.com/devicefarm.

Create Your Project

Now that you’re logged in, you’ll need to create your first Project.
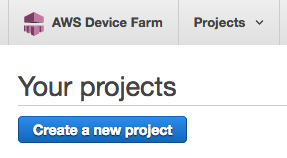
amazon device farm xctest

For this simple trial, I reused my Xcode project name for my Amazon Device Farm project name, “CocoaHeadsTestingPresentation”.
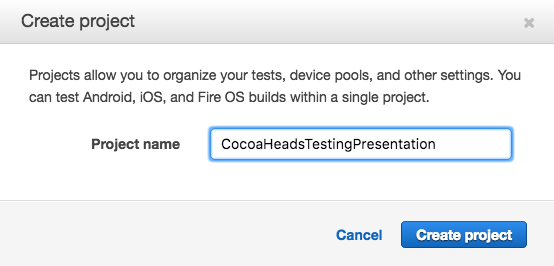
amazon device farm xctest

After you’ve created your project, you’ll see it in the list of projects:
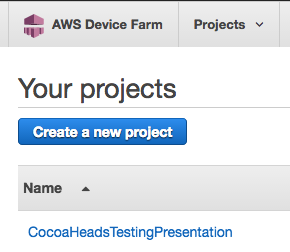
amazon device farm xctest

Create Your Run

Select your project from the project list, and you’ll see a page that will eventually show your test runs. Since you have no test runs at this point, the page is empty. Now, you’ll create your first Run. Select Create a new run.
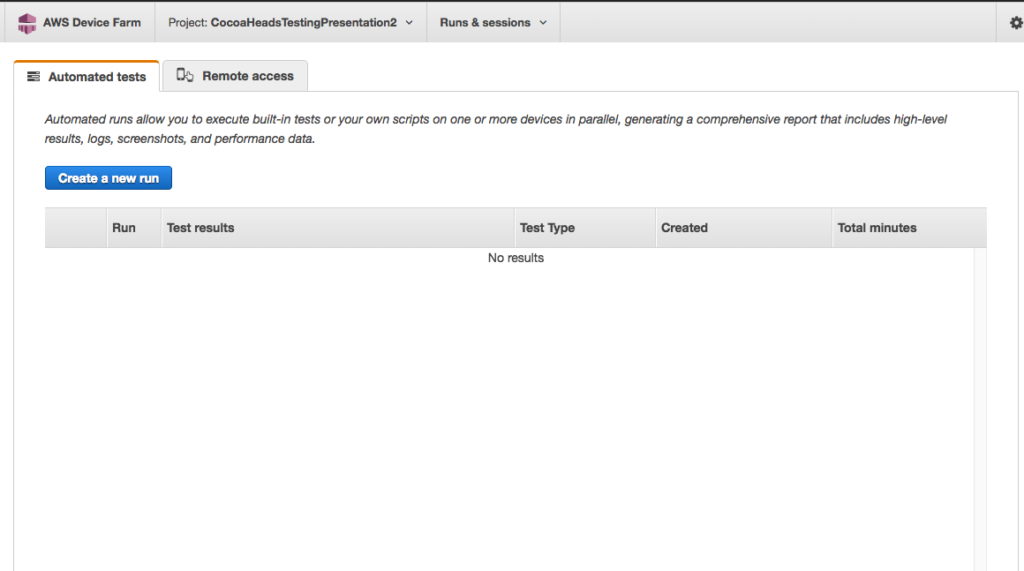
amazon device farm xctest

On Step 1, select the button that shows the Android and Apple icons to indicate that you are going to create a run for a native app.

Prepare And Upload Your Build

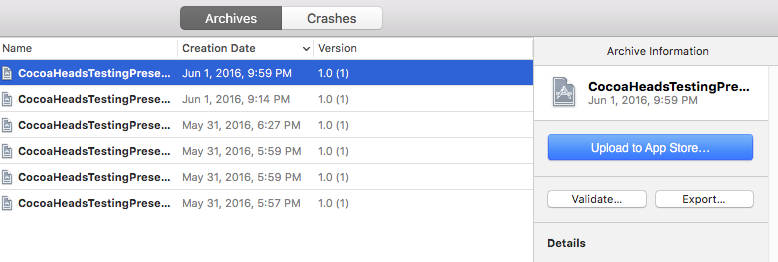
Now you need to prepare your application for execution within the Amazon Device Farm XCTest Run. This was a little tricky, and under documented in Amazon’s documentation, so I think this part will really help you. Jump over to Xcode, and Archive a build. Archiving a build will inherently enforce you to make sure you are building for device, as this is also a requirement of running Amazon Device Farm XCTest cases, since they actually run on devices. Once your build has finished archiving, select the build and **Export…* it from Xcode:
amazon device farm xctest

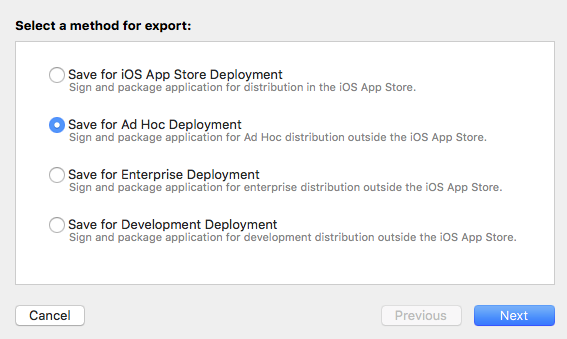
Select Save for Ad Hoc Deployment:

amazon device farm xctest

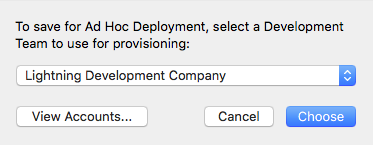
Ensure that the same identify as your build settings is used for code signing:
amazon device farm xctest

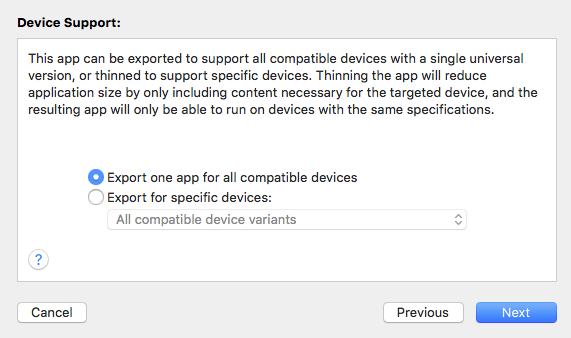
And then ensure that you Export one app for all compatible devices:
amazon device farm xctest

After selecting Next, follow through another couple prompts selecting the default options, and specify a location for your .ipa file and Xcode will code sign your application and create an .ipa file that will be uploaded to Amazon Device Farm. Go back into your browser that was left off on Step 1 of Create a new run in your first Amazon Device Farm project. Click Upload and navigate to your new .ipa file, and upload it.

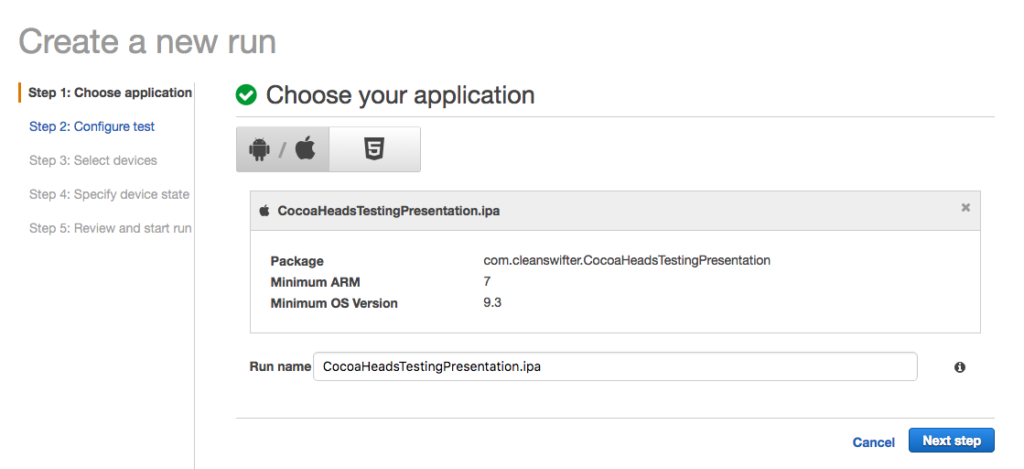
You’ll know it was successful when Amazon Device Farm shows you information about the .ipa file:
amazon device farm xctest

Click Next step.

Specify and upload your XCTests

On Step 2, select XCTest as the test type, and then you’ll need to upload your XCTests. This was the hardest part of the process to get right, and also the most under-documented in Amazon’s documentation. Here’s a couple things to tweak and double check in Xcode to make sure you are setup:

  • Unit tests will compile with each build – This should be the default setting, but it’s worth double checking. Open the Build action settings for the scheme in the Scheme Editor. Verify that in the Run column, your test targets are checked. This means that when you type Command-B or even run your app, your tests will be compiled too. amazon device farm xctest
  • SUT Classes are included with the test target – In order for your classes under test (aka SUT) to be available within the test bundle, you need to ensure they are included with test target membership. In my project, WelcomeViewController.swift was a class under test, so I needed to actually add it to the test target membership since this isn’t technically required in a Swift world with the @testable annotation for importing modules. amazon device farm xctest
  • Build tests for devices – Your XCTest bundle must be built for device, not simulator. Select a device, rather than a simulator. amazon device farm xctest

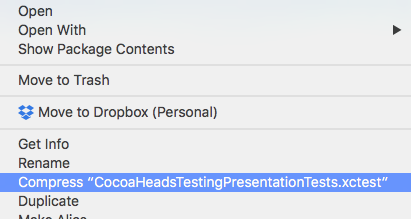
Now that you are all setup, build your tests with Command-B. Now, you need to find the .xctest folder, compress it, and then upload it. I used a find command from Terminal to find it:

CocoaHeadsTestingPresentation|⇒ find . -type d -name '*.xctest'
./Carthage/Checkouts/ios-snapshot-test-case/DerivedData/FBSnapshotTestCase/Build/Products/Release-iphoneos/FBSnapshotTestCase iOS Tests.xctest
./Carthage/Checkouts/ios-snapshot-test-case/DerivedData/FBSnapshotTestCase/Build/Products/Release-iphonesimulator/FBSnapshotTestCase iOS Tests.xctest
./DerivedData/CocoaHeadsTestingPresentation/Build/Products/Debug-iphoneos/CocoaHeadsTestingPresentation.app/PlugIns/CocoaHeadsTestingPresentationTests.xctest
./DerivedData/CocoaHeadsTestingPresentation/Build/Products/Debug-iphoneos/CocoaHeadsTestingPresentation.app/PlugIns/SnapshotTests.xctest
./DerivedData/CocoaHeadsTestingPresentation/Build/Products/Debug-iphoneos/CocoaHeadsTestingPresentation.app/PlugIns/UserInterfaceTests.xctest
./DerivedData/CocoaHeadsTestingPresentation/Build/Products/Debug-iphonesimulator/CocoaHeadsTestingPresentation.app/PlugIns/CocoaHeadsTestingPresentationTests.xctest
./DerivedData/CocoaHeadsTestingPresentation/Build/Products/Debug-iphonesimulator/CocoaHeadsTestingPresentation.app/PlugIns/SnapshotTests.xctest
./DerivedData/CocoaHeadsTestingPresentation/Build/Products/Debug-iphonesimulator/CocoaHeadsTestingPresentation.app/PlugIns/UnitTestBundle2.xctest
./DerivedData/CocoaHeadsTestingPresentation/Build/Products/Debug-iphonesimulator/CocoaHeadsTestingPresentation.app/PlugIns/UserInterfaceTests.xctest
CocoaHeadsTestingPresentation|⇒ 

Remember, you want the bundle built for device, not simulator. That means you’ll use the one in the directory Debug-iphoneos, not Debug-iphonesimulator. The directory you need to compress to a zip file is:

./DerivedData/CocoaHeadsTestingPresentation/Build/Products/Debug-iphoneos/CocoaHeadsTestingPresentation.app/PlugIns/CocoaHeadsTestingPresentationTests.xctest

Compress it as a standard zip file (you can use Finder for this), and Upload it back in the Amazon Device Farm browser.
amazon device farm xctest

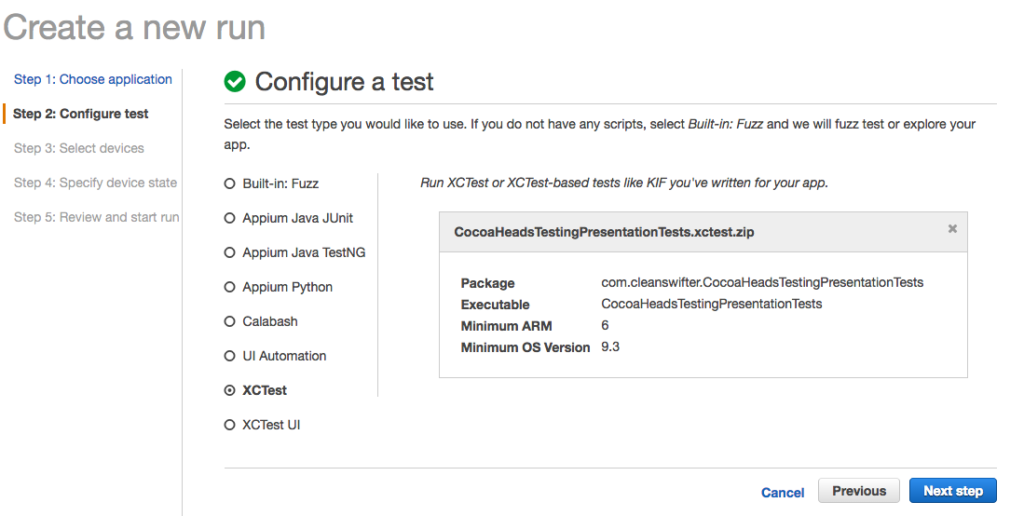
You’ll know the upload was successful when you see details about the XCTest zip file:
amazon device farm xctest

Click Next step to select your devices for the run.

Select Devices

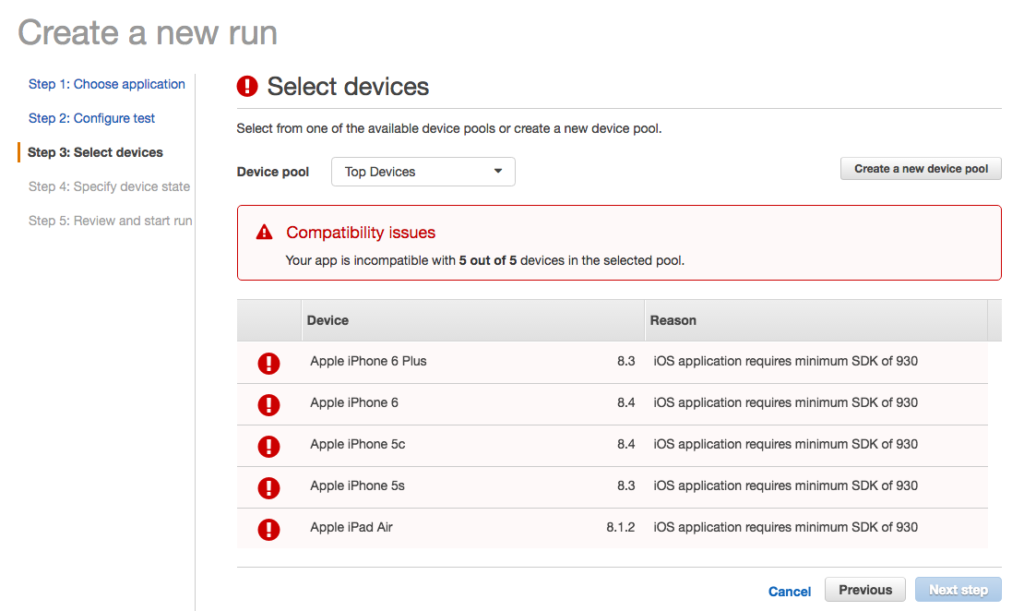
One thing that annoyed me with setting up my first Run for an Amazon Device Farm XCTest was that when I finally got to the screen to select which devices to execute my Run on, the default list contained five devices, none of which were supported by my app. I would have rather’d some smarts on Amazon’s part to look at the lowest iOS version supported by my app, and then only show me “Top Devices” for that minimum iOS version.

Since the suggested list didn’t work for me, the first thing to do was Create a new device pool, which is what you should click to do that:
amazon device farm xctest

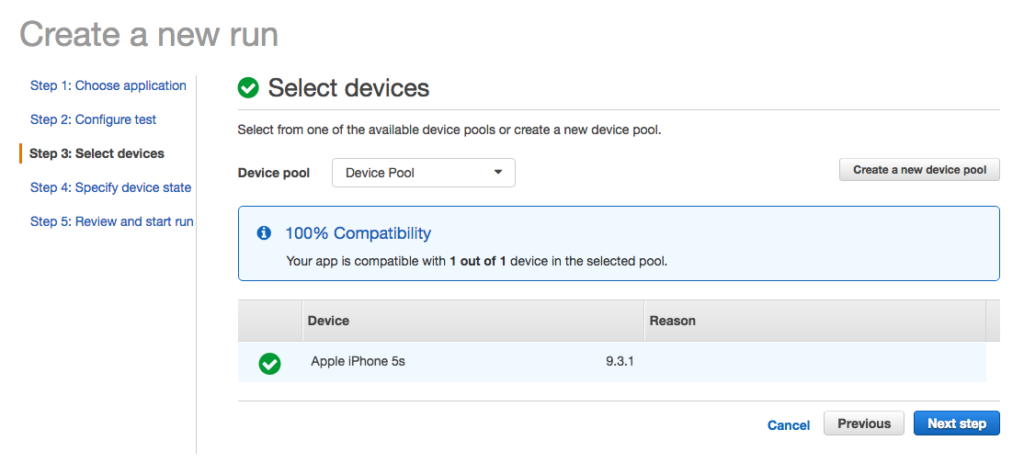
On the resulting screen, it’s obvious enough to select devices for a new “pool” – just make sure you select devices compatible with your app’s minimum version, because you won’t be prevented from doing that.

Once you create a pool of compatible devices, you’ll see a message about “100% Compatibility”
amazon device farm xctest

Select Next step to specify initial device state.

Specify Device State

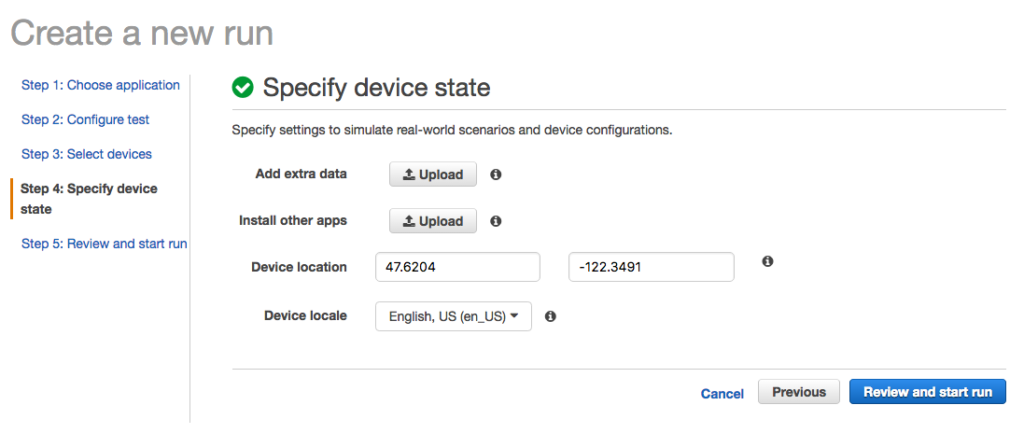
In Step 4, you can specify other initial aspects of the device’s initial state, like other apps to load, a geographic location, or which locale to use:
amazon device farm xctest

I didn’t change any of these values from the default for my app.

Next, click Review and start run. The next page reviews your Run’s settings, and allows you to start it. Click “Confirm and start run” to start it.

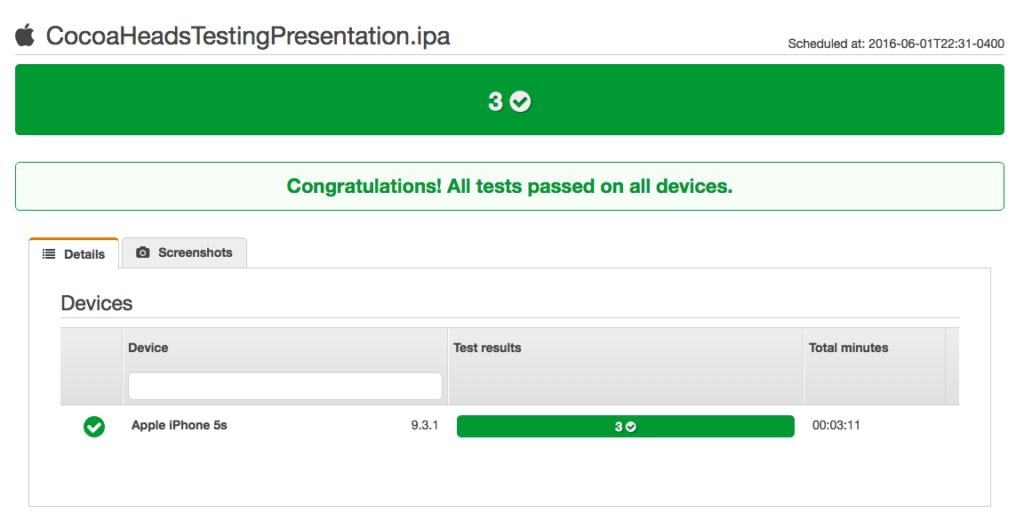
Boom, that’s it! At this point, you’re basically done. If all is configured correctly, your Amazon Device Farm XCTest will be running. Congrats!
amazon device farm xctest

Observations of Amazon Device Farm XCTest

Here’s a couple observations from going through this setup for Amazon Device Farm XCTest.

Setup Is Too Manual

Next, I really need to investigate automating this. There’s no way I would frequently go through this in order to run my tests. It’s so much faster to run it from Xcode locally. There’s just too much clicking through prompts. Ideally, I want to connect this with my continuous integration server, so that’s the next thing I’ll look into.

Tests Are Slow

Just the simple act of running tests is really slow. For my sample project, that is totally bare bones, with ONE XCTest unit test, it took just over three minutes to run in Amazon Device Farm. That’s compared to like one second locally in Xcode. I’d like to try this with a larger code base and observe how long it takes. I hope the duration doesn’t lengthen with the size of the project or number of tests, but it probably will. At this point, I don’t think I’d put such long running tests in the middle of my code review workflow, but rather integrate these as nightly builds across a large number of devices.

Documentation Lacked Key Steps

The hardest part of getting this setup was getting the precise build settings right, both for the app binary ipa itself, and the .xctest bundle as well. Amazon totally glossed over this in their documentation, which really prompted me to write this article. The good news is that in Googling around, I noticed Amazon support employees actually answering questions on Stack Overflow, and also participating in Amazon’s own dedicated form for supporting Amazon Device Farm.

Wrap Up

I noticed that there is a command line reference for Amazon Device Farm. In order to integrate Amazon Device Farm XCTest with my continuous integration procedures, I know I need to test this with more complicated projects, and also automate it. I’ll do that in a future post.

Happy cleaning.

Asynchronous iOS Unit Test Tutorial

By default, iOS unit tests in Xcode execute just like any other method, from top to bottom, in serial order. This is fine most of the time. Occasionally though, you’ll find the need to write a unit test for asynchronous code. And with the prevalence of closures in Swift, writing an asynchronous iOS unit test will become even more common place.

The Method To Test

Consider this method under test:

class Parser {

  func parse(toParse: String, success: () -> Void, failure: () -> Void) {
    // code omitted
  }

}

It requires some imagination, but envision that this is some kind of complicated parsing routine that takes a long amount of time to complete. Depending on the outcome of parsing the input, either a closure success() or ‘failure()` (that are provided to the method) are guaranteed to be called at some asynchronous, non-deterministic point in the future.

Why This Is Hard To Test

At the core of this method, an input string will be parsed, probably on a different thread. In some cases that will pass, and in some cases that will fail. We need to figure out how to write tests to verify that.

Initially, one might think to try a test like this:

func testParse_Succeeds() {
  let toTest = Parser()
  toTest.parse("Something that will parse", success: {
    // do nothing, test will pass
  }) { 
    // if failure parsing, fail test
    XCTFail()
  }
}

The problem with this approach, is that assuming the long running code in parse(_:success:failure) is executed on another thread, `testParse_Succeeds()’ will likely complete before the parsing actually completes, thus never giving the test the chance to perform the actual verification. This will result in false positives, with no way to actually see the test fail.

asynchronous iOS unit test

The Solution – Expectations

There’s a really cool API provided in an XCTestCase extension that makes testing asynchronous code possible.

public func expectationWithDescription(description: String) -> XCTestExpectation

and

public func waitForExpectationsWithTimeout(timeout: NSTimeInterval, handler: XCWaitCompletionHandler?)

Here’s how you can use this with the previous example to verify the asynchronous code:

func testParse_Succeeds() {
  // 1
  let expectation = expectationWithDescription("Parsing Succeeds")
  let toTest = Parser()
  toTest.parse("Something that will parse", success: {
      // 2
      expectation.fulfill()
    }) { 
      // 3
      XCTFail()
  }

  // 4
  waitForExpectationsWithTimeout(1.0) { (_) -> Void in
  }
}

Looking at this line by line:

  1. Create an expectation for parsing to succeed
  2. When parsing succeeds, mark the expectation as fulfilled (and optionally perform any other verification)
  3. Explicitly fail the test if parsing does not succeed
  4. Tell XCTest to wait 1.0 second for the expectation to be fulfilled, or otherwise fail the test. (Good thing the timeout is configurable).

That’s it, now you can write an asynchronous iOS unit test!

Getting Cleaner

Now you know how to write an asynchronous iOS unit test. Take a minute to try out these sweet extensions on XCTestCase. I think you’ll find a lot of creative uses for them. Keep in mind, it doesn’t necessarily need to be long running code that needs this solution, but rather any code that is going to execute in an asynchronous fashion. Do you unit test your web service API calls?

Happy cleaning.

Other References:

Your First iOS Unit Test

I recently had the question posed to me, “how do I get started with unit testing on iOS?” I have a suggestion for your first iOS unit test, look for a piece of code that performs an operation on a String. Write your first iOS unit test for that method. Strings and their related manipulations are easy to unit test. They don’t have deep integration with other frameworks like UIKit or CoreData, and the behavior is usually easily understandable just by reading the code, thus making it easy to reverse engineer what “should” happen, in order to translate it into a unit test. Let’s work through an example.

A “Unit” Defined

The first thing to understand about “unit testing” is what a “unit” even is.

Your First iOS Unit Test

No, not a storage “unit.”

It’s a vague term for sure. I’d describe it as, “the smallest piece of code that actually does something useful.” It’s kind of like art, you know it when you see it. I’ve written dedicated unit tests for single lines of code before. I’ve written unit tests for entire methods before. Bigger than that, and you start to take on too much scope for the test. You want the test to be straightforward. You want the test to be easily troubleshootable when it fails. And you want to minimize the reasons it could fail, to only a few reasons. This keeps your tests well factored, and easily maintainable.

My suggestion for your first test is to look for a standalone method, aka a “unit” that performs an operation on a string. Here’s an example for your first iOS unit test:

The Code To Test

I wanted to come up with a straight forward example to help you visualize a piece of code that is easily verified with a unit test. Consider the following struct that represents a person with a name:

struct Person {

  let firstName:String
  let lastName:String
  let suffix:String?

  init(firstName: String, lastName: String) {
    self.firstName = firstName
    self.lastName = lastName
    self.suffix = nil
  }

  init(firstName: String, lastName: String, suffix: String) {
    self.firstName = firstName
    self.lastName = lastName
    self.suffix = suffix
  }

  func formattedName() -> String {
    if let suffix = suffix {
      return "\(firstName) \(lastName), \(suffix)"
    } else {
      return "\(firstName) \(lastName)"
    }
  }
}

The struct sets up a Person as a thing that is represented by three Strings, a firstName, a lastName, and an optional suffix.

formattedName jumps out as a prime candidate for a unit test. A standalone method that does some isolated logic based on some inputs, and returns a a new value based on those inputs.

Add An XCTestCase Your Project

Now that you know what you want to test, in order to test it, you need to leverage the XCTest framework to test it. Xcode makes this easy.

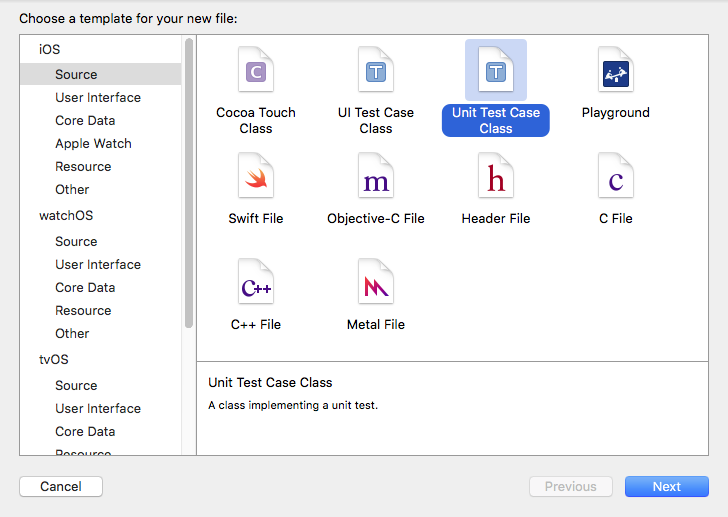
From your project, select File -> New -> File… and pick Unit Test Case Class.

Your First iOS Unit Test

Give it an appropriate name, usually ending in the convention of: Tests, so in my case, PersonTests.

That’s it, a new file will be created containing a class that is a subclass of XCTestCase. Add your tests here. Anything function whose name begins with “test” will be executed when you run unit tests.

Writing The Unit Tests

Reviewing formattedName() in Person there are two flows through the code, when the Person has a suffix and when they don’t. Two flows through the “unit” means two tests – keep your tests small. Test one thing at a time.

Consider this test to verify that a Person‘s formattedName() is correct when they don’t have a suffix:

func testFormattedName_ProperlyFormats_WhenNoSuffix() {
  let theCleanSwifter = Person(firstName: "Andy", lastName: "Obusek")
  let expectedFormattedName = "Andy Obusek"
  XCTAssertEqual(expectedFormattedName, theCleanSwifter.formattedName())
}

First, a Person is setup without a suffix, then the expected output is defined, and finally XCTest is used to verify that the output matches the expectation.

Here’s a test for the opposite condition, when a Person does have a suffix:

func testFormattedName_ProperlyFormats_WhenSuffixPresent() {
  let theCleanSwifter = Person(firstName: "Andy", lastName: "Obusek", suffix: "Jr.")
  let expectedFormattedName = "Andy Obusek, Jr."
  XCTAssertEqual(expectedFormattedName, theCleanSwifter.formattedName())
}

This test is very similar to the prior test. The only differences are that a suffix is provided for the Person and the expectedFormattedName is different.

Running The Tests

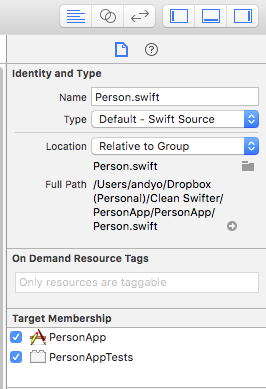
IMPORTANT: For your tests to compile, any files that you reference in the main target (eg. the code under test) need to be included in the test target. You specify this in the File Inspector:

Your First iOS Unit Test

To run the tests, use the keyboard shortcut Command-U (or if you want to be slow, select the menu item Product -> Test. The iOS Simulator will launch, the tests will run, and you’ll see the results in the Console. They look like this:

22:11:52.771 PersonApp[12486:9452629] _XCT_testBundleReadyWithProtocolVersion:minimumVersion: reply received
22:11:52.777 PersonApp[12486:9452629] _IDE_startExecutingTestPlanWithProtocolVersion:16
Test Suite 'Selected tests' started at 2016-04-19 22:11:52.785
Test Suite 'PersonTests' started at 2016-04-19 22:11:52.787
Test Case '-[PersonAppTests.PersonTests testFormattedName_ProperlyFormats_WhenNoSuffix]' started.
Test Case '-[PersonAppTests.PersonTests testFormattedName_ProperlyFormats_WhenNoSuffix]' passed (0.021 seconds).
Test Case '-[PersonAppTests.PersonTests testFormattedName_ProperlyFormats_WhenSuffixPresent]' started.
Test Case '-[PersonAppTests.PersonTests testFormattedName_ProperlyFormats_WhenSuffixPresent]' passed (0.000 seconds).


Test session log:
    /Users/andyo/Dropbox (Personal)/Clean Swifter/PersonApp/DerivedData/PersonApp/Logs/Test/78B021DC-E467-4F0E-8D95-EE44156AB2DE/Session-2016-04-19_22:11:43-ZVrKpY.log

Test Suite 'PersonTests' passed at 2016-04-19 22:11:52.810.
     Executed 2 tests, with 0 failures (0 unexpected) in 0.021 (0.023) seconds
Test Suite 'Selected tests' passed at 2016-04-19 22:11:52.811.
     Executed 2 tests, with 0 failures (0 unexpected) in 0.021 (0.025) seconds

Congratulations, You Did It!

BOOM! That’s it, you just wrote your first iOS unit test! Well, two of them. How does it feel? Trivial? Powerful? I can relate to both of those feelings. Starting out, you might be thinking, “That’s so simple, how does it even provide value?” Well, ya, if you write the test and never execute it again, chances are you’ll never get any value out of it. The power of tests comes with repeated execution of those tests. Anytime you make a change to your project, run the tests! (and add new tests too!) I guarantee you that at some point, your tests will eventually catch a bug that you didn’t otherwise notice. Then you’ll be sold on automated testing. You’ll never get there if you don’t start somewhere.

Thanks for reading, happy cleaning.

PS – Continuous integration tools like Xcode Server or Jenkins further magnify the power of your first iOS unit test by enabling automatic execution of builds and tests in response to events like source code repository commits. I’ll tackle this topic in a future post.