iOS 10 UNUserNotificationCenterDelegate Overview

I just finished watching “Introduction to Notifications” from WWDC 2016 and there are some really cool new features for iOS 10 local notifications. Notifications are core to the mobile experience, regardless of what platform you’re using – Android, iOS, or something else. Apple really raised the bar with their iOS 10 local notifications through creation of a new framework, the User Notifications framework. The brand new iOS 10 UNUserNotificationCenterDelegate in the User Notifications Framework is one thing that jumped out at me.

Why Create A New Framework?

Push notifications have been available in iOS for years. Just like any framework, over time, as use cases and technology evolves, frameworks need to be reconsidered and improved. It is that time for push notifications on iOS. New in iOS 10, Apple created the User Notifications Framework. When implementing notifications, you have the choice to implement a local or remote notification. A local notification does not require a server to alert the user, where a remote notification does require a remote server to send information to the user. In past iOS versions, depending on the type of notification you are handling, there are two different methods in UIApplicationDelegate to implement to handle either notification type – remote or local. As such, this can lead to a lot of duplicate code since it’s likely that there is common handling of notifications regardless of whether they are local or remote.

One Notification Handler To Rule Them All

The User Notification Framework in iOS 10 fixes this as there is now a single method for handling both types of notifications. The new iOS 10 UNUserNotificationCenterDelegate now has a single set of methods for handling both remote and local notifications.

Deprecated

The old methods on UIApplicationDelegate are deprecated, including:

  • application(_:didReceive:) – Sent to the delegate when a running app receives a local notification.
  • application(_:didReceiveRemoteNotification:) – Called when your app has received a remote notification
  • application(_:handleActionWithIdentifier:forRemoteNotification:completionHandler:) – Tells the app delegate to perform the custom action specified by a remote notification.
  • application(_:handleActionWithIdentifier:for:withResponseInfo:completionHandler:) – Called when your app has been activated by the user selecting an action from a local notification.
  • application(_:handleActionWithIdentifier:forRemoteNotification:withResponseInfo:completionHandler:) – Called when your app has been activated by the user selecting an action from a remote notification.

New

Instead, these are all consolidated into a TWO METHODS in the new iOS 10 UNUserNotificationCenterDelegate protocol:

  • userNotificationCenter(_:didReceive:withCompletionHandler:) – Called to let your app know which action was selected by the user for a given notification.
  • userNotificationCenter(_:willPresent:withCompletionHandler:) – Delivers a notification to an app running in the foreground.

That’s right, two methods. And what’s better, is that now that they are moved into their own protocol, the iOS 10 UNUserNotificationCenterDelegate so this will help clean up your existing UIApplicationDelegate by being able to refactor all that old notification handling code into a shiny, new, cohesive protocol of it’s own.

Here’s an example:

extension NotificationManager: UNUserNotificationCenterDelegate {

    func userNotificationCenter(_ center: UNUserNotificationCenter, didReceive response: UNNotificationResponse, withCompletionHandler completionHandler: () -> Void) {

        switch response.actionIdentifier {

        // NotificationActions is a custom String enum I've defined
        case NotificationActions.HighFive.rawValue:
            print("High Five Delivered!")
        default: break
        }
    }

    func userNotificationCenter(_ center: UNUserNotificationCenter, willPresent notification: UNNotification, withCompletionHandler completionHandler: (UNNotificationPresentationOptions) -> Void) {

        // Delivers a notification to an app running in the foreground.
    }
}

That’s literally it for handling notifications.

Bonus: Creating Local Notifications

Similar, creating local notifications has also been simplified. In order to verify the behavior of the new iOS 10 UNUserNotificationCenterDelegate protocol, I wrote some sample iOS 10 User Notifications Framework code to generate a local notification:

// 1
let highFiveAction = UNNotificationAction(identifier: NotificationActions.HighFive.rawValue, title: "High Five", options: [])
let category = UNNotificationCategory(identifier: "wassup", actions: [highFiveAction], minimalActions: [highFiveAction], intentIdentifiers: [], options: [.customDismissAction])
UNUserNotificationCenter.current().setNotificationCategories([category])

// 2
let highFiveContent = UNMutableNotificationContent()
highFiveContent.title = "Wassup?"
highFiveContent.body = "Can I get a high five?"

// 3
let trigger = UNTimeIntervalNotificationTrigger(timeInterval: 5, repeats: false)

// 4
let highFiveRequestIdentifier = "sampleRequest"
let highFiveRequest = UNNotificationRequest(identifier: highFiveRequestIdentifier, content: highFiveContent, trigger: trigger)
UNUserNotificationCenter.current().add(highFiveRequest) { (error) in
  // handle the error if needed
  print(error)
}

Here’s an overview of that code block:

  1. Create the custom “High Five” action for responding to the local notification, and set it as a category for the notification in addition to a system provided category for simply “dismissing” the notification.
  2. Create the content for the local notification.
  3. Create the trigger for the notification, for it to pop 5 seconds in the future.
  4. Add the notification to the notification system.

This code highlights two new features of local notifications in iOS 10, custom actions and time based triggers.

Custom actions now let you specify any number of actions for which the end user may respond to the notification.

iOS 10 UNUserNotificationCenterDelegate

Time based triggers allow you to delay the local notification by a time interval, designate it as repeating or not, and even schedule it based on an actual date.

I didn’t hear it confirmed in the WWDC presentation, but I’m pretty sure that the custom notification actions require 3D Touch. I could not figure out how to interact with them on my iPhone 5s device that is running iOS 10.

I’ve even bundled all this code up into an Xcode project for you on GitHub, here.

Notify Me

Notifications, remote and local, enable some of my favorite features on iOS so as an end user, I’m happy to see all these enhancements. As a developer, I can’t wait to try them out in my own app. This only scratches the surface of the new stuff Apple added. Do you use notifications in your app? What are you looking forward to most about the new iOS 10 User Notifications Framework? What about the iOS 10 UNUserNotificationCenterDelegate?

Happy cleaning.

UIPasteboard iOS 10 Example

I just finished watching What’s New in Cocoa Touch today from WWDC 2016, it was an awesome session. My coworker called it “the index for the rest of WWDC.” Olivier Gutknect basically goes on rapid fire for an hour citing change after change in UIKit for iOS 10. For each thing he mentions, he covers varied levels of detail, and usually references a different WWDC session where the framework or topic will be covered in more detail. The UIPasteboard iOS 10 API made an appearance in this session, just like the keynote. When I heard about the Universal Clipboard changes for iOS 10 and macOS Sierra, I was so excited to actually be able to use this new feature as an end user. It’s so cool, leveraging Handoff and continuity, iOS and macOS will intelligently share your clipboard across devices. This means I can copy something on my laptop, and then pickup my iPhone and have that most recent thing copied available for pasting.

As a developer, I was also curious to see what new changes were in store in the UIPasteboard iOS 10 API.

In order to take advantage of the new Universal Clipboard in your apps, you don’t need to do anything differently than you’ve been doing, just use the UIPasteboard API. That being said, in order to provide the best user experience, there’s two changes to the UIPasteboard iOS 10 API that are related to the Universal Clipboard:

  1. Methods to help understand what is in the clipboard.
  2. Methods to designate the lifetime of the clipboard item.

Understanding the Clipboard Contents

Some of the changes to the UIPasteboard iOS 10 API enable you to inspect the contents of the clipboard to understand what type of contents are in the clipboard. Is it a color? Is it an image? Is it a string? Is it a URL? As a developer, you can intelligently take advantage of this. For example, say your app contains a color picker. You could provide a standard looking color picker, while also observing that the clipboard contains a color and show it as well.

Here’s an example:

// Setup, let's put some stuff in the UIPasteboard

let pasteboard = UIPasteboard.general()
pasteboard.string = "andy"
pasteboard.url = URL(string: "http://cleanswifter.com")
pasteboard.image = UIImage()
pasteboard.color = UIColor.red()

// Understanding the UIPasteboard contents

if pasteboard.hasStrings {
    print("The pasteboard has Strings!")
}
if pasteboard.hasURLs {
    print("The pasteboard has URLs!")
}
if pasteboard.hasImages {
    print("The pasteboard has images!")
}
if pasteboard.hasColors {
    print("The pasteboard has colors!")
}

Designating The Lifetime of Clipboard Contents

With the changes to the UIPasteboard iOS 10 API that introduce Universal Clipboard, it also opens a slight security vulnerability in that an end user could copy a sensitive piece of data and inadvertently make it available across all their devices. The UIPasteboard iOS 10 API provides a way to lock this down. As a developer, you can either:

  • Flag a piece of data as “local only” in which it will not appear in the Universal Clipboard across devices, and
  • Set an expiration date on a piece of data such that it isn’t available after that date.

Here’s an example of flagging a pasteboard item as “local only”:

// Add a string
let aLocalOnlyStringKey = "Local only string key"
let aLocalOnlyStringValue = "Local only string value"

// Set the string in the LOCAL pasteboard
pasteboard.setItems([[aLocalOnlyStringKey: aLocalOnlyStringValue]], options: [UIPasteboardOption.localOnly : true])

In one line, you set the item in the UIPasteboard with an option localOnly as true.

Here’s an example of adding something to the pasteboard with an expiration date:

let aExpiringStringKey = "Local only string key"
let aExpiringStringValue = "Local only string value"
// Create a date 24 hours from now
let expirationDateOfTomorrow = Date().addingTimeInterval(60*60*24)

// Add the string and mark it to expire 24 hours from now
pasteboard.setItems([[aExpiringStringKey: aExpiringStringValue]], options: [UIPasteboardOption.expirationDate: expirationDateOfTomorrow])

Again, in one line you get to pass an expiration date for when the UIPasteboard item should expire. You can also use these together.

Gonna Needa Pasteboard

James Dempsey is going to need to update the lyrics to his song “Gonna Needa Pasteboard” to account for the Universal Clipboard and these new UIPasteboard iOS 10 API features. In the meantime, I absolutely can’t wait to use the Universal Clipboard, and all the while knowing that if developers properly take advantage of these new UIPasteboard iOS 10 API features, my data will be safe and my applications will be snappy.

The code from this post is available in GitHub as a playground, here.

Don’t forget, this UIPasteboard iOS 10 API is still in beta and could change between now and the public release.

Happy cleaning.

How To Start A Programming Blog

In commemoration of this, the 50th post on cleanswifter.com, I wanted to get a little meta and reflect on some learnings I’ve had of how to start a programming blog. I wanted to capture: What has gone well? What improvement areas are there? What success have I had? Where do I want to go from here?

Start With Why

In case you didn’t catch my About Me page, there were three reasons I created cleanswifter.com:

  • I want to improve my Swift, and the best way to learn something is to teach it to others.
  • Dogfooding is invaluable. At AWeber, my day job, we provide a service digital marketers. Bloggers fit this category. My maintaining a blog, I’ll be able to better relate to our customers.
  • Help others learn. I know I have so much to learn with Swift and iOS app programming. On the same note, I also have a lot of experience building apps for the past 8 or so years. With this experience, and my continued learning, maintaining a blog is a great way to give back to the community and help others learn as well.

While I didn’t really write these down until later on, I had a good grasp as to why I wanted to start a blog right from the very beginning, before I wrote any post or even tried a content management system. Having this foundation, or core values even, has been a driving factor in being able to “stick with it.” I absolutely urge you think through the same thing if you want to start anything in life- why are you doing it? This way, anytime self-doubt creeps in, or you need a sounding board for making a decision related to your project, you can always return to this foundation for guidance. It’s helped me immensely.

Build Your Tribe

With each post, I imagine that there are people out there looking at my blog everyday to follow what I’m going to post next. When I write my posts I imagine that I’m writing directly to these people. To help better connect with your raving fans, I also urge you to start an email list from day one. You may not even necessarily know how you’ll eventually use this list for yourself down the road (trust me there are plenty of ways, http://www.smartpassiveincome.com/ – Pat Flynn’s site is a little heavy on the fluff, but there is some major insight there on monetizing your following). For me, this is where some of the dogfooding comes into play, AWeber is a software as a service specifically for email marketers. I want to build my own email list of my raving fans. I use SumoMe‘s WordPress plugins to help collect email addresses on cleanswifter.com. This then automatically sends collected email addresses to my AWeber list. Right now, anyone who signs up will get each post to cleanswifter.com delivered right to their inbox. Looking at Google Analytics to see that people are visiting my site is energizing, but looking at my email subscribers reliably opening my emails and clicking the links is a whole other world. These are my tribe, and it’s exactly them who I have in mind when I write each post.

Picking A CMS

For me, picking a content management system was a big decision. I had been using Squarespace for my personal site, <andyobusek.com> and it worked well enough, but I wasn’t thrilled. It seemed targeted to an end user less technical than me. I had also played around with a more static solution like jekyll, and while that worked well enough for the pure function of writing blog posts, it wasn’t easily extensible and it was almost more low level than I wanted. I have been using WordPress for my work with raywenderlich.com and the AWeber Engineering Blog so I’m familiar with it from an end user standpoint, but never really an Admin. It intrigued me, so I purchased some shared hosting from DreamHost (affiliate link) and I haven’t looked back. It’s no joke that WordPress runs the Internet, and now I see why. You can totally customize your website and not write a single line of HTML.

Here’s a list of plugins I’m using:

Start A Programming Blog

SEO Is King

SEO really is king for starting a programming blog. I’ve loosely been running a test to see how I can grow my traffic by purely focusing on SEO. Besides tweeting once about one of my posts on Storyboard Code Review, and including a link to Xcode Testing Shortcuts with my appearance on the raywenderlich.com podcast, I haven’t done any social sharing of articles on cleanswifter.com. I have tried posting links back to cleanswifter.com on a couple other relevant blogs in comments of related articles on those sites. I know I’m missing out, but I also didn’t want to revel in vanity metrics of page views from my mom. I wanted to focus purely on driving traffic to my blog in organic ways.

Yoast Rocks

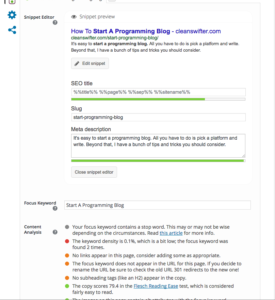
The Yoast SEO plugin for WordPress is freakin awesome. It gives you a gamified way to optimize your post for SEO. You just try to get all the little lights green, and then your post if good to go for SEO. One caveat is that it’s kind of incompatible with other WordPress plugins for Markdown. That’s okay though, because even though the bubble isn’t green, you’re still good from an SEO perspective.

start a programming blog

Google Search Console

I have yet to dig into the Google Search Console to its fullest extent, but it’s important to get it setup from the very beginning. Essentially, the Google Search Console does at least two important things: it let’s you refine how Google sees and indexes your site, and 2) shows you data on what people are searching for when they see your site in search results (and whether they clicked on it or not).

Post Everyday

I have yet to definitively tie this to SEO, but I’ve read all over the web that there are two things really important to driving traffic to your site: post frequency, and post frequency consistency. This means, pick a frequency for posts, and do it no matter what. For me, I’ve chosen to get a post out Monday through Friday each week. It’s tough to sustain for sure. I can see a future position where I dial this back. Once a week feels too infrequent, but I’d like to still have time to work up that monster post, while also surrounding it with some solid content curation.

There are a TON of other tips on SEO available on the web, just Google it.

Figuring Out Content

For me, one of the biggest hurdles in my output is figuring out what to write about. Assuming that what I’ve read about SEO is true, that posting everyday leads to higher SEO rankings, that means I need to post everyday. Whew, let me say that again, I need to post everyday. That…is…a…lot…of…content. One of the things that is most stressful to me, is coming up with that content. I want to make sure the content is relevant and valuable as well. Now, I’m not talking massive 3500 word tutorial posts, but Yoast suggests a minimum length of 300 words. Here’s some strategies I’ve come up with to keep the content flowing:

  • Content Brainstorm List – I have a Google Sheet where I just jot down post ideas as they come to me. It’s long, somewhere between 50-100 items. It’s great for capturing an idea when it comes to me, and nothing else.
  • Content Calendar – I found that if I can seed the idea for the post days ahead of time, it vastly removes the stress of writing the post. I’ve been planning for the 1 to 2 week timeframe at the moment. Basically, over the weekend, I’ll make sure I know which topic I’m going to write about each day for the upcoming week. I’ll also look out one week further for an even rougher idea of which posts I’ll be focusing on.
  • Content Curation – Content curation is an awesome way to get valuable content out to your readers. Just because you saw a popular article on Twitter, don’t assume that your readers have seen it. Chances are, they haven’t. And even if they have, there’s always room for more voices and opinions on the topic. Re-post it with your own perspective and your readers will love it. I’ve tried either linking to another piece of valuable content that I found that week with some additional commentary of my own, or lately, been doing more of the dogfooding thing and using my app Curate to construct a weekly newsletter. The newsletter gets sent to my email list subscribers via AWeber. I then post a link to the web-based version of the newsletter from my blog.
  • Weekly Menu – I actually heard this idea at the 2015 AWeber Ascend Conference (for digital marketers). The bad thing is that I can’t remember who presented it. Basically, the gist is that you line up your posts over the week as you might line up your courses while out to eat for dinner. Monday’s post is just like an appetizer, something light to whet your appetite. For me, lately I’ve been posting my videos while reading Martin Fowler’s book on refactoring. Similarly, Friday is all about an easy transition into the weekend with some content curation. The mid-week is all about the monster post. Somewhere between Tuesday and Thursday, I’ll shoot for a longer post, usually something instructional, to allow my readers to dive into something a little more meaty. These will probably be the best posts to really tweak for SEO. If you can write an in-depth instructional article, chances are, new readers will come to your site for this content. On the surrounding days, write other posts somewhere in between the long monster post, and the shorter content curation posts. I’ve also tried weeks of related content, like back when I was writing about code coverage.

Progress To Date

50 posts ago, when I was just getting started, I learned in this article titled 5 Tips to Drive More Traffic to Your Blog Today that once you have 51 posts, your blog traffic increases by 53%. 50 posts has been a milestone I’ve had in mind ever since I started, and now that it is here, I’m really excited. It’s just a milestone, not a goal. I’ll continue past it and am now looking forward to my 100th post.

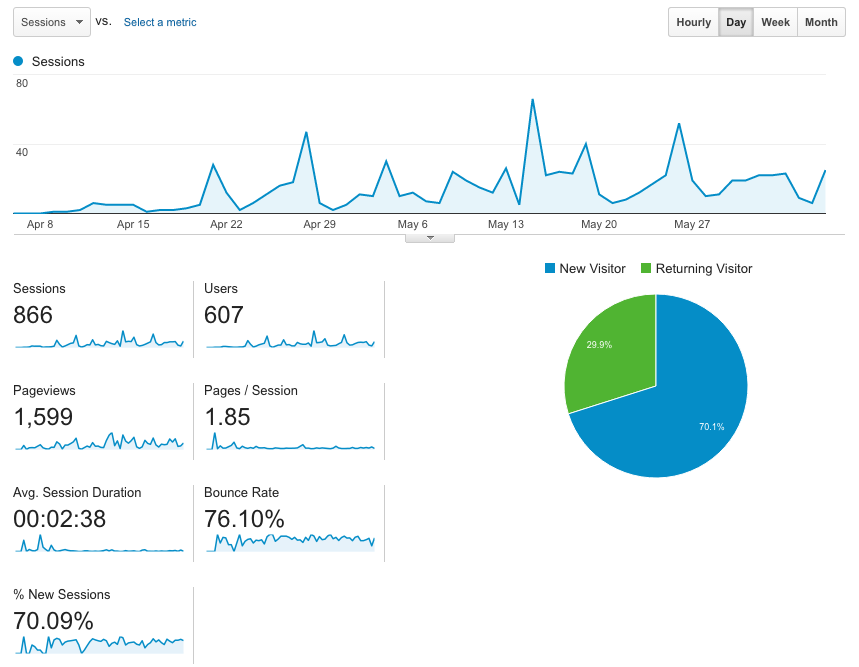
Here’s a screenshot from my Google Analytics Audience Dashboard:

Start A Programming Blog

Now I know I haven’t changed the world, but I feel really good about 607 users over almost 2 months. That’s my tribe. It’s hard to find actionable information in Google Analytics, but for me, seeing the trend upward in readership really motivates me. For that alone, Google Analytics is invaluable. It helps reinforce to me that I’m actually helping people.

Other Random Tips

Don’t Start With H2

RSS feeds don’t show style. So if your RSS feed takes an excerpt from the beginning of your article, and your first line is an H2 title, if won’t appear as such in the feed and may seem disjointed from the rest of the content. Your better off writing an introductory paragraph, and then following it up with an H2 when you introduce the first section of real content.

Spam In Google Analytics

Did you know that you can get spam in Google Analytics? Ya, it’s a real thing. I first noticed it in when looking at referrers to me site. Basically spammers simulate requests to Google Analytics properties with randomly generated ids. Then, the spammer’s website shows up as a referrer to your site. You click their URL to check out their page thinking “Oh who’s this that linked to my site?” and you land on something totally bogus. There’s a ton of information online for tweaking your Google Analytics settings to prevent this rotten information from infecting your analytics, do yourself a favor and check it out.

Looking Forward

I have so many more ideas on how to make cleanswifter.com even better, that really time is the big constraint.

Time Is Not On My Side

Time is by far the constrained resource. Right now, my priority is to get the daily content out on cleanswifter.com. And I’m on a streak that I don’t want to break. In the future, there will be a day when that streak breaks. I can see the merit in less frequent posts – maybe then the posts that do go out are higher quality, or longer? Either way, posting everyday, and then doing surrounding tasks like picking a new theme, or working on screencasts, is incredibly hard to find the time to do.

Pingdom

Right now, I just trust that DreamHost is available all the time. I certainly haven’t had any problems to date with it. Pingdom is a great service that I’ve used in other projects that will essentially monitor the uptime of your website, and then alert you when it goes down. I’d like to hook this up to cleanswifter.com.

Create My Funnel

I referenced Pat Flynn earlier in the article. He has some great information on his website smartpassiveincome.com/ for monetizing your content. I’d love to investigate some of these options to help offset the costs with maintaining cleanswifter.com.

Share Your Love

I have not spread the word about cleanswifter.com through my own social channels. Honestly, I’ve been a little shy about it. I wanted to make sure it was something I stuck with. I don’t even really have this confidence yet, but I had always looked at 50 posts as a milestone where if I got that far, I figure it would become something part of me, and that I would stick with. I guess I’m there? Either way, I kind of look at 50 posts as a coming out party, and now that cleanswifer.com is here on the scene, I’ll start tweeting new posts, sharing links in the Slack rooms I’m in, and actively trying to drive social traffic to the site.

Theme Blues

I hate my WordPress theme. I need a new one. I have such a terrible eye for design that I don’t know where to begin. I’ve tried a couple others, but don’t feel they are any better. On the other hand, I look at colleagues’ WordPress sites, and they look beautiful. How do I get therE? Something to figure out for the future.

The Sign-off

Well, that’s the highlights of my learnings for how to start a start a programming blog. I’ve come to adopt the tagline for signing off posts, “Happy cleaning.” It’s kind of a quirky line, but something that I feel like adds a little bit of personalization to the posts. And with that…

Happy cleaning.

Amazon Device Farm XCTest Tutorial

Amazon Device Farm has been on my radar for some time now. It offers the ability to remotely test your iOS apps on physical devices that are located somewhere else. Remember my post about cattle vs pets, and how your continuous integration box should not be a pet? I wanted to test out how well Amazon Device Farm XCTest actually worked, and report back here on my experience so you know how to do it as well.

Extensive List of Supported Devices

Not only does moving your automated testing to the cloud move you away from owning a “pet” build box, but it is also a cost effective way of testing your application across a large number of devices and OS versions. You won’t need to go buying old iOS devices on eBay. Amazon Device Farm supports all the way back to iOS 7. Ever accidentally upgrade your old iOS8 test device, only to realize that you can’t downgrade? With cloud based testing, you no longer need to worry about that. Amazon Device Farm supports many devices and OS versions, across iOS AND Android. You can take a look at the actual list of supported devices here.

The Goal

The goal is to evaluate and document getting a project executing Amazon Device Farm XCTest runs. I’m going to reuse my sample project from my CocoaHeads presentation, you can find it here. The project actually has three test targets setup: unit tests with XCTest, KIF tests, and FBSnapshotTestCase tests. My primary goal here get Amazon Device Farm XCTest running for unit tests. Getting the other two test targets running would be icing on the cake.

Running Amazon Device Farm XCTest Cases

TLDR

If you’ve gone through Amazon’s documentation, and are still stuck, there are two key things that I discovered that made this work for me:

  1. Properly create the .ipa file – I achieved this by Archive -> Save for Adhoc Deployment, etc.
  2. Properly create and find the .xctest folder – I had a hard time finding the .xctest folder to zip up. It’s buried in your Derived Data folder. I used the command line find command to locate it. Also, Amazon Device Farm requires you to include any class under test in the test bundle as well.

More details on those two steps later, so read on!

Overview of Amazon Device Farm

Amazon Device Farm breaks down your work into Projects and Runs. Amazon describes a Project as:

A project in Device Farm represents a logical workspace in Device Farm that contains runs, one run for each test of a single app against one or more devices. Projects enable you to organize workspaces in whatever way you choose. For example, there can be one project per app title, or there can be one project per platform. You can create as many projects as you need.

You basically have the freedom to use Projects as wide or as narrow as you want. I’m imagine a Project to be analogous to a Jenkins job. Just like a Jenkins job, a Project will consist of any number of Runs, which are basically just an execution of a given test script.

Access Your Account

To use Amazon Device Farm, you’ll need a Amazon Web Services account. Follow the instructions here for creating an account and setting it up. It’s a little more involved than just registering. You can actually create additional users within your AWS account to help segregate identities and access management, and it’s recommended that you do this to be used with Amazon Device Farm.

Once you have your account setup, sign in to the Amazon Device Farm at https://console.aws.amazon.com/devicefarm.

Create Your Project

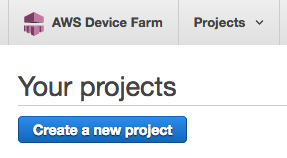
Now that you’re logged in, you’ll need to create your first Project.

amazon device farm xctest

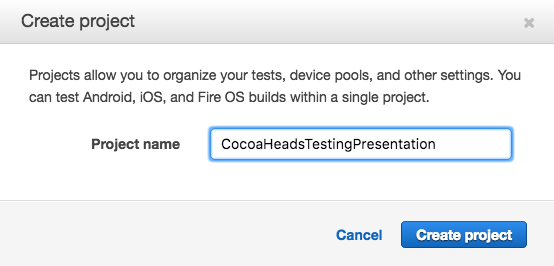
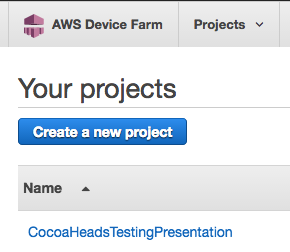
For this simple trial, I reused my Xcode project name for my Amazon Device Farm project name, “CocoaHeadsTestingPresentation”.

amazon device farm xctest

After you’ve created your project, you’ll see it in the list of projects:

amazon device farm xctest

Create Your Run

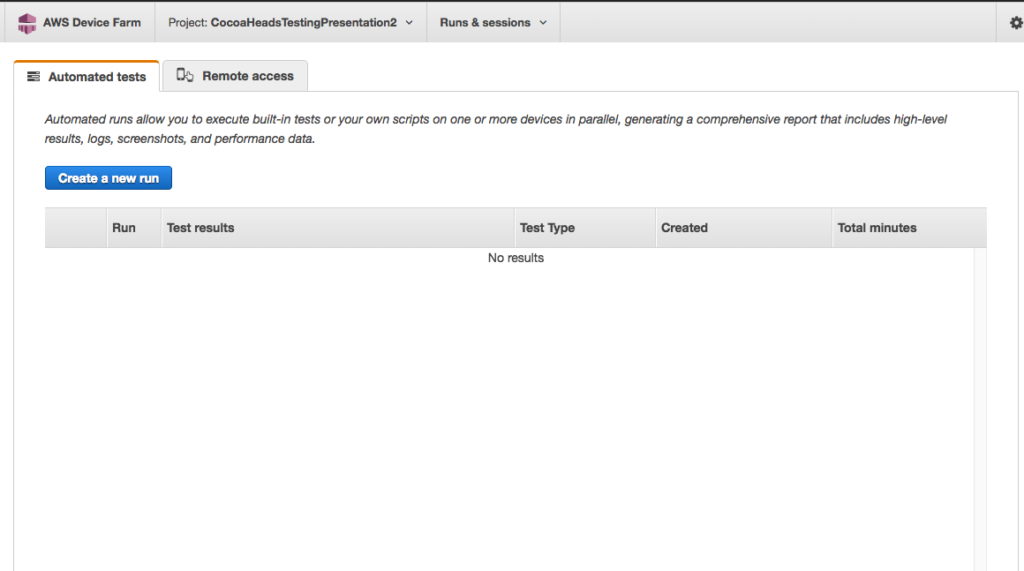
Select your project from the project list, and you’ll see a page that will eventually show your test runs. Since you have no test runs at this point, the page is empty. Now, you’ll create your first Run. Select Create a new run.

amazon device farm xctest

On Step 1, select the button that shows the Android and Apple icons to indicate that you are going to create a run for a native app.

Prepare And Upload Your Build

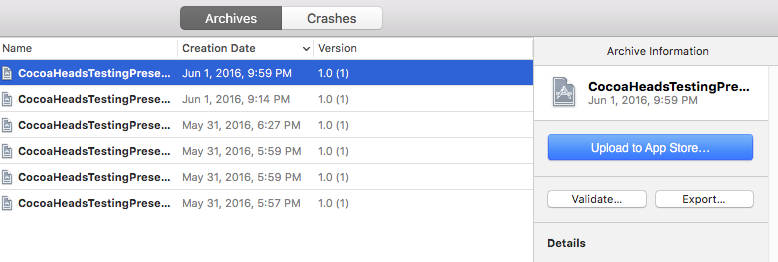
Now you need to prepare your application for execution within the Amazon Device Farm XCTest Run. This was a little tricky, and under documented in Amazon’s documentation, so I think this part will really help you. Jump over to Xcode, and Archive a build. Archiving a build will inherently enforce you to make sure you are building for device, as this is also a requirement of running Amazon Device Farm XCTest cases, since they actually run on devices. Once your build has finished archiving, select the build and **Export…* it from Xcode:

amazon device farm xctest

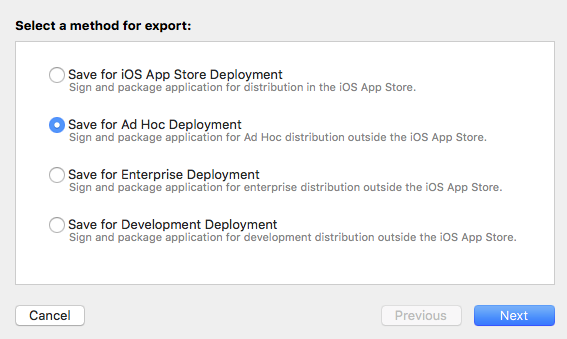
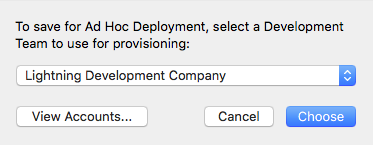
Select Save for Ad Hoc Deployment:

amazon device farm xctest

Ensure that the same identify as your build settings is used for code signing:

amazon device farm xctest

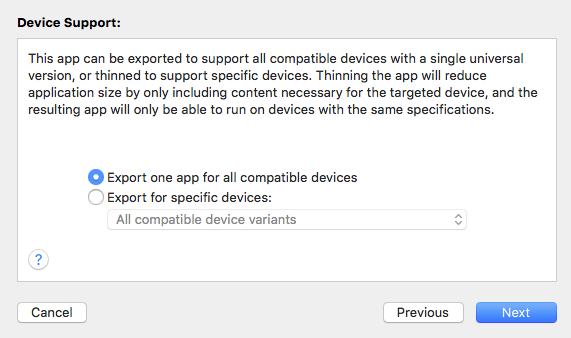
And then ensure that you Export one app for all compatible devices:

amazon device farm xctest

After selecting Next, follow through another couple prompts selecting the default options, and specify a location for your .ipa file and Xcode will code sign your application and create an .ipa file that will be uploaded to Amazon Device Farm. Go back into your browser that was left off on Step 1 of Create a new run in your first Amazon Device Farm project. Click Upload and navigate to your new .ipa file, and upload it.

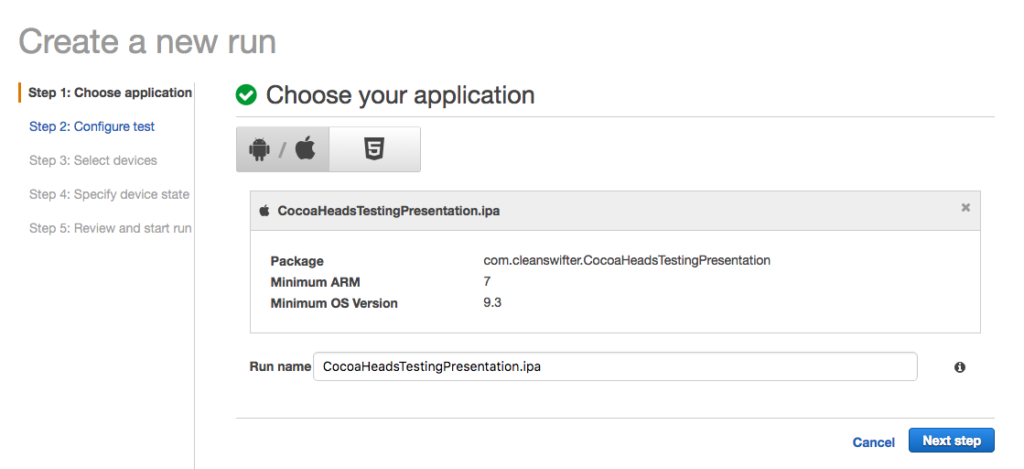
You’ll know it was successful when Amazon Device Farm shows you information about the .ipa file:

amazon device farm xctest

Click Next step.

Specify and upload your XCTests

On Step 2, select XCTest as the test type, and then you’ll need to upload your XCTests. This was the hardest part of the process to get right, and also the most under-documented in Amazon’s documentation. Here’s a couple things to tweak and double check in Xcode to make sure you are setup:

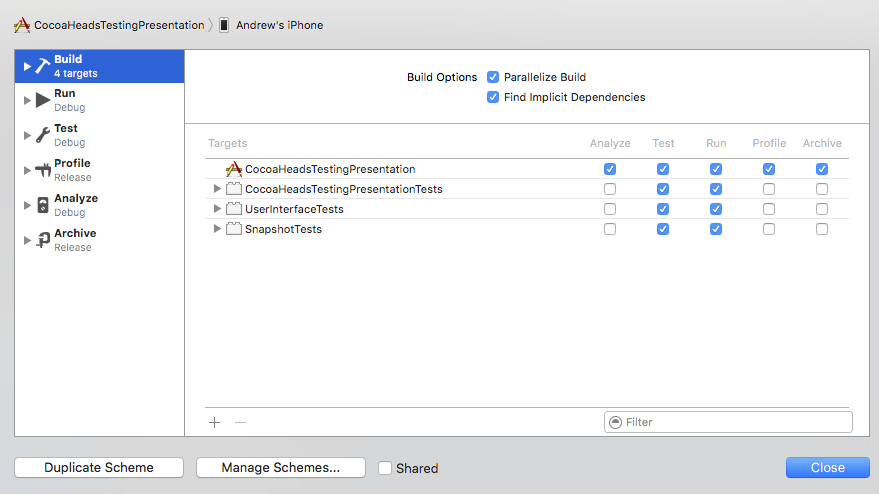
  • Unit tests will compile with each build – This should be the default setting, but it’s worth double checking. Open the Build action settings for the scheme in the Scheme Editor. Verify that in the Run column, your test targets are checked. This means that when you type Command-B or even run your app, your tests will be compiled too. amazon device farm xctest
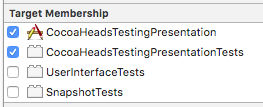
  • SUT Classes are included with the test target – In order for your classes under test (aka SUT) to be available within the test bundle, you need to ensure they are included with test target membership. In my project, WelcomeViewController.swift was a class under test, so I needed to actually add it to the test target membership since this isn’t technically required in a Swift world with the @testable annotation for importing modules. amazon device farm xctest
  • Build tests for devices – Your XCTest bundle must be built for device, not simulator. Select a device, rather than a simulator. amazon device farm xctest

Now that you are all setup, build your tests with Command-B. Now, you need to find the .xctest folder, compress it, and then upload it. I used a find command from Terminal to find it:

CocoaHeadsTestingPresentation|⇒ find . -type d -name '*.xctest'
./Carthage/Checkouts/ios-snapshot-test-case/DerivedData/FBSnapshotTestCase/Build/Products/Release-iphoneos/FBSnapshotTestCase iOS Tests.xctest
./Carthage/Checkouts/ios-snapshot-test-case/DerivedData/FBSnapshotTestCase/Build/Products/Release-iphonesimulator/FBSnapshotTestCase iOS Tests.xctest
./DerivedData/CocoaHeadsTestingPresentation/Build/Products/Debug-iphoneos/CocoaHeadsTestingPresentation.app/PlugIns/CocoaHeadsTestingPresentationTests.xctest
./DerivedData/CocoaHeadsTestingPresentation/Build/Products/Debug-iphoneos/CocoaHeadsTestingPresentation.app/PlugIns/SnapshotTests.xctest
./DerivedData/CocoaHeadsTestingPresentation/Build/Products/Debug-iphoneos/CocoaHeadsTestingPresentation.app/PlugIns/UserInterfaceTests.xctest
./DerivedData/CocoaHeadsTestingPresentation/Build/Products/Debug-iphonesimulator/CocoaHeadsTestingPresentation.app/PlugIns/CocoaHeadsTestingPresentationTests.xctest
./DerivedData/CocoaHeadsTestingPresentation/Build/Products/Debug-iphonesimulator/CocoaHeadsTestingPresentation.app/PlugIns/SnapshotTests.xctest
./DerivedData/CocoaHeadsTestingPresentation/Build/Products/Debug-iphonesimulator/CocoaHeadsTestingPresentation.app/PlugIns/UnitTestBundle2.xctest
./DerivedData/CocoaHeadsTestingPresentation/Build/Products/Debug-iphonesimulator/CocoaHeadsTestingPresentation.app/PlugIns/UserInterfaceTests.xctest
CocoaHeadsTestingPresentation|⇒ 

Remember, you want the bundle built for device, not simulator. That means you’ll use the one in the directory Debug-iphoneos, not Debug-iphonesimulator. The directory you need to compress to a zip file is:

./DerivedData/CocoaHeadsTestingPresentation/Build/Products/Debug-iphoneos/CocoaHeadsTestingPresentation.app/PlugIns/CocoaHeadsTestingPresentationTests.xctest

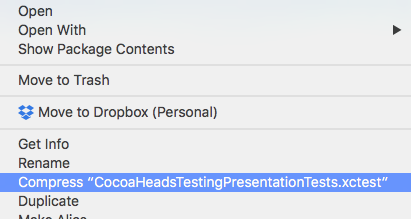
Compress it as a standard zip file (you can use Finder for this), and Upload it back in the Amazon Device Farm browser.

amazon device farm xctest

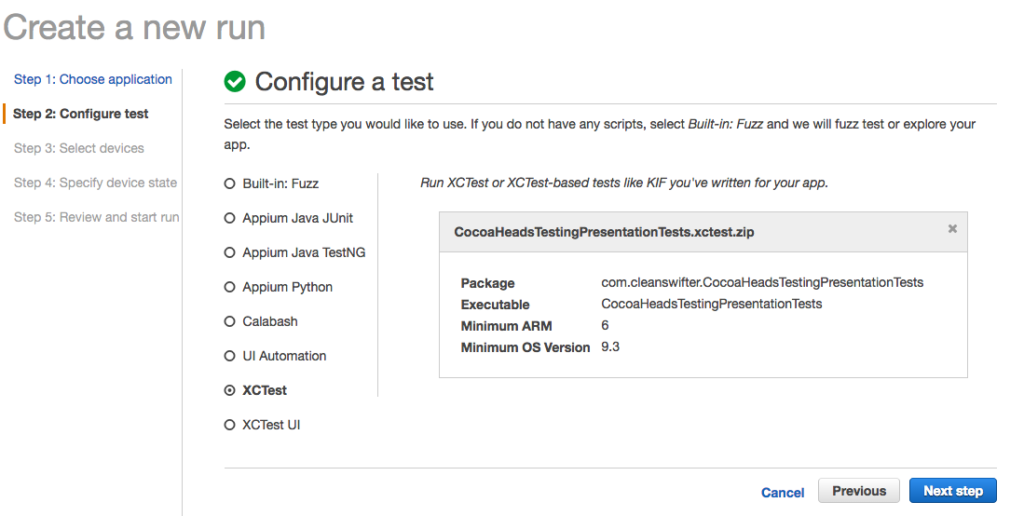
You’ll know the upload was successful when you see details about the XCTest zip file:

amazon device farm xctest

Click Next step to select your devices for the run.

Select Devices

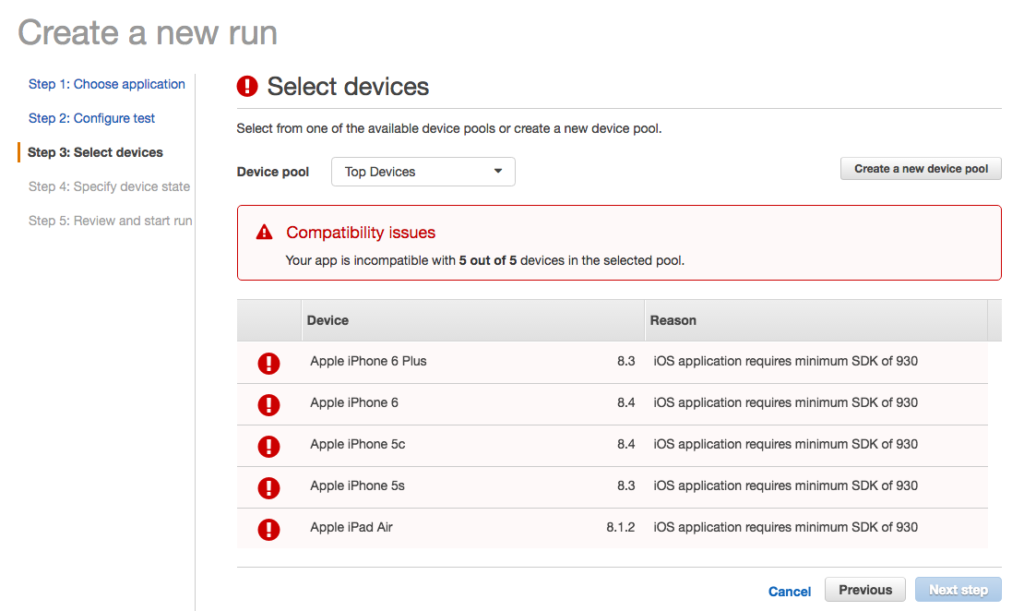
One thing that annoyed me with setting up my first Run for an Amazon Device Farm XCTest was that when I finally got to the screen to select which devices to execute my Run on, the default list contained five devices, none of which were supported by my app. I would have rather’d some smarts on Amazon’s part to look at the lowest iOS version supported by my app, and then only show me “Top Devices” for that minimum iOS version.

Since the suggested list didn’t work for me, the first thing to do was Create a new device pool, which is what you should click to do that:

amazon device farm xctest

On the resulting screen, it’s obvious enough to select devices for a new “pool” – just make sure you select devices compatible with your app’s minimum version, because you won’t be prevented from doing that.

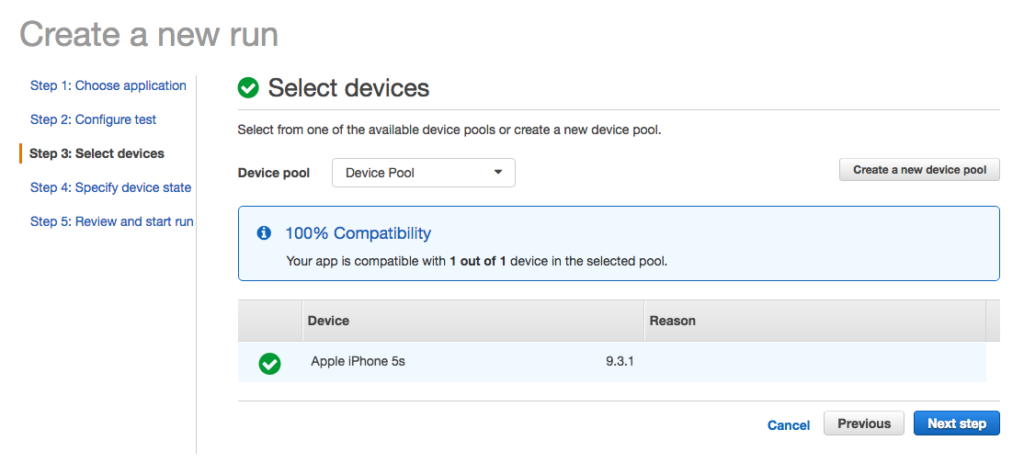
Once you create a pool of compatible devices, you’ll see a message about “100% Compatibility”

amazon device farm xctest

Select Next step to specify initial device state.

Specify Device State

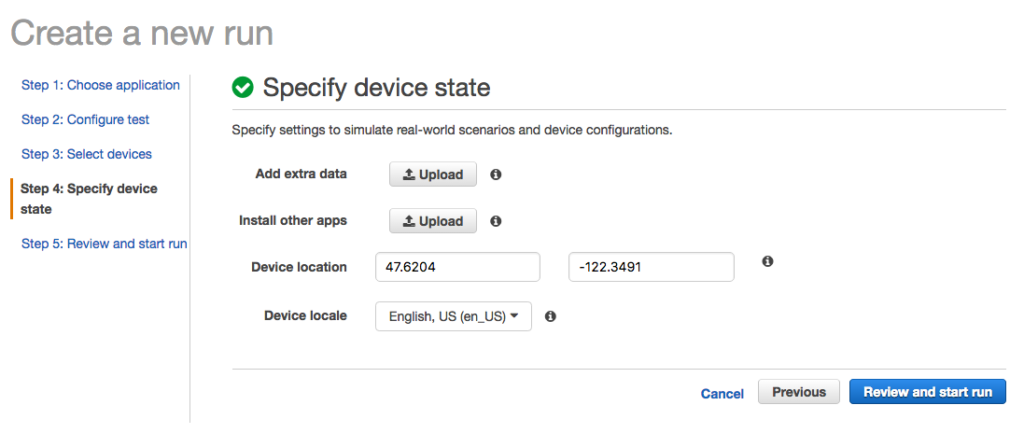
In Step 4, you can specify other initial aspects of the device’s initial state, like other apps to load, a geographic location, or which locale to use:

amazon device farm xctest

I didn’t change any of these values from the default for my app.

Next, click Review and start run. The next page reviews your Run’s settings, and allows you to start it. Click “Confirm and start run” to start it.

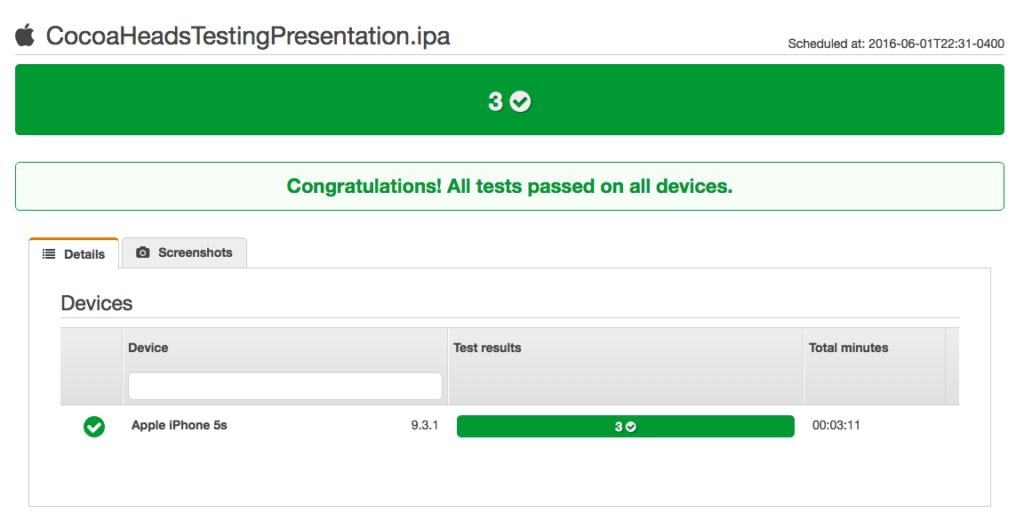
Boom, that’s it! At this point, you’re basically done. If all is configured correctly, your Amazon Device Farm XCTest will be running. Congrats!

amazon device farm xctest

Observations of Amazon Device Farm XCTest

Here’s a couple observations from going through this setup for Amazon Device Farm XCTest.

Setup Is Too Manual

Next, I really need to investigate automating this. There’s no way I would frequently go through this in order to run my tests. It’s so much faster to run it from Xcode locally. There’s just too much clicking through prompts. Ideally, I want to connect this with my continuous integration server, so that’s the next thing I’ll look into.

Tests Are Slow

Just the simple act of running tests is really slow. For my sample project, that is totally bare bones, with ONE XCTest unit test, it took just over three minutes to run in Amazon Device Farm. That’s compared to like one second locally in Xcode. I’d like to try this with a larger code base and observe how long it takes. I hope the duration doesn’t lengthen with the size of the project or number of tests, but it probably will. At this point, I don’t think I’d put such long running tests in the middle of my code review workflow, but rather integrate these as nightly builds across a large number of devices.

Documentation Lacked Key Steps

The hardest part of getting this setup was getting the precise build settings right, both for the app binary ipa itself, and the .xctest bundle as well. Amazon totally glossed over this in their documentation, which really prompted me to write this article. The good news is that in Googling around, I noticed Amazon support employees actually answering questions on Stack Overflow, and also participating in Amazon’s own dedicated form for supporting Amazon Device Farm.

Wrap Up

I noticed that there is a command line reference for Amazon Device Farm. In order to integrate Amazon Device Farm XCTest with my continuous integration procedures, I know I need to test this with more complicated projects, and also automate it. I’ll do that in a future post.

Happy cleaning.

Asynchronous iOS Unit Test Tutorial

By default, iOS unit tests in Xcode execute just like any other method, from top to bottom, in serial order. This is fine most of the time. Occasionally though, you’ll find the need to write a unit test for asynchronous code. And with the prevalence of closures in Swift, writing an asynchronous iOS unit test will become even more common place.

The Method To Test

Consider this method under test:

class Parser {

  func parse(toParse: String, success: () -> Void, failure: () -> Void) {
    // code omitted
  }

}

It requires some imagination, but envision that this is some kind of complicated parsing routine that takes a long amount of time to complete. Depending on the outcome of parsing the input, either a closure success() or ‘failure()` (that are provided to the method) are guaranteed to be called at some asynchronous, non-deterministic point in the future.

Why This Is Hard To Test

At the core of this method, an input string will be parsed, probably on a different thread. In some cases that will pass, and in some cases that will fail. We need to figure out how to write tests to verify that.

Initially, one might think to try a test like this:

func testParse_Succeeds() {
  let toTest = Parser()
  toTest.parse("Something that will parse", success: {
    // do nothing, test will pass
  }) { 
    // if failure parsing, fail test
    XCTFail()
  }
}

The problem with this approach, is that assuming the long running code in parse(_:success:failure) is executed on another thread, `testParse_Succeeds()’ will likely complete before the parsing actually completes, thus never giving the test the chance to perform the actual verification. This will result in false positives, with no way to actually see the test fail.

asynchronous iOS unit test

The Solution – Expectations

There’s a really cool API provided in an XCTestCase extension that makes testing asynchronous code possible.

public func expectationWithDescription(description: String) -> XCTestExpectation

and

public func waitForExpectationsWithTimeout(timeout: NSTimeInterval, handler: XCWaitCompletionHandler?)

Here’s how you can use this with the previous example to verify the asynchronous code:

func testParse_Succeeds() {
  // 1
  let expectation = expectationWithDescription("Parsing Succeeds")
  let toTest = Parser()
  toTest.parse("Something that will parse", success: {
      // 2
      expectation.fulfill()
    }) { 
      // 3
      XCTFail()
  }

  // 4
  waitForExpectationsWithTimeout(1.0) { (_) -> Void in
  }
}

Looking at this line by line:

  1. Create an expectation for parsing to succeed
  2. When parsing succeeds, mark the expectation as fulfilled (and optionally perform any other verification)
  3. Explicitly fail the test if parsing does not succeed
  4. Tell XCTest to wait 1.0 second for the expectation to be fulfilled, or otherwise fail the test. (Good thing the timeout is configurable).

That’s it, now you can write an asynchronous iOS unit test!

Getting Cleaner

Now you know how to write an asynchronous iOS unit test. Take a minute to try out these sweet extensions on XCTestCase. I think you’ll find a lot of creative uses for them. Keep in mind, it doesn’t necessarily need to be long running code that needs this solution, but rather any code that is going to execute in an asynchronous fashion. Do you unit test your web service API calls?

Happy cleaning.
Other References:

Writing Your First FBSnapshotTestCase

I’m in the thick of preparing for my talk at Philly CocoaHeads this week, but I wanted to get a quick post out that shows you how easy writing your first FBSnapshotTestCase is. Yesterday, I showed you how to setup FBSnapshotTestCase with Carthage. I’m going to assume you’ve done that already. I’ve create a sample project for my talk on Thursday that I’m going to use for this walkthrough on writing your first FBSnapshotTestCase. You can download that on GitHub here.

What You’ll Test

Open the application, and Build and Run.

writing your first FBSnapshotTestCase

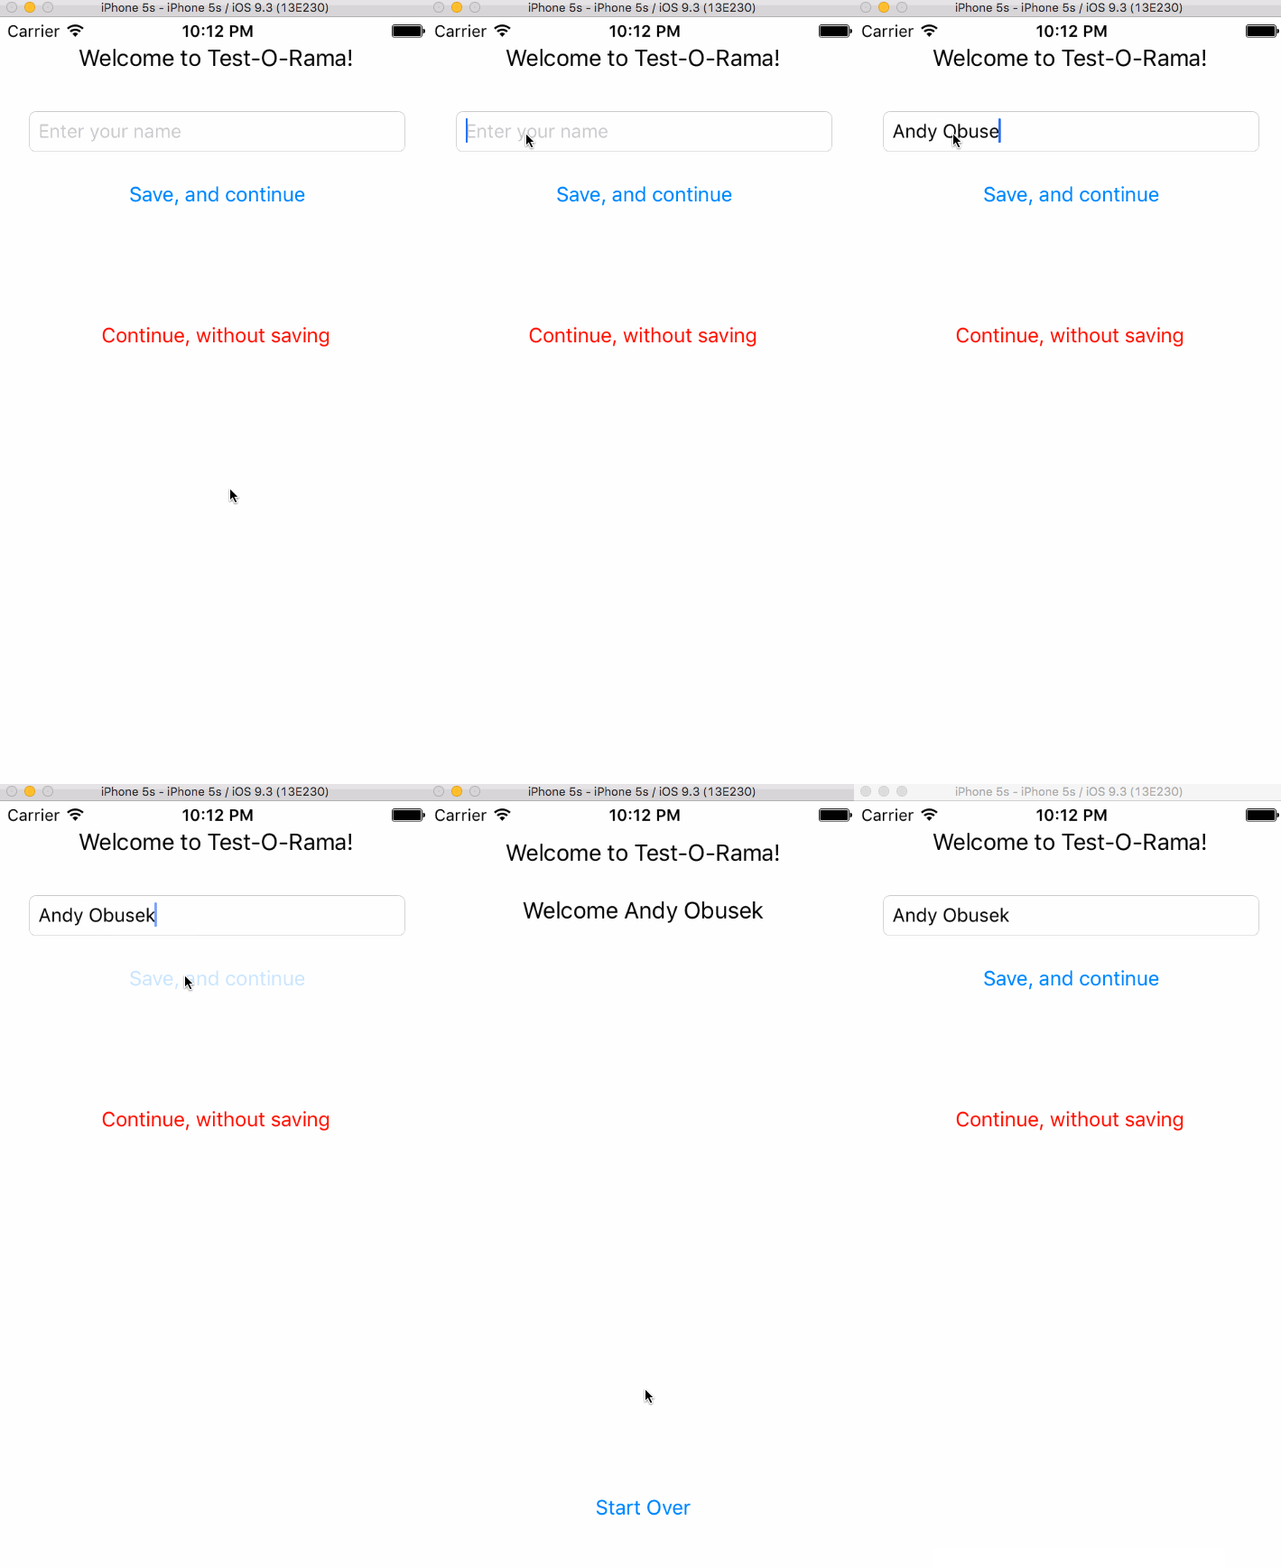
You’ll see it’s a simple app, one that I’ve even used before in other posts. There’s two flows forward from this first screen, either with the Save, and continue button or the Continue, without saving button. If the user chooses, they may enter their name and tap Save, and continue to access the Welcome view where their name is shown to them.

writing your first FBSnapshotTestCase

Simple enough. In writing your first FBSnapshotTestCase, you are going to verify that the name specified shows up correctly on the Welcome view.

Take The Baseline Snapshot

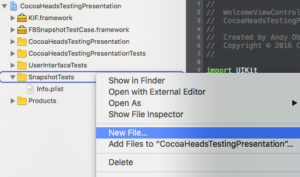
To create the test, right-click the SnapshotTest group, and select New File:

writing your first FBSnapshotTestCase

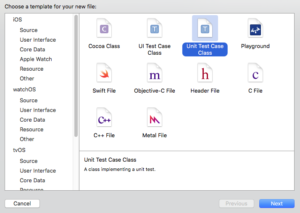
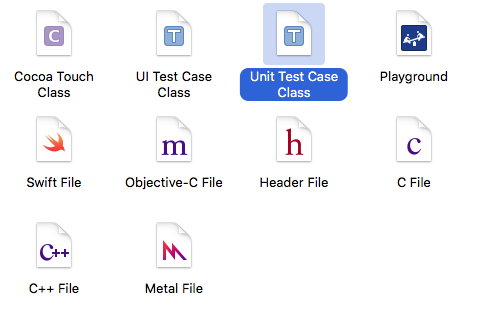
Select Unit Test Case Class and Next:

writing your first FBSnapshotTestCase

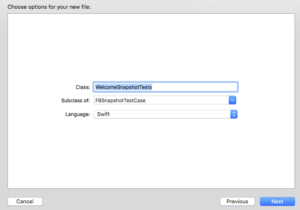
Name the test WelcomeSnapshotTests and specify it as a Subclass of FBSnapshotTestCase. Click Next:

writing your first FBSnapshotTestCase

Click Create on the subsequent screen.

If you are prompted to create a bridging header, select Don’t create.

Now, Xcode will create the source file for you and drop you in it. The first thing to do is correctly import FBSnapshotTestCase.

Replace this:

import XCTest

with this:

import FBSnapshotTestCase
@testable import CocoaHeadsTestingPresentation

Importing CocoaHeadsTestingPresentation is necessary to access classes from that module so we can create views specific to the app. Now, you should be able to build with Command-B.

Delete everything within the WelcomeSnapshotTests class, and add this:

override func setUp() {
  super.setUp()
  recordMode = true
}

This setUp() method tells FBSnapshotTestCase that when recordMode is true, new snapshots will be taken. This requires the application to be in a “known good state.” That means that the view that you are going to “snapshot” looks just as you want it to look, because all future test runs will compare against this view.

Next, add this test method:

func testWelcomeView_WithName() {
  let welcomeVC = UIStoryboard(name: "Main", bundle: nil).instantiateViewControllerWithIdentifier("WelcomeViewController") as! WelcomeViewController
  welcomeVC.name = "Andy Obusek"
  FBSnapshotVerifyView(welcomeVC.view)
  FBSnapshotVerifyLayer(welcomeVC.view.layer)
}

This test creates a WelcomeViewController from a storyboard, specifies the name to be shown, and then verifies the view and layer.

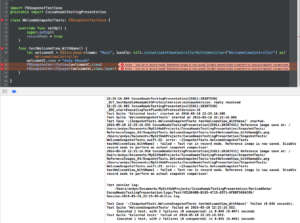
Run this test. Just as usual, I suggest the keyboard shortcut Command-U. You’ll actually see the test fail:

writing your first FBSnapshotTestCase

But looking closer at the message:

Test ran in record mode. Reference image is now saved. Disable record mode to perform an actual snapshot comparison!

Nothing is actually wrong. FBSnapshotTestCase is just telling you that since it’s in recordMode, it will take new snapshots, but not let the test pass.

To see the snapshot, open the directory /SnapshotTests/ReferenceImages_64/SnapshotTests.SnapshotTests/. Inside that directory, you should see a png file that is the snapshotted view! So cool!

writing your first FBSnapshotTestCase

Turn Off Record Mode

Now that the baseline snapshot has been taken, turn recordMode off.

override func setUp() {
  super.setUp()
  recordMode = false
}

Now, rerun the test with Command-U. And bingo bango, the test passes! Light is green, trap is clean!.

Make Sure It Fails When It Needs To

It’s hard, if not impossible, to practice test driven development when writing your first FBSnapshotTestCase, or really any snapshot test at all. Since it requires the known “good state” to be snapshotted, some amount of real development has to happen first. That being said, you should still make sure that the test fails when it should. To do that, we’ll hack a bug into WelcomeViewController. Open WelcomeViewController.swift and add a few “eeee” to how the welcome message is set:

override func viewDidLoad() {
  super.viewDidLoad()
  if let name = name {
    welcomeLabel.text = "Welcomeeeeeeeee \(name)"
  } else {
    welcomeLabel.text = "Welcome Player 1"
  }
}

Re-run the test. It will fail! Whew, now we know that it will actually fail when it should.

Wrap Up

See, wasn’t it easy writing your first FBSnapshotTestCase? I hope snapshot testing helps you out. I’d love to hear how it helps you, or what you think of this approach. Please leave a comment!

Happy cleaning.
FBSnapshotTestCase Installation with Carthage

FBSnapshotTestCase installation failed with CocoaPods 1.0.0.rc.2 while in preparation for an upcoming presentation to Philadelphia CocoaHeads. I gave Carthage a try, and it worked! I wanted to write it up and share it with you. Now I know that switching to Carthage may not work for everyone just to use a test framework, but maybe there’s a hybrid solution that you could come up with?

What is FBSnapshotTestCase

FBSnapshotTestCase is a testing framework that was originally written at Facebook by Jonathan Dann with significant contributions from Todd Krabach. As a testing framework, it allows you to test the user interface of your iOS app by diff’ing screenshots. Yep, you heard me write, you literally take a source screenshot, mark it as “correct” and then all future runs of the test suite use this as the basis for determining if the test passes or not.

As my preferred channel, and as the README suggested, I wanted to install FBSnapshotTestCase with CocoaPods, but this issue prevented me from doing so in a Swift project. Instead, I tried using Carthage and was successful.

FBSnapshotTestCase Installation with Carthage

Step 1: Download Carthage

Carthage is an alternate dependency management framework, one that is more lightweight than CocoaPods (and doesn’t require Ruby! YEY). If you don’t have Carthage installed, download the latest .pkg file from here. I used 0.16.2 for this tutorial. FBSnapshotTestCase Installation was really easy with Carthage.

Step 2: Create a Cartfile

In the root of your project, create a new file called Cartfile. Add this to it:

github "facebook/ios-snapshot-test-case"

The Cartfile contains your dependencies for the project. While you can specify versions of your dependencies, I was content just picking the latest release, and thus didn’t specify a version.

Step 3: Install the Dependencies

Now that you have a Cartfile, the next thing to do is install the dependencies with Carthage. To do this, from a shell, run:

carthage update --platform iOS

You’ll see output like:

*** Fetching ios-snapshot-test-case
*** Checking out ios-snapshot-test-case at "2.1.0"
*** xcodebuild output can be found in /var/folders/mp/k1jy2r2d3gg9bzkz0v9y5jxm00024f/T/carthage-xcodebuild.GOHIjS.log
*** Building scheme "FBSnapshotTestCase iOS" in FBSnapshotTestCase.xcworkspace

A new Carthage/ directory will be created with your dependencies. Carthage is different from CocoaPods, in that, you now need to manually configure the libraries within your Xcode project.

Step 4: Add Dependencies to Your Project

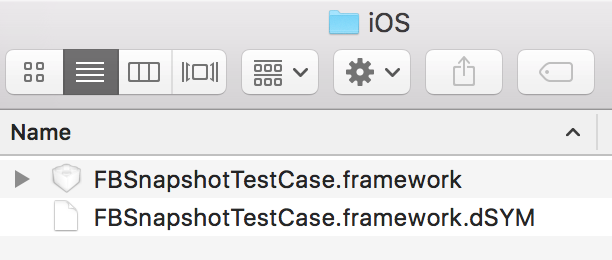
Open a Finder window for the root folder of your project, and then navigate down the hierarchy to Carthage/Build/iOS. You should see the framework for FBSnapshotTestCase.

FBSnapshotTestCase Installation

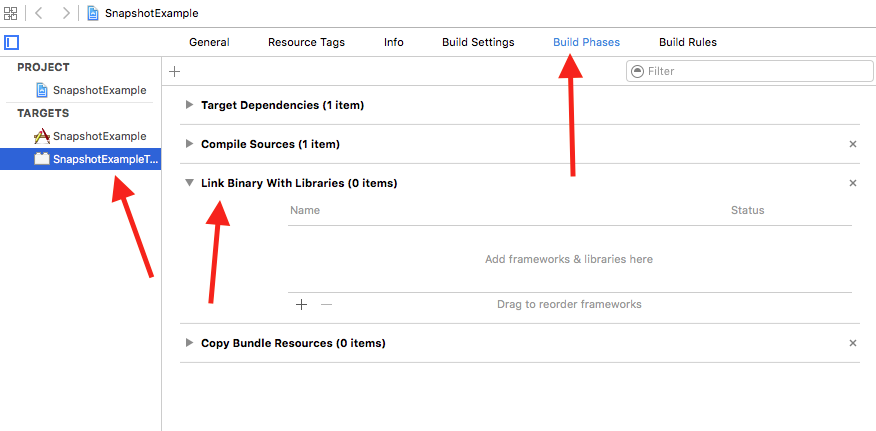
Now, in Xcode, open the target settings for your test target, in my case it’s called SnapshotExampleTests, and then select the Build Phases tab, and then expand Link Binary With Libraries. Drag the framework in there:

FBSnapshotTestCase Installation

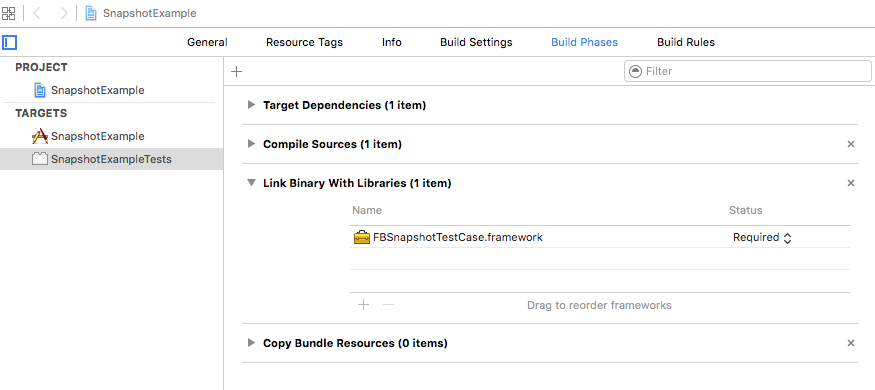
It will then look like:

FBSnapshotTestCase Installation

Step 5: Add a FBSnapshotTestCase

Create a new unit test (File -> New -> File):

FBSnapshotTestCase Installation

And specify it as a subclass of FBSnapshotTestCase

FBSnapshotTestCase Installation

At the top of the file, replace:

import XCTest

with

import FBSnapshotTestCase

At this point, you can try running your new FBSnapshotTestCase (Command-U). Everything should compile, but the test will fail.

Step 6: Copy-Frameworks

I’ll be honest, I’m not really sure why this final step is necessary, but without it, the tests would not pass. Carthage’s README indicates it’s necessary for an “App Store submission bug” but I’m not even archiving here, just running tests.

Do this (copied right from Carthage’s [README]):

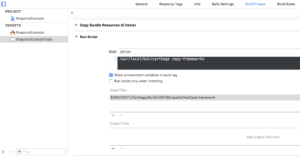
On your application targets’ “Build Phases” settings tab, click the “+” icon and choose “New Run Script Phase”. Create a Run Script in which you specify your shell (ex: bin/sh), add the following contents to the script area below the shell:

/usr/local/bin/carthage copy-frameworks

and add the paths to the frameworks you want to use under “Input Files”, e.g.:

$(SRCROOT)/Carthage/Build/iOS/FBSnapshotTestCase.framework

It should now look like this:

FBSnapshotTestCase Installation

Now, try to run your FBSnapshotTestCase again with Command-U. It should compile and pass your test!

Wrap Up

See, isn’t FBSnapshotTestCase installation easy? Now you’re free to go ahead and use FBSnapshotTestCase to your heart’s content. I plan to write another post that will help you through creating your first FBSnapshotTestCase. If you’re a long time CocoaPods user, I know this isn’t optimal, but hey, look at it this way, at least you have an opportunity to try out Carthage if you’ve never looked at it before.

I got a log of inspiration and ideas for installing FBSnapshotTestCase with Carthage from this article on <raywenderlich.com>.

Happy cleaning!

Separate Schemes For Better iOS Code Coverage

As you continue to construct the test pyramid for your iOS apps to Martin Fowler’s specification, you’ll find the desire to separately measure your code coverage for both unit tests and functional tests. And if you don’t have that desire, then you should know that measuring a combined code coverage for both unit and functional tests is not an accurate representation of how your production code is truly covered. For one, functional tests will generally have a higher coverage, while also including less assertions. This is because of how much code gets executed while broadly navigating through your app as functional testing does. This data will then be glom’d on to the code coverage metrics for your unit tests, making it really hard to identify where you can refine the coverage of your unit tests. And the opposite can also be true, where you have unit test coverage and no functional test coverage, but since you are only evaluating a single number, you can’t figure out where one ends and one begins. To fix this, use separate schemes for better iOS code coverage. By moving each group of tests into their own scheme, you’ll be able to measure code coverage independently.

The Fix – Separate Schemes

To fix this, you are going to create separate schemes for better iOS code coverage. To start, you are going to duplicate the main scheme for your app, and then specify a different set of tests for each scheme. I’ll walk you through creating a separate scheme for your unit and functional tests. For this example, we’ll be using KIF as the tool for the functional tests (Yes, soon enough I’m going to take a deep dive into Xcode’s new UI tests). For this walkthrough, you’re going to continue with the project from Wednesday where you setup code coverage for unit tests. You can find the project on GitHub if you just want to start there. https://github.com/obuseme/CodeCoverage.

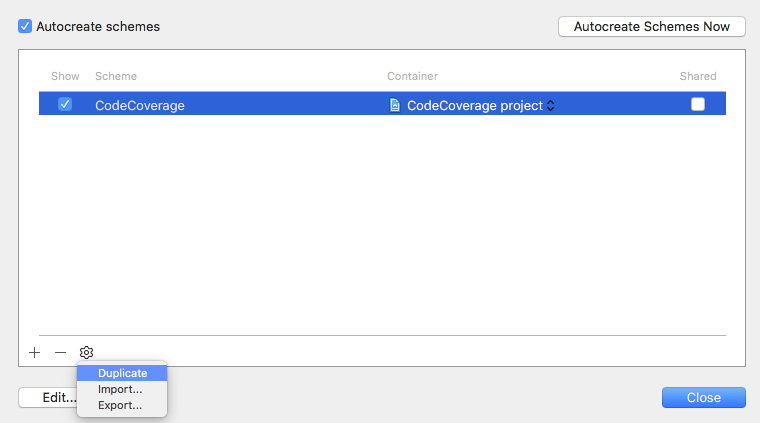
To start, open the Scheme Editor and duplicate the one and only scheme.

Separate Schemes For Better IOS Code Coverage

The new, duplicate, scheme that you created will be used for executing your functional tests, while the initial scheme will be used for your unit tests. The benefit of this is that you’ll be able to separately calculate code coverage for each set of tests. The drawback is that you’ll need to manually switch the scheme to execute each set of tests.

After you’ve duplicated the scheme, rename the new scheme to CodeCoverageFunctionalTests.

Next, create a new “iOS Unit Testing Bundle” target named CodeCoverageFunctionalTests. This target will contain your KIF tests.

Next, install KIF, preferably with CocoaPods. For detailed instructions on doing this, follow my previous post here. Ensure that the target you specify for where KIF should be installed is CodeCoverageFunctionalTests. And of course, after first configuring CocoaPods with a project, after you install pods for the first time, close CodeCoverage.xcodeproj and open CodeCoverage.xcworkspace instead.

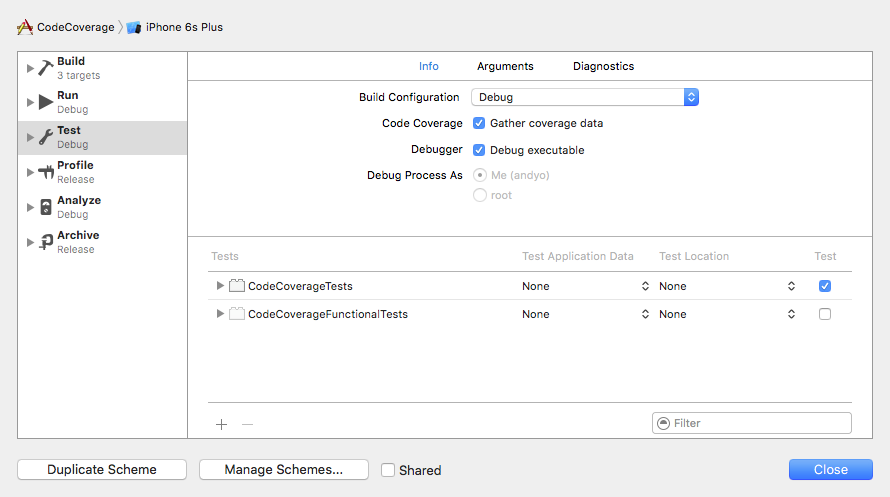
And for the final step, edit each scheme to selectively use one of the two test targets for its Test step. First, edit the scheme for CodeCoverage and set the test suite for the Test step to be CodeCoverage. Make sure Gather code coverage is selected as well in each scheme.

Separate Schemes For Better IOS Code Coverage

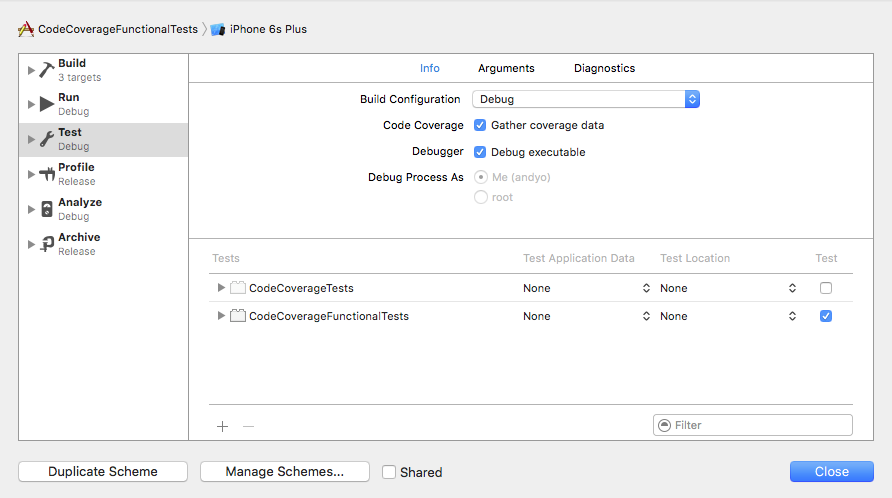
Then, edit the scheme for CodeCoverageFunctionalTests and set the test suite for the Test step to be CodeCoverageFunctionalTests.

Separate Schemes For Better IOS Code Coverage

BOOM! That’s it. Now you can explicitly change schemes, and use Command-u to run tests for each scheme. Depending on the scheme selected, a different set of tests will be run – either the unit tests or the functional tests, and as a result, different code coverage metrics will be generated.

Wrap Up

This post concludes a week of code coverage information. I hope you enjoyed it, and I hope your tests are better covered as a result separate schemes for better iOS code coverage. I’d love to hear how you’re using code coverage. Please post a comment and let me know!

Happy cleaning!

Broken Code Coverage in Xcode: How To Fix It

When using metrics to make decisions about your code, it’s fundamentally important that those metrics are 100% correct. You need to have absolute faith in the reported numbers. If this is not the case, you risk making decisions and taking action through inaccurate data, and risk making incorrect decisions. By default, there’s a critical flaw in how code coverage is measured by Xcode for iOS apps. From the moment you setup unit tests for a project, Xcode will automatically identify code as “covered” for anything that is triggered through the normal application launch sequence, such as your application delegate. This means that your code coverage numbers will be artificially inflated! And broken code coverage in Xcode means you won’t fully understand how well your app is tested.

Let me say this one more time to it sinks in, your iOS code coverage numbers are not correct unless you take specific action to fix them.

An Example Of Broken Code Coverage in Xcode

First, I’m going to demonstrate to you the broken-ness of code coverage in Xcode. Then, I’m going to show you how to fix it.

To observe the broken code coverage, you are going to perform these steps:

1) Create a new empty project, including unit tests 2) Leave the unit tests empty 3) Turn on code coverage 4) Run the tests, and review coverage

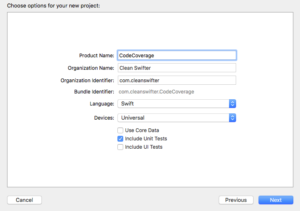
Let’s do it. First, create a new Swift iOS project called CodeCoverage. Be sure to check Include Unit Tests.

broken code coverage in xcode

Open CodeCoverageTests.swift. You aren’t going to make any changes to this file, but notice how there are two empty test implementations testExample() and testPerformanceExample(). These tests will run and pass, but should generate 0% coverage of the application.

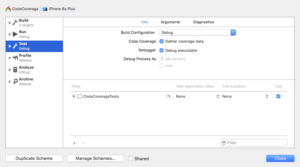
Now, turn on Code Coverage. Open the Scheme Editor and check Gather coverage data.

broken code coverage in xcode

Finally, run the tests. Command-U (you only get a keyboard shortcut today :). Open the Code Coverage results from the Report Navigator.

broken code coverage in xcode

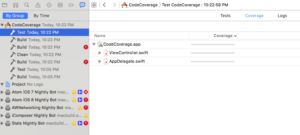
Uhhh, what’s wrong with that picture? It should be obvious, code coverage is being shown for ViewController and AppDelegate despite there being absolutely no legitimate tests in the project.

Why There Is Broken Code Coverage in Xcode

Well, I wouldn’t blame it all on Xcode. Xcode is measuring the code that is executing when your tests execute. And technically, since you app is starting up and showing the first view controller, that code has executed, so it’s reported as covered. The thing is, by the definition of how you want to measure code coverage, that code isn’t actually “covered.” There’s a really easy way to correct this.

How To Fix Broken Code Coverage in Xcode

Jon Reid’s article on How to Switch Your App Delegate for Fast Tests inspired me to figure out how to fix this. You are going to create a separate app delegate that is used by your tests. This app delegate will be entirely empty, so it totally intercepts the app launch sequence. This way, no code in your real app delegate will be executed unless explicitly done so from a test, and ditto for any view controller that it would have otherwise instantiated.

Note: I want to give full attribution to Jon Reid on this code. I just figured out that it also fixes broken code coverage in Xcode.

To fix this, first open AppDelegate.swift and delete this line:

@UIApplicationMain

Create a new Swift file named TestingAppDelegate.swift, and replace it’s contents with:

import UIKit

class TestingAppDelegate: UIResponder {
}

This is the meat of the fix. It’s an empty implementation of an app delegate that will be used rather than your “real” app delegate.

Create a new Swift file named main.swift, and replace its contents with:

import UIKit

let isRunningTests = NSClassFromString("XCTestCase") != nil
let appDelegateClass : AnyClass = isRunningTests ? TestingAppDelegate.self : AppDelegate.self
UIApplicationMain(Process.argc, Process.unsafeArgv, nil, NSStringFromClass(appDelegateClass))

This is the first code that executes on app launch. It first checks whether XCTestCase is an available class to determine whether the app is being launched from tests or not. Depending on the result, a decision is made as to which app delegate should be used – the real one, or the empty one.

That’s it. Now re-run your tests and open your coverage report.

Note: You may need to Clean for a successful build.

broken code coverage in xcode

Woohoo! 0% coverage. Ya, that’s the only time you’ll ever be happy about 0% coverage, but in our case, we have no legitimate tests, so it’s what we want! Yay, we fixed our code coverage.

Side Benefit: Faster Tests

A side benefit of this fix for correcting broken code coverage in Xcode is that your tests will run faster. By alleviating the simulator of bootstrapping a significant portion of app startup, you’ll save that time each test run. I just compared the before state and after state of this fix on one of my current projects where we have about 500 unit tests. Before the fix, the tests ran in 21 seconds. After the fix the tests ran in 19 seconds. That’s about a 5% speed increase. Multiple 2 seconds over the large number of times that the tests will be run, and that’s a lot of time.

Looking forward

I added the final project to GitHub at https://github.com/obuseme/CodeCoverage. I hope that you find use in this approach. Just remember, you want 100% confidence in your code metrics. For me, if I notice something wrong with one of my code metrics, I stop using it until I get to the bottom of the false data.

Tomorrow, I want to show you how you can gather separate code coverage metrics for your different types of tests. Hint, it involves some crafty Scheme creation.

Happy cleaning.
Swift Code Coverage: How to measure it

Yesterday, I talked about the merits of how code coverage can be used as a metric in your software development process. Measuring Swift code coverage in Xcode has never been easier. Apple provides a great overview in their WWDC 2015 session, “Continuous Integration and Code Coverage in Xcode”. Xcode 7 provides a integrated experience for tracking the coverage of your tests. You can literally start measuring the code coverage of your tests by clicking a single checkbox. And good news, the coverage also works for your KIF tests.
How To Turn On Code Coverage Measurement

Open your scheme editor by selecting Product -> Scheme -> Edit Scheme, or the keyboard shortcut Command-Shift-Comma.

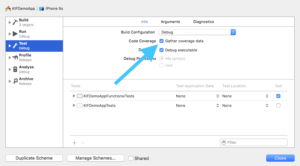
Select Test in the left hand pane, and then check the box for Gather code coverage.

swift code coverage

That’s it! On your next test run, Xcode will measure the Swift code coverage of your tests.

Viewing Swift Code Coverage Results

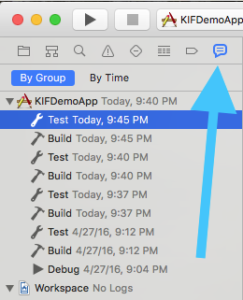
Viewing the results of how your tests fare with code coverage is just as easy. Run your tests, and then open the Report Navigator. You can open this by either selecting the thing that looks like a chat bubble in the left hand pane of Xcode, or select the menu Product->Scheme->Edit Scheme…, or use the keyboard shortcut Command-8. Then select your most recent Test run in the list.

swift code coverage

From there, in the center pane of Xcode, look for the Coverage tab.

swift code coverage

On the Coverage tab, you’ll see a list of your classes, and their methods, with bar charts indicating how much of their code is covered from your tests.

You can then even jump right to the corresponding code from the coverage viewer. Just double click either the class or method name. And what’s even cooler, is that Xcode will show you the number of times the line of code was executed in the right hand gutter of the editor.

Overlapping Test Types

Keep in mind, that depending on how your test targets are configured in the scheme, that the results you are looking at may be an aggregate of more than one type of test. For example, if you’ve created both unit and UI tests, and they each live in their own targets, but both targets are included in the Test action for the scheme, that the coverage numbers will be an aggregate of both types of tests. I’ll write a post later this week with a proposal on how you can separate these metrics (hint: it involves creating separate schemes for each type of tests).

Wrap Up

Measuring your Swift code coverage really is that easy. Normally code coverage is also tracked in actual numbers, and reviewed for trends over time. With Xcode alone, it doesn’t provide this. Xcode Server helps remediate the problem while providing specific measurement numbers and also allowing you to compare coverage numbers across different devices. Have fun with code coverage. When working in a team, it’s fun to watch code coverage change over time, hopefully for the better. I suggest that even as you code review your peers’ work, peak at how the code coverage for a given piece of code changes with their change. Does it go up? Does it go down? Remember, code coverage is just a metric that indicates whether a line of code was executed or not. It doesn’t speak at all to the quality of the test. Please be a professional, and professionals don’t write code without using test driven development.

Happy cleaning.